Recently I made a post with the unpacking of the order from the Japanese region in which there were questions about how much, but there was one question that I wanted to sew a bag, but I don’t know what is needed for this. So I decided to write in more detail about the tool, especially since I have to wait half a day in the traffic police queue.
And so we begin. For storage u mknya ordinary plastic case with a shelf of leruashki.
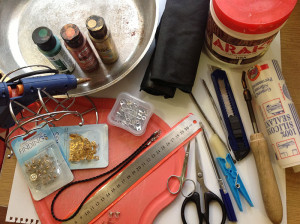
And here is its contents
Let's start in order, from left to right from top to bottom:
1. Slicker. It serves to polish the cut. I have a mini drill head. Manual use only if too wide grip is needed.
2. Line punches. The first: oblique flat. In principle, nothing, but ten-mowing mows. Chinese, cheap but rather not bad. The downside is that when two parts are glued together, the holes cross over to a cross, the pros are that if you miscalculate with the number of holes, it is easy to disguise the discrepancy. The second is a diamond. I can’t say anything about them - I haven’t worked with them yet, only they came. Third: round. Required with replaceable teeth (there are not interchangeable, pressed). Very comfortable piercers, when gluing parts together is exactly the same, it is a pleasure to sew, the needle runs like clockwork. Cons - if the miscalculation of the holes it is more difficult to disguise.
3. Planer. He and in Africa planer, thin skin. In general, a convenient thing.
4. Shorny knife. When cutting blanks from a piece of leather, corners are badly cut. There is no need to dear them, because the corner of the blank will be dragged out, it’s not very convenient to cut with clerical, but to cut this very thing.
5. Office knife and blades to it. I bought it in Lerua, the knife is comfortable in the hand, the blades are penny. Instead of constantly sharpening the knives on the skin - broke the section and forward. It really simplifies the cut.
6. Clay moment Crystal. I tried different moments, this very thing. Fragile and not spreading and transparent.
7. Tortsbila or edging. 0.8 and 1 mm. Need for chamfering from the edge of the skin to prepare the cut for polishing.
8. Silver rod. Marking, easily erased from the skin.
9. Scissors. Flat, comfortable, can be manicure, if the wife does not give a kick-in.
10. Multitul. Includes three nozzles tortsbila, groove cutter and seam. I use as a ditch. I like when the thread is slightly recessed into the seam.
11. Punch with interchangeable heads. I use for punching holes for grommets.
12. Needles. They differ from ordinary ones in that they are dulled, therefore they do not pierce the thread.
13. Semicircular cutoffs and oval piercer. Nafig not needed in principle, took to manufacture the belt.
14. Two breakthroughs. I use for holes for buttons.
15. Parallel markers, marking the line under the seam.
Greetings to all, dear needlewomen! Have you ever seen the original, beautiful, sometimes surprising in its design -? This and various costume jewelry and original elements of clothing. Also, do you know about the existence of a decorative leather trim? But this is a whole art, needlewomen who know how to work with leather, were real masters of the arts and have always been very appreciated by the people. My skin, as a material, has always been very attractive, of course, I decided to master this kind of needlework and I already have a certain experience in this matter. So, I want to tell you how and when I came to work with the skin. Suddenly you will be interested in this activity.
It all started with a pension. I did not think that retirement life gets a completely different side. Walking on the collection of certificates in the social security for the design of pensions, and most importantly - the category where I will now refer to - "pensioner", terrified me. What will I do at home ?! Well, home, housekeeping, husband, children, grandchildren, and what is for the soul? After the active work of the teacher, when you lay out with the preparations for the lessons, notes, notebooks, extracurricular work, preparation of clarity. Began gray monotonous everyday life, depression, the thought that no one needs. No need to get up early and run to work, dress up, get ready for lessons. The daily bog begins to suck in such a way that it is hard to get out of it.
On one of these days, my sister came and showed me her new job - leather jewelry. She retired before me and immediately stormy began to do needlework:, handicrafts, leather jewelry. Her husband, jokingly, calls him the “Sanitary of Nature”, because she does not pass by some twisted branch or a crushed hairy bump, everything will be set in motion.

Although I have been sewing for a long time myself, and - also my hobbies, but I never made jewelery making, and even made of leather, I thought that this was beyond my power. Her work amazed and surprised me so much that I, too, caught fire with this idea. , a few are no worse, each with different curlicues and decorated with rhinestones, assembled from them for a necklace - long stood before his eyes. Light on weight, elegant, painted in ivory, it looked elegant, solid and expensive.
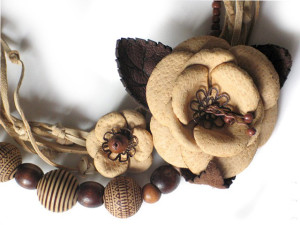
As I sew, it was clear to me how the flowers are collected, but how to make the edges of the petals round out and look like plastic? After all, just do not do it with scissors. It was then that my sister gave a secret: I cut out flowers, “fry” them in a griddle, I paint them, I collect them. I was shocked by the simplicity of the work. Then I did not yet know the properties of the skin during heat treatment. Then, of course, I read and studied a lot about the skin and how to work with it. Fortunately, there are books, much can be found on the Internet. I could not try this, there is always leather in the house: old bags, belts, jackets, jackets, skirts, pants. Moreover, it was planned a long time ago - it’s time to say goodbye to some things. All you need is to leave all that is leather, and the rest is in a suitcase and ...

At that time there were no tools at home (except for scissors), no paints, no glue. But the desire to try to do something like leather flowers, was the strongest of all. When the first batch of “fried flowers” came out, I experienced such pleasure and joy - it HAPPENED!
A little about the skin.
The oldest noble material mastered by mankind is the skin of livestock, pigs, sheep, horses, goats. For a long time, the skin serves man faithfully and truly: clothes, shoes, jewelry, paintings, crafts. At all times there were not so many skin masters and skin care methods they were kept secret, passing them only by kinship. Therefore, as I have already said, the skin masters were always in value and treated them with great respect. The richness of the expressive properties of the skin is amazing. It goes well with delicate chiffon and capron, with a thick drape and metal, various stones and fur, feathers and beads, creating all sorts of decorative effects of conformity and contrasts. In work, it is malleable, flexible and pleasant. Not complicated homemade leather jewelry any woman can do, for this it is not necessary to be an experienced master. All you need is desire and creative mood.

Essential tools.
I must say that the tools for working with leather are expensive (from $ 30 to $ 700) and they can not always be found on sale. But to get started, you can purchase by visiting craft shop.
The most running - punch hole punch.
Sharp tailors, small manicure, curly scissors.
Construction or office knife, replaceable blades, shoe knife (only it should be sharpened often).
Metal wide ruler.
Tweezers (to keep parts during heat treatment).
Flat surface for cutting strips, cords. There will be kitchen plastic boards, boards for sculpting.
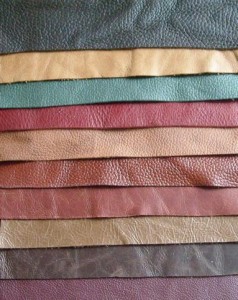
Color tools (photo 2).
Hot glue gun, PVA glue, Moment glue.
Old-fashioned griddle or candle.
Acrylic paints.

I have listed only the minimum necessary tools for working with leather. Almost all of them are in every home. For starters, this is enough. Of course, if you are engaged in embossing, engraving on the skin, then there are no different piercers, stamps, no vice to do here.
How to prepare the skin for work.
Washing the skin.
Spread old, used leather clothing, clean seams from threads, remove gaskets, and lightning locks. Wash contaminated areas with a washcloth or brush. Soak the skin for 15-20 minutes in warm water with soap suds, add 50 grams of salt per liter of water, some table vinegar (for elasticity). Zamsh can be washed in warm water by adding ammonia or in warm milk with the addition of baking soda.
Skin drying.
You can dry your skin between old newspapers or rags under pressure so that they can take on moisture. When newspapers or cloths get them wet, they can be replaced with flat plates so that the skin dries out and is smooth and even. While the skin is slightly moist, lubricate it with castor oil, adding a little liquid ammonia. I even i lubricate the skin with simple vegetable oil. Or make a mixture of warm water with butter, add ammonia. Lubricate with a brush or soft cloth. Make sure the skin is not oily. Take the skin in your hands, remember it, it is elastic and ready to work.
As you can see, this is not so difficult. Dare, dear needlewomen! Start with the simplest. The skin is so tightening that you will not notice how you move from a simple product to a complex one, start looking new ideas. And this hobby can grow into a business. In any case, there will be no problems with gifts to relatives and friends. Paintings, jewelery, leather crafts are always expensive, beautiful and for a long time. Successes all of you in creativity!
Almost ten years since I started making leather goods. At that time, there were no lessons and master classes on the technique of working with leather. And now there are also very, very few of them. I didn’t have any acquaintances who were knowledgeable in this field, so I had to learn from my mistakes, from articles on the Internet, and quite rarely published specialized literature.
1. Where to get skin?
You can buy leather in specialized leather stores. Most of these stores can be found in the directory in "DoubleGIS" under the heading "Fur / Leather - Raw Materials." In various atelier, you can often find trimming the skin.
2. How much is the skin?
In general, leather is sold with whole skins. The cost of the skin is usually shown per square decimeter. Pork, calf and goat skin, depending on the thickness, quality and characteristics of processing, can cost from 5 to 40 rubles. per square decimeter. At the beginning of the article, the photo shows calf leather with the romantic name "Venice", its cost in leather stores is 25 rubles. per square decimeter.
The skin of various exotic animals: such as snakes, python, monitor lizards, and so on .. can cost from 100 rubles. per square decimeter
The smallest skins have an area of about 40 square decimeters.
In the studio various trimming can be purchased at a cost of 100-200 rubles. per kilogram.
One kg of scraps by area is about 50-60 square decimeters.
3. Where to buy tools for working with leather?
You can buy many devices for working with leather in ordinary building stores. Some tools have to make their own hands. Special tools for embossing and not only can be purchased at online stores.
4. How to cut the skin?
Knives
For working with leather it is convenient to use knives with replaceable blades, which can be broken off as they wear out. Excellent knives and replaceable blades are made by Olfa. You can buy such knives and blades in the shops of building tools, materials, shops for repair, as well as in specialized online stores
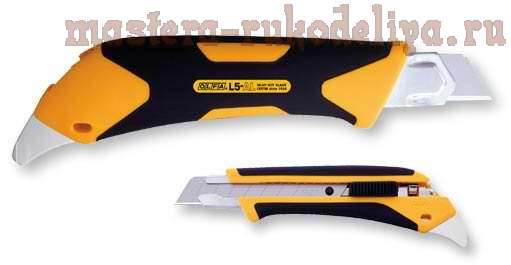
If you cannot find special construction knives, then you can use ordinary cheap stationery knives, which you can buy at any office supply store. The only inconvenience of such knives - you have to break off the blade more often.
You can also use a shoe knife (in books about working with leather, people write about it very often), but it has such a disadvantage as the need for frequent sharpening.
You will also need a wide and long metal ruler. A wide ruler should be in order to protect the fingers from a sharp cutter, namely a metal one, because the wooden ruler will become unusable very quickly. A metal square is also required.
When working with leather, I use the CK-2 Olfa Household knife, the RTY-2 / DX Olfa knife, and the AK-1 / 5B Olfa art knife. Also, I am going to soon buy a couple more knives, for example circular.
Scissors
For working with leather, it is best to use self-sharpening tailor's scissors. Ordinary inexpensive scissors will either become very dull or chew the skin very quickly. Very good scissors company "Scheren konig", they are sold in each more or less decent sewing shop.

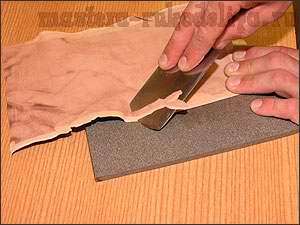
5. On which surface to cut the skin?
The surface for cutting the skin must not be slippery, otherwise the skin without additional adhesion to the surface will move when cutting, and the knife slide. Also, the surface should not be loose, otherwise the knife will go very deep into it and get stuck. The surface for cutting the skin should not be fibrous, as the knife will deviate from the desired line and go along the fiber.
Plastic, for example, kitchen boards or boards for modeling clay of A4 or A2 size, plexiglas, linoleum, the smooth side of hardboard, is well suited. Personally, I use sculpting boards.
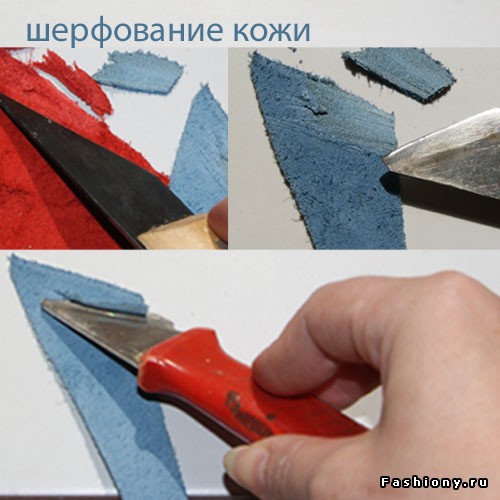
6. How to thin the skin?
Thinning of the skin is called scribing. If you want to make the edge of the skin less thick, then this is done with the same knife that cuts the skin.
If the area is large, then the so-called French knife is used:
Sherfovka - quite a long and complicated procedure, so it is easier to immediately buy the skin of the desired thickness.
7. How to cut laces?
For cutting leather cord there are several special tools.
On the Internet, specialized tools for cutting the cord, as well as many others for working with leather, can be purchased at www.zadi.ru
If you still cannot buy such tools, then the laces can be cut from a long piece of leather with the same knife on a steel ruler or, if a piece of leather is small, then in a spiral.
For cutting laces I use a knife and a ruler.
8. What other tools are needed?
Punch (punch).
The simplest punchers are metal tubes of different diameters.
Firm "Stayer" and "Legioner" produce high-quality and inexpensive punch in the form of tongs. Usually they can be found in the shops of various tools. On the Internet you can buy them for example here: skladinstrumentov.ru

Often these piercers are sold in sewing stores or creative stores, but there they usually cost more.
I use in work, and punches-tubes and punchers-tongs. They complement each other quite well: with tongs it is good to make holes along the edge, under the sheath, it is convenient to use piercers in the center of things where the tongs do not reach.
Vice
Required for fixing the product in a certain position during operation:

Clamp
Sometimes it happens that you need a few clamps. For example, in order to securely clamp two parts. big size at the time of gluing. 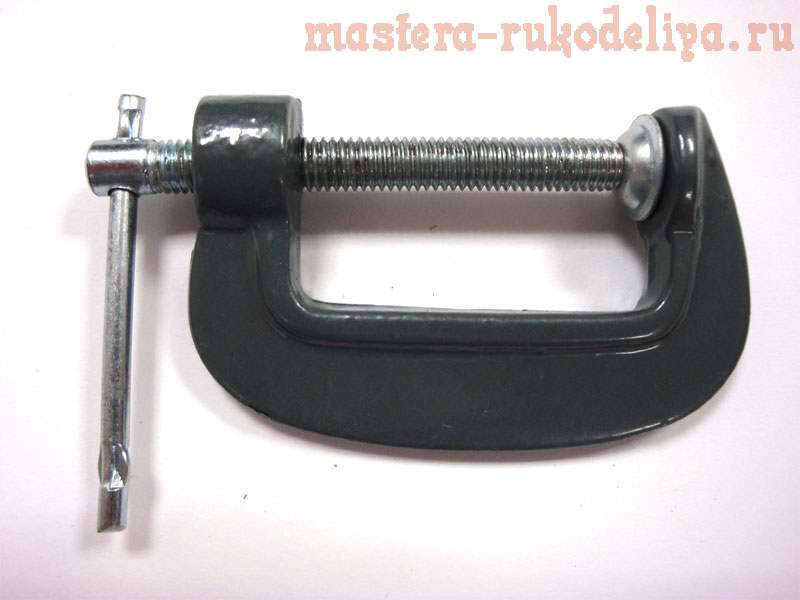
Leather is a very interesting material.. Due to its organic origin, it has properties that perfectly distinguish it from traditional fabric for making clothes. I. Despite the fact that the leather parts are sewn and stitched using needles and sewing machines, it is impossible to approach this material as well as woven cloths!
So, what with skin can not be done:
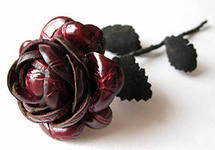
1. You can not iron thin clothing skin, especially with steam! (only ironing is allowed with a slightly heated iron) the collagen fibers of which it consists are organic and when exposed to high temperatures fold! As a result, the skin becomes rough, brittle and deformed. But the same property of the skin, rolled up from high temperatures, is widely used in decorative work with the skin. So, heating the flame of the future flower over the flame, it is bent inwards and the petal acquires a beautiful convex shape. In addition, blanks for future brooches are fried in a skillet and even boiled in boiling water. This technique is called "boiling"
2. Skin can not be washed off! No, of course, if you really want to, then who can forbid you. But the traces left by the needle on the skin will remain on it forever. In fact, when sewing on a sewing machine, you need to feel almost like a sapper, who makes mistakes only once. To fix the curved line by simply unzipping it will not succeed, the line will have an untidy look.
3. It is believed that the skin can not be washed. In this case, fats are washed out and the skin coarsens. But it depends on the skin itself, and on the cleaning solution. Some types of skin are quite loyal to mild washing in warm water using laundry soap. Then, it is necessary to lubricate the skin with a solution of glycerin.
Here, in fact, all the restrictions.
Everything else can be done with the skin. This is such a fertile material! Due to the porous structure in leather clothes, it is not hot even in summer! A plasticity and decorative of this material leaves a huge scope for imagination.
And actually the main question arises: "Where can I get the skin?"
In fact, this is not a problem, as there are whole skins on sale, and so the culled residues. The main thing is to find places where it is sold.)
In addition, leather is a very wearable material and perfectly restorable. Therefore, you can safely use old jackets, coats, tops of boots, gloves. I will not write here about the restoration of the skin. On the Internet there is material on this topic.
Let us dwell on the types of skin.
Leather can be vegetable and chrome tanning. But more often it is chrome. In addition to tanning methods, there is clothing, haberdashery, lining, furniture and shoe leather. Also by the name of cattle distinguish bastin, sheepskin, goat, pork, calfskin, well, and other exotic animals.
According to the method of processing - suede, split, nubuck, perforated, embossed, and others. Also, according to the method of processing, they release the skin with a coating (colored with nitro paint, relief created by a press) and without coating - colored, but not additionally processed leather.
The skin has two sides: the face, the actual treated leather itself, and the bakhtarma, the back of the fleecy.
A split is the type of skin that forms when a layer of skin is sawn, divided into two parts. The upper leather part goes on a thin clothing skin, and what they sawed off is bahtarma on both sides. Looks like suede. It is less durable than regular skin and is hygroscopic (permits moisture). This is the cheapest kind of skin. Used in the haberdashery industry for the manufacture of bags and as a lining in footwear products.
Suede is leather with a further processed bahtarmen part, due to which it has a beautiful fleecy texture. Unlike a split leather, the back part of a suede is leather.
Nubuck is so finished face (leather) that it becomes a bit like suede, the surface becomes as if rough. Nubuck, though beautiful, but very capricious in processing. The slightest drop of glue or solvent leaves an irreversible mark on its surface.
There is also such a type of skin as chaprak is the most durable and thick skin. It goes on the manufacture of military belts, saddles, harness. On such skin because of its thickness it is good to use such kind of decorative processing as embossing.
This is not all types of skin, but these are the ones I have come across
When selling leather is measured in square decimeters. That is, the cost is written for a square measuring 10 by 10 cm.
But actually my "combat arsenal" Those tools that I use in my work.
1 Drawing tools.) The fact is that marking on the skin often becomes a real problem. Remnants and crayon does not always save, as they are powerless on patent leather. Markers and pens are suitable only from the inside, as they leave indelible marks. And if I need to make a markup on the face on the glossy skin, an ordinary awl comes to the rescue, and for straight lines there is a scroll wheel.
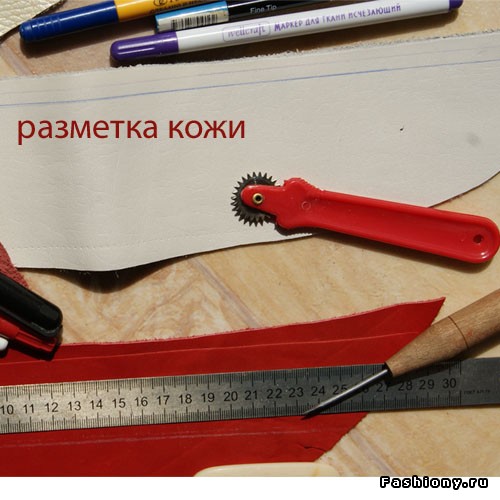
Such achievements of clerical thought are suitable for fair skin, like a felt-tip pen “write-erase”, one side of which draws a line, the other has a sponge soaked in a substance, this line is washing. You can also use vanishing markers for the fabric. Well, for the lines on the inside, I use a simple pencil, a ballpoint pen, a rollerball pen, markers of different colors (it all depends on the friability of the bakhtarma, the looser it is, the harder it is to draw a clear line and save only markers)
2 Cutting and cutting tools:

When working with leather, such a knife with a beveled blade is indispensable. It is used for grinding (cutting off excess thickness). The shoe knife is used for the same purpose, it has a one-sided sharpening, so that the lower part of the skin is not cut through when grinding.
Office knives are used for cutting in a straight line, for example, for cutting leather strips. The disk knife is used with the same purpose. If you master the work with him, you can more smoothly cut the skin
Scalpels - standard and small (ophthalmic) - are used for incisions, incisions, thinner grindings, and also for cutting patterns on the skin.
Tailor's scissors are used for figure cutting. For example, blanks for flowers. Manicure scissors are intended for figure cutting of small parts.
Awl for marking, puncture holes in the skin
Sewing tools
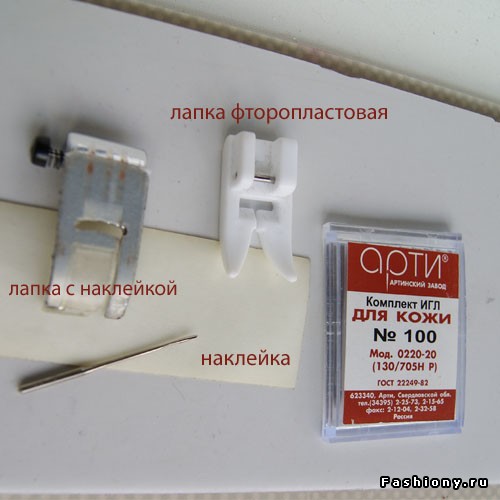
A skin needle is different from a garment in that it has not a blunt, but a pointed tip, similar to a miniature blade. Due to this, such a needle does not move apart, but cuts through the fibers of the skin and the skin is sewn much easier. And this rectangle, the same sticker on the foot, which ensures that the foot slides along the skin when sewing, is an alternative to the fluoroplastic foot. And I personally like it more. And this is my usual foot with such a sticker on the wrong side.
Tools optional.

Cutting board. It is a wooden board with a piece of linoleum glued on it. Cut the skin better on linoleum. Better yet, purchase a special cutting mat. All my hands do not reach - or rather, my legs do not reach ... to the store)).) A piece of tile is used for shafting. For this operation, a perfectly smooth, smooth and rigid surface is simply necessary. Tools for sharpening knives. The knife must always be sharp and in the process it must often be eroded.
By the way, scarfing is one of the basic operations and it is necessary to master it. The fact is that the leather material is quite thick and these transitions in thickness, in the case of overlapping of one part to another, are just hidden, if we thin the combined edges, the product looks much neater and often transitions are almost imperceptible. In addition, when sewing bags from thick leather, it is simply necessary to otscherfat all stitched allowances, otherwise the seams will not take the necessary form. Well, in the case when you need to bend the edge of the skin, it will be easy to do if the edge becomes thinner than the main part. To grind, place a piece of skin on a smooth surface and a special knife, at an angle of 45 degrees approximately, in the direction away from you begin to cut off the bakhtarma, holding the piece of skin with your other hand. If the knife is sharp, then this operation will not cause any special difficulties.
Tools for the installation of accessories. Crimper for mounting eyelets. Designed for the size of the grommet 4 mm. Alas, for the time being for installation I am only dreaming.
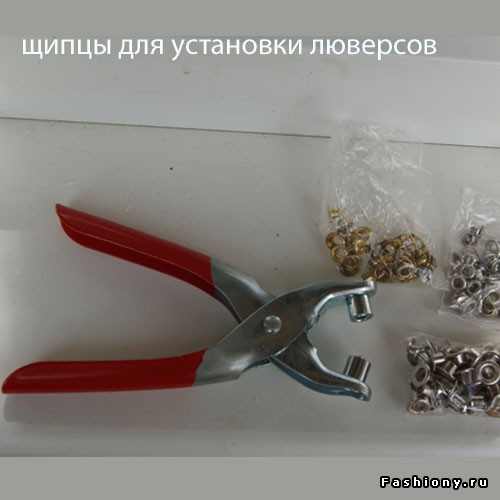
Manual punches. 2 homemade, and one 8mm bought in the "Gamme". Punch pliers are used to punch holes in fabric and skin. Sizes vary up to 6 mm.

That's actually the very accessories Holniteny, eyelets.

Holniteny installed to secure parts. In the pockets of jeans for fastening the seam, on the handles of bags. Often they have a purely decorative “decorating” function. There are two-sided (decorative hat on both sides) and one-sided (the second side of the leg does not have a cap). Eyelets consist of two parts: the grommet itself and the fixing ringlet, which is placed on the inside and additionally supports the grommet from falling out ) To install one-sided holnitenov, you can do without a special press, just a hammer and a teaspoon. We put a teaspoon down under the hat of the holniten, so as not to deform it upon impact, but with a hammer we strike the flat part.
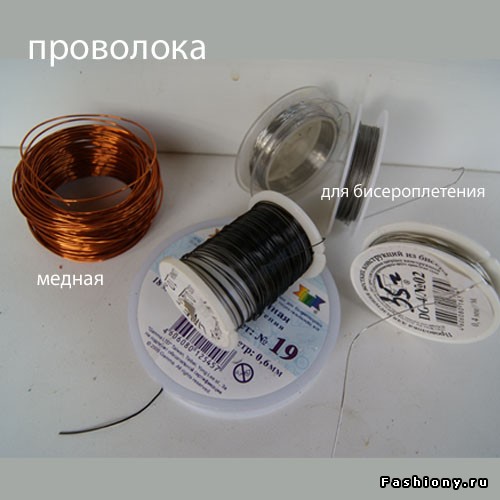
In addition, soft plastic wire may be necessary for working with the skin. I use copper wire and various beadwork wires.
And these tools are slingshot-grasping. And simply put nippers (for cutting the wire), round pliers (for twisting it in the rings) and pliers for all other supporting, pulling and compressing operations.

And this is a burning device. In fact, the usual soldering iron, but has several nozzles, allowing you to make different in thickness lines, and a couple of ready-made dies. I don’t use this demonic car very often, but it will not replace it in the processing of edges and holes on dark skin.
The skin can be painted with acrylic paints, but not with a thick layer, so as to avoid further cracking, and cover it with acrylic or varnish matte or glossy. But it is best to paint the skin with car paint from balonchik, which are sold in hardware stores. This color is obtained firstly even, secondly more durable than acrylics, and thirdly, elasticity is preserved. One minus compared to acrylic, it is a terrible smell of such paint, and therefore work with it only in a ventilated room. Well, it is better to paint the product according to the result of the work, because many paints will not tolerate heat treatment, which is very often used in leather decor.
http://fashiony.ru/
Since I have been friends with skin for about twenty years, the experience has been considerable. Something I can tell novice tanners.
I will not paint here what kind of skin is and what is going on. This information is more than enough on the Internet. I will tell only about what, as a rule, do not write.
1. It is believed that ironing is a problem.
Thin skin is perfectly ironed. To do this, purchase baking paper at any hardware store. It is white, similar to parchment and brown. Any is suitable.
How to smooth the seams:
First, lay the product on a hard surface, turning it inside out. Lightly beat off all seams with a hammer (they say, it is better wooden, but I beat off the usual metal). This procedure will tighten the seams well and make the seam thinner and more elegant (you may not need ironing after this).
If it is necessary to iron the seams, then we iron the inside out through the paper; we set the heat on the wool. Then from the face (also through the paper), the heat is slightly reduced.
Sometimes the skin from a long lying becomes crumpled, shapeless and unsightly. You can wet or stroke it. But it's easier to wet and stretch.
2. Washing the skin.
Here in the community read that the skin does not erase. Wrong, wash. If a large piece of skin is large, pour a little warm water into the bath, add a bit of fairies or other washing liquid, put the skin face up and gently sponge all or contaminated areas. Then rinse in warm water. Preferably, this whole process does not delay, try to do everything quickly.
It is not necessary to squeeze the skin, hang it on the edge of the bath, move it with your palm on the front side, driving away excess water. Then find a flat smooth surface (plastic table, linoleum, and so on). Place your wet skin (face up) on this surface and begin to straighten it with your palms, smoothing from the middle to the edges, until all the skin sticks. So leave to dry. No buttons and nails are needed. After drying, the skin will become smooth and slightly firm. The view will be almost like new. Then you can wipe it with special creams or silicone impregnation (not all, you need to try on a piece).
3. How to cut (if you want to do tailoring).
I cut it on the floor. And always with a full set of patterns, that is, the right and left shelf, two sleeves, back and all the small details completely. If the skirt, then both parts (front and back). You can draw on the skin with crayons or a silver ballpoint pen.
4. If you need a little stretch of skin.
Moisten it on a smooth surface, as I wrote above. Smooth it with palms with force from the center, giving the desired shape. If you need to stretch strongly, shift it to a wooden surface and fasten along the edges with buttons.
Another such nuance. I have a photo roller left for photo glossing. Here they are very cool to roll out wet skin. She then greatly increases in size.
5. How to make a beautiful and smooth stitching.
To do this, use a Teflon foot, it greatly simplifies this process. But there is another trick: cut a strip 2-3 cm wide from a rustling transparent film (not the one from which plastic bags are made). It may even be a wrapper for floral bouquets. Need to try on the sample. Put this strip on top of the product and scribble directly on it. Then just tear it off on both sides of the stitch. The result will please you.
6. What needles to sew.
I sewed the most simple number 90. Although you can pervert if desired.
7. How to combine parts cut.
Leather parts do not sweep. The simplest thing is to connect them with a ribbon transfer. Need to line, stepping back from the tape by 2-3 mm, as the glue sticks to the needle. After stitching the tape is removed.
This tape is also required when sewing zipper.
You can connect the parts with paper clips.
8. Not everyone probably knows that with a good, usually Italian, sheepskin, you can tear off the upper layer, which comes to shrink in jewelry.
How to do it. From the front side of the corner with a sharp knife, slightly, diagonally, make an incision. Pick it up with your hands and begin to tear off carefully, without hurrying, this very thin layer.
Not every skin gives in to such mockery, it is necessary to try different.
Shared - Irina "Cheprachok."