Mastering various techniques and methods of action with paper helps to develop the ability to consciously work with the hands, develop fine motor skills of hands and develop the eye. The origami process forces you to focus on making a model that promotes concentration, to get the desired result. The need to remember the techniques and ways of folding, the sequence of making a model, helps to stimulate and develop the memory of a preschooler. The design process activates the child's mental activity. As well as in the process of mastering the technology of origami, vocabulary is expanded and enriched, speech and communication skills of a preschooler are improved.
Origami is an affordable technology for preparing a child for school, in addition to preparing a hand for writing, the spatial transformation of a flat sheet will make it easy for children to play complex mathematical concepts in the future, to solve problems in geometry.
Origami is a unique occupation for everyone, this art of paper plastics, which originated in Japan, will not leave anyone indifferent.
Using technology origami in my group I set myself the following tasks:
- Introduce the art of origami.
- Familiarity with the properties and possibilities of changing the shape of paper.
- Develop spatial orientation on the plane of the sheet.
- To form the skills of preschool children to act according to verbal instructions, to work on a pattern using schemes.
- Develop fine motor skills of hands.
- Develop constructive and creative abilities.
- Develop speech and communication skills of preschoolers.
- To cultivate diligence and perseverance, the ability to bring the job started to the end.
- Involve parents in joint creative work with children.
A bit of history about origami. Despite the fact that the paper itself appeared in China, it was in Japan that the figurines of amazing beauty were guessed from it, and it was many centuries ago. “Ori” means “folded”, and “kami” means “paper” and “god” at the same time. At the dawn, origami was used in temple rites. For example, pieces of fish and vegetables, intended as a gift to the gods, were put in paper boxes of sanbo. After some time, the ability to fold paper figures became an indispensable part of the culture of the Japanese aristocracy. This skill has been handed down from generation to generation. Some noble families even used origami as a coat of arms and seal. About 100 years ago, worker Akiro Yoshidzawa decided to devote himself to origami and contributed to its development. The main merit of Yoshizzawa is that he managed to create what today is called the "origamnaya alphabet." Symbols, symbols, graphic signs, invented by Akiro, allowed to fix on paper the process of folding origami shape. This remarkable discovery allowed origami to become a universal international language. And today, all books devoted to the art of origami use the origami alphabet of Akiro Yoshidzawa. These signs will help to read origami patterns.
After telling children about the history of origami, the next stage of my work was to identify and consolidate children's knowledge about the properties of paper. Together with the children, they conducted a study on which paper folds easily and does not break, keeps its shape. Then, to work with children, she mastered the technique of adding the model and already showed how the figure was formed “from hand to hand” in small groups.
Before class, you must prepare the paper of the desired color, it must be thin and bend well. A visual sample of the model is required. From the beginning, make a riddle about what you will do if it is a living creature, highlight its characteristics, it will help the development of speech and enrich the vocabulary of children. It is advisable to start working with a large square sheet 16 * 16 or 20 * 20. Perform actions slowly, gradually explaining the landmarks on the sheet: upper and lower edges, angle, side, fold line, etc. When the show does not need to make extra turns and leaf turns. Explain to the children that the fold lines should be well ironed, and the combination of corners and sides should be accurate. Refer to safety precautions before using scissors. Occupation should not last more than 15 -20 minutes, when fatigue appears in children, perform finger gymnastics. Do not forget to praise the child or encourage in case of failure. After making an origami model, you can create a story composition, complementing the elements of the application.
To form the ability of preschoolers to fold origami is necessary with simple basic shapes. The basic origami forms are the basis on which it is possible to create different origami models. Simple basic shapes with minimal wrinkling will help children create the first models. Simple basic shapes are based on the ability to fold a square in half (vertically or diagonally), trimming the sides to opposite corners. In the process of folding simple shapes, children become familiar with such geometric concepts as square, triangle, angle, side, vertical, horizontal, diagonal. Simple basic forms will help preschoolers to master special terms, easy to navigate on a sheet of paper and in space. The most simple basic forms available at the initial stage: “Triangle”, “Kite”, “Book”, “Door”, later you can enter such simple forms as “Pancake”, “House”.
Next, we introduce children to the operational map, which shows the sequence of actions to create a model and helps the child to independently perform one or another favorite origami shape. After mastering the operational map, we acquaint children with the generally accepted origami creation schemes.
The crafts created by children can be used in gaming activities, in the design and decoration for the holiday group premises. During the year, together with the children, we created gifts for friends and relatives in the technique of origami: September 1, the Day of Older Persons, Mother's Day, New Year, February 23, March 8, Easter, etc. In the technique of origami they created theaters based on the fairy tales “Teremok”, “The Tale of the Foolish Mouse” by S.Ya. Marshak and the educational models “Zoo”, “Animals of the Southern Countries”, “Animals of the North”.
During the work on the origami technique, I used such methods as:
- visual (viewing samples, illustrations on the subject, conducting observation)
- verbal (conversations, use of an artistic word, reading fiction, discussion of the progress of work)
- practical (joint and individual work with children, the use of didactic games).
In parallel with the work with children in the technique of origami, work was carried out with parents to achieve better results. Parents are active participants in the educational process and for them consultations were developed: “The Art of Origami”, “The Importance of Origami in the Development of a Preschooler”, “How to Take a Child at Home”, a master class “Magic World - Origami” was made, a brochure “International conventional symbols adopted in origami, the purpose of which was to acquaint parents with the origami technique, to tell about the significance of this technique in preparing children for school. Parents of my pupils are already familiar with origami techniques and often use origami techniques in joint activities with children.
As a result of using origami technology, children have learned various methods of working with paper: bending, repeatedly folding, notching, and pasting. Preschoolers independently began to apply knowledge and skills in independent activities. The increased level of concentration of attention, children began to easily remember the techniques and ways of folding models. The orientation of preschoolers on the plane and in the surrounding improved. The children learned not only to follow the oral instructions, but also to independently understand the diagrams of the models. Graphic skills have become more confident and of high quality, as a result of the development of fine hand motor skills.
Observing the positive impact of origami on the development of children, I believe that it is necessary to continue working in the integrated application of origami technology.
Bibliography:
- T.I. Tabarina "Origami and child development. A popular guide for parents and teachers. ”Yaroslavl:“ Academy of Development ”, 1997.
- .Z.A.Bogateeva "Wonderful crafts from paper" Moscow, Enlightenment, 1992
- Internet resource http://fusionpiter.ru/articles/origami
Circle work
"Origami Country"
for 2014-2015 academic year
MBDOU Kindergarten Glowworm"
Teacher: Skurikhina S.A.
The relevance of the circle "Origami Country".
Work in the style of origami is of great importance in the development of the creative imagination of the child, his imagination, artistic taste, accuracy, the ability to carefully and economically use the material, outline the sequence of operations, actively strive for a positive result.The circle "Origami Country" is designed to help children aesthetically comprehend images of familiar objects, transfer them to graphic activities, emphasizing the beauty and colorful appearance, through various actions with paper, in the course of its processing, through the use of different methods and techniques for working with it. appearance in a transformed form.
Origami classes allow children to satisfy their cognitive interests, expand awareness in this educational area, enrich their communication skills and acquire the ability to work together in the learning process. this mug. And also contribute to the development of fine motor skills of hands, which has an important impact on the development of children's speech.
Children are enthusiastically making paper crafts that are then used in games, dramatization, group decoration, a kindergarten section, or as a holiday gift to their parents and friends.A child is happy that a toy made with his own hands acts: a pinwheel is spinning in the wind, a boat is floating on the water, an airplane takes off, etc.
The purpose and objectives of the circle.
The purpose of the mug: comprehensive intellectual and aesthetic development of children in the process of mastering the basic techniques of origami, as an artistic way of designing from paper.
Tasks circle:
Educational
· Introduce children to basic geometric concepts and basic origami shapes.
· Forming the ability to follow oral instructions.
· Teach various paper handling techniques.
· Familiarize children with basic geometric concepts: circle, square, triangle, angle, side, vertex, etc. Enrich the child’s vocabulary with special terms.
Create compositions with products made in the technique of origami.
Developing:
· Develop attention, memory, logical and spatial imagination.
· Develop fine motor skills and eye.
· To develop the artistic taste, creativity and imagination of children.
· Develop the ability of children to work with their hands, to accustom them to precise movements of their fingers, to improve their fine motor skills, to develop an eye.
· Develop spatial imagination.
Educational:
· Foster an interest in the art of origami.
· Expand children's communication skills.
· Build a work culture and improve work skills.
· To contribute to the creation of game situations, to expand children's communication skills.
· Improve labor skills, form a work culture, teach accuracy, the ability to carefully and economically use the material, maintain a working place.
The training grid and the mode of operation of the Origami Country group in the preparatory group
Lesson grid: Wednesday.
Number of classes
Qty
children
in Group
in Week
per month
in year
Methods used in the classroom circle:
conversation, story, fairy tale;
viewing illustrations;
showing sample work sequence.
Form of employment - thematicteam work.
List of children attending the group
Ablaev Ruslan
Beleush Polina
Gerashchenko Sasha
Grigoriev Semen
Ermakov Artem
Kirichuk Slava
Kirichuk Katya
Kiryanova Polina
Honey cyril
Mosienko Vanya
Okrugin Semyon
Parfentsov Matvey
Plautina Natasha
Pushkareva Varya
Strizhov Daniel
Ustinov Egor
Shavel Alina
Jankovic Daniel
The work plan of the circle "Origami Country".
Theme
purpose
Material
september
Familiarizing children with the art of origami
Tell the children about the ancient Japanese art of paper folding - the art of origami. Show the children the work done. Allow children to touch, play with figures. Arouse interest in artistic design.
2-3
Basic terms and elements of folding
To acquaint children with the basic geometric concepts (angle, side, square, triangle, etc.), to enrich the dictionary with special terms. Show simple square folding techniques used in the works.
october
FLAG
To teach children to fold a square in half with a "kerchief", combining opposite corners. To raise interest in the results of their labor.
Two red squares 15 * 15 cm, two strips 1 cm wide, 20 cm long, made of cardboard, glue.
Glass Cup
To fix the ability to fold a square diagonally. To teach to bend the acute angles of the obtained triangle to opposite sides, to introduce it into the formed gap. Cultivate interest in the process of folding paper.
Square 10 * 10 of any color.
Book
Learn to bend a rectangle in half, combining the short sides
Three rectangles of A4 format: two of them are white, the third is colored, glue.
Christmas tree
To teach children to fold a square in half, combining opposite corners, to bend the resulting triangle. Learn to make a tree from triangles, starting from the bottom with the biggest detail. Educate accuracy in working with glue.
Three squares of green color 15 * 15cm, 10 * 10cm, 5 * 5cm, glue.
november
Kite
To raise children's interest in making handicrafts in the technique of origami, to consolidate the skills of decorative decoration of the finished figure, to exercise in the free choice of color.
Paper squares (10 * 10) of different colors, strips of multicolored paper, glue.
Frog
Introduce the simplest craftsmanship using origami technique by folding a square diagonally (the basic shape is a “triangle”)
Green square (10 * 10).
Blanks for the eyes of the frog, scissors, glue.
Bunny
Continue to teach children how to make crafts using origami techniques, foster self-reliance, accuracy
Square (10 * 10), blanks for eyes and faces, glue
Butterfly
To learn to bend the square diagonally, fold the triangle in half, bend the upper acute angles in different directions. To cultivate the ability to aesthetically decorate their crafts.
Paper squares (10 * 10), blanks for eyes, scissors, glue
december
Snowflakes
Teach children to connect parts in pairs, tucking the corner of one inside of another. Continue to learn carefully, work with glue. Improve the skills of small and precise movements of the fingers of both the right and left hand. Raise interest in origami classes.
12 squares of blue color 5 * 5, a blue circle with a diameter of 3 cm and a white circle with a diameter of 2 cm.
Gnome
Continue to teach children to make paper figures from two parts, to learn clearly, to follow the instructions of the teacher.
Squares (8 * 8, 6 * 6) of different colors, paper edge, glue, scissors.
Continue to learn to make paper squares simple crafts using the already known methods of folding paper, to develop constructive thinking, imagination and imagination.
Multicolored squares of different sizes, paper trimming, glue, thread, scissors.
Snowman
january
Gingerbread Man
To teach children from a rectangle to bend all angles evenly. Continue to learn how to decorate the craft with details (mouth, nose, eyes). Raise the joy of hand-made gifts.
Yellow rectangle 20 * 10cm, orange and red squares 3 * 3cm, two orange circles, glue.
Bunny
To fix the ability to bend the square "book" and twice "kerchief", lower the opposite corners to the center of the square, getting a "candy." Continue to teach children to carefully listen to the instructions of the educator. Raise autonomy and attention.
Squares gray 8 * 8cm and 10 * 10cm, blanks for eyes and faces, glue.
Wolf
Continue to learn to bend the square "kerchief", bend down one of the corners upward obliquely. Fix the ability to glue the head, draw the eyes. Develop the eye. Nurture perseverance.
Two gray squares 15 * 15cm, 10 * 10cm, glue, blanks for eyes and nose.
Fox
Teach children to listen to the teacher's oral instructions.
To introduce in practice with the basic geometric concepts. To cultivate accuracy in working with paper.
A square is orange (red) 15 * 15 cm, a rectangle 15 * 7.5 cm, blanks for eyes and faces, glue.
february
Bear
To learn to bend the "kerchief" in half. Learn to understand that the details of the head and torso are performed separately from squares of different sizes. To educate
and develop the ability to control with the help of the brain movements of the hands and fingers.
Squares of brown color 15 * 15cm, 10 * 10cm, two squares 6 * 6cm, glue.
Ship
To acquaint children with the manufacture of crafts using the technique of origami from a rectangular sheet of paper, exercise in the free choice of colors, develop fine motor skills of hands, use ready-made crafts in games
Rectangular sheets 20 * 15cm.
Asterisks
To fix the ability to fold the basic form of "kite". Learn to alternate colors, connect parts, putting the short side of the workpiece to the inflection line of the previous one. To cultivate perseverance, responsibility.
8 squares 10 * 10cm, 4 of them of the same color, 4 - another, glue.
Hen
Learn to fold the square twice with a "kerchief", continue to teach children to carefully listen to the instructions of the teacher, to foster independence and attention.
Red square 3 * 3cm, yellow (orange) square 15 * 15cm, glue, pencil or felt-tip pen.
march
Chrysanthemum, carnation, tulip
To acquaint children with a new way of making flowers using origami technique, to consolidate the ability to use scissors.
16-20 squares (4 * 4) of white or purple color, yellow paper, scissors, glue.
Gift mom
To acquaint you with the design of cards using figures made in the technique of origami, bring up accuracy, perseverance
Multi-colored cardboard, squares of yellow, blue, red paper (10 * 10), green paper for leaves and stems, scissors, glue.
Turntables
To teach children to make new crafts from a square, a circle, a triangle, to learn to use the designations of the cut line on the blank, to exercise in the free choice of color and shape of paper, to encourage self-reliance, creative initiative.
Squares (15 * 15) of different colors, equilateral triangles with a side of 20 cm, circles with a diameter of 20 cm with traced lines of cuts, circles from cardboard, scissors, glue, sticks.
Kitty
Secure with children the folding and the name of the base forms. Learn to make the torso and head separately from the squares. To learn to fold a triangle in half with a “kerchief”, to lift corners from the middle of the long side, but without bringing it to the top of the upper corner. To cultivate accuracy in work, attention.
Two 15 * 15cm squares of the same color, pencils or felt-tip pens for decoration of the face, glue.
april
Gifts for kids
Using the technique of origami, learn to make models of birds, ships, foster a desire to care for the younger, exercise in the free choice of color.
Multi-colored squares (10 * 10)
Fishes
Learn to fold paper using different basic forms, combining together in pairs to create a marine composition.
Blue cardboard, multi-colored squares, scissors, glue, paper edge.
Owl
Remind how the basic form of "kite". Learn to bend the upper triangle forward and return to its original position, make cuts along the fold line, bend the ends of the fold. To cultivate accuracy in working with paper and scissors.
Square 10 * 10, blanks for the eyes, glue, scissors.
Hedgehog
Continue to teach children to fold the square in half "book". Understand the terms: "upper corner", "lower corner". Develop the eye of children. Nurture respect for paper.
A square of gray, brown color 10 * 10 cm, a pencil or a felt-tip pen to draw eyes and needles on a fur coat.
May
The Rooks Have Arrived
Continue to teach children how to make crafts from the basic form of "kite", improve the skills of working with paper and scissors
Black squares (15 * 15), blanks for eyes, scissors, glue.
Branch of mountain ash
To consolidate the ability to make crafts from the basic form of "arrow", bring up accuracy, teach clearly, follow the instructions of the teacher
Cardboard, squares (1.5 * 1.5) orange or red, (3 * 3) green for leaves, glue.
My favorite is origami.
To fix the techniques and forms of origami learned in the classroom. Improve the skills of small and precise movements of the fingers of both the right and left hand. To raise interest in the results of their labor.
Multi-colored squares 10 * 10, scissors, glue.
The final lesson.
Registration of an album of children's works for the period of study. Development of communication skills and ability to align their interests with the interests of other children.
Album, crafts in the technique of origami, glue.
MUNICIPAL AUTONOMOUS PRESCHOOL EDUCATIONAL INSTITUTION "Kindergarten No. 390"
Origami class in medium group.
Theme: Flowers
abstract drawn up
Zelenina T.V.
perm, 2011
Purpose:
- Teach children how to make flowers using origami.
- Develop an eye, fine motor skills of hands, speech of children.
- To cultivate the desire to bring the work started to the end; love and respect for flowers.
Material:Pictures of tulip flowers, paper squares 6x6 cm in red and yellow, one square in green 10x10, glue, brushes, napkins, a “magic wand”, a large circle of paper - “flowerbed”.
Lesson progress:
Reading a poem.
If I pick a flower,
If you pick a flower,
If you and I are together,
If we pick flowers,
All the fields will be empty
And there will be no beauty.
Q. Guys, do you think it is possible to tear flowers with armfuls?
Q. Why?
D. It hurts — it cannot, it hurts — it cannot, because they will wither — and we will still throw them away ...
Q. Children, what flowers do you know?
D. chamomile, rose, marigold, tulips ...
V. Guys, today we will make flowers with you, because a beautiful flowerbed can be made from paper. Origami masters have come up with many ways to fold paper colors. You are my masters, you can do everything. Let's do today ... (showing pictures of tulips)
D. tulips?
Q. What do you think, what color are tulips?
D. Red, yellow ...
The tutor shows how to make a tulip. A stalk is made from the basic form of "kite" (with the children to disassemble the sequence of manufacturing the stalk).
V. (takes the "magic" wand) And now, I will turn you into flowers. How many beautiful flowers are here!
I slept a flower and suddenly woke up
More sleep did not want.
He moved, stretched,
I flew up and flew.
The sun will only wake up in the morning
The butterfly is spinning and winding (movements according to the text)
1,2,3 from a flower to a child turn!
V. I suggest trying to make a tulip by yourself, I know, you will definitely succeed. What color are the tulips? (children choose a square of paper for a tulip, the color they like)
D (children's answers)
The work of children.
The teacher in the course again explains how to make a tulip.
Take the square of the color you want. Fold it in half. Then with your eyes, find the middle of the long side of the resulting rectangle and from it bend the corners up and a little to the side, laying one over the other. The result was a tulip.
And now we will make a stalk.
V. Well done! What different and beautiful flowers we got! You are real origami masters! And now we will plant our tulips in a flower bed!
Children stick their flower on the middle of a large circle of paper (flower beds)
Analysis of children's work. Tell me about your flower
We planted flowers of unprecedented beauty,
All the flowers are different: white and red,
Yellow and blue - all flowers are beautiful
How beautiful every color is -
There are no better beds!
Download:
Preview:
MUNICIPAL AUTONOMOUS PRESCHOOL EDUCATIONAL INSTITUTION "Kindergarten No. 390"
- Origami class in the middle group.
Topic: Flowers
Synopsis compiled
Tutor I category
Zelenina T.V.
perm, 2011
Purpose:
- Teach children how to make flowers using origami.
- Develop an eye, fine motor skills of hands, speech of children.
- To cultivate the desire to bring the work started to the end; love and respect for flowers.
Material: Pictures of tulip flowers, paper squares 6x6 cm in red and yellow, one square in green 10x10, glue, brushes, napkins, a “magic wand”, a large circle of paper - “flowerbed”.
Lesson progress:
Reading a poem.
If I pick a flower,
If you pick a flower,
If you and I are together,
If we pick flowers,
All the fields will be empty
And there will be no beauty.
Q. Guys, do you think it is possible to tear flowers with armfuls?
D. No!
Q. Why?
D. It hurts — it cannot, it hurts — it cannot, because they will wither — and we will still throw them away ...
Q. Children, what flowers do you know?
D. chamomile, rose, marigold, tulips ...
V. Guys, today we will make flowers with you, because a beautiful flowerbed can be made from paper. Origami masters have come up with many ways to fold paper colors. You are my masters, you can do everything. Let's do today ... (showing pictures of tulips)
D. tulips?
Q. What do you think, what color are tulips?
D. Red, yellow ...
The tutor shows how to make a tulip. And the stalk is made from the basic form of "kite" (together with the children, to disassemble the sequence of manufacturing the stalk).
V. (takes the "magic" wand) And now, I will turn you into flowers. How many beautiful flowers are here!
I slept a flower and suddenly woke up
More sleep did not want.
He moved, stretched,
I flew up and flew.
The sun will only wake up in the morning
The butterfly is spinning and winding (movements according to the text)
1,2,3 from a flower to a child turn!
V. I suggest trying to make a tulip by yourself, I know, you will definitely succeed. What color are the tulips? (children choose a square of paper for a tulip, the color they like)
D (children's answers)
The work of children.
The teacher in the course again explains how to make a tulip.
Take the square of the color you want. Fold it in half. Then with your eyes, find the middle of the long side of the resulting rectangle and from it bend the corners up and a little to the side, laying one over the other. The result was a tulip.
And now we will make a stalk.
V. Well done! What different and beautiful flowers we got! You are real origami masters! And now we will plant our tulips in a flower bed!
Children stick their flower on the middle of a large circle of paper (flower beds)
Analysis of children's work. Tell me about your flower
We planted flowers of unprecedented beauty,
All the flowers are different: white and red,
Yellow and blue - all flowers are beautiful
How beautiful every color is -
There are no better beds!
Natalya Taranenko
Origami lesson« Magic bunnies» .
Middle group.
purpose: 1. Teach children to fold from square. bunnylearning to fold the base form "kite"progling the fold lines.
2. Continue to teach children to navigate the square, to find the right-left side, the corners.
3. Create a positive emotional state in group.
4. Develop the ability to coordinate their actions with the actions of other children, with the rules of the game, with the rhythm of the verse.
5. To bring up in children a sense of friendship, caring for a friend, comrade.
6. To cultivate accuracy in work, interest in collective work.
Preliminary work: acquaintance with children, viewing photos of children, conversation about friendship, viewing the album by origami.
Dictionary activation: sad, cheerful, friends, funny, kind, envelope, square, side, corner.
Vocabulary enrichment: mood, fold line, basic form "kite", postman.
Materials: 1010 cm squares. Different colors, scissors, glue, photos of children, audio recording of a song "Friendship"mood patterns, background music.
Lesson progress:
Sounds of quiet music.
A game "We are friends" (Children stand in a circle and join hands.)
I'm in a hurry here in the morning
Hello my friends!
Hello, friend, on the right!
Hello, friend, that left.
Hello, Sun and Earth
The teacher with the children in a relaxed atmosphere sits on the carpet. View photos taken on the eve.
What is your mood now guys? (shows model)
And today I have a little sad mood. Do you know why? Today I learned that our Vanya was sick and would not come to kindergarten. Tell me, what is our Vanya? (children's answers) Do you miss him? What do you think, what is his mood? Why? (children's answers) Of course, when you are alone at home, you are ill, you are very bored and sad because you are not with friends.
Guys, how can we help Vanya? What can we do to make it more fun? (children's answers)
And let's give him a surprise gift, you want? But in order to give him a surprise, we have to turn into magic bunnies. Repeat all for me:
Skok-poskok, skok-pokok,
.
Bunny jumped to the stump.
(jumping on the spot on two legs).
In the drum, he beats loudly,
(walking in place.)
In leapfrog play is calling.
(clap.)
Hare is cold to sit,
(Sat down.)
It is necessary to warm the paws.
(Clap your hands.)
Paws up, paws down,
(Hands up and down.)
On socks pull up.
(Stretched, raised their hands up.)
We put paws on a flank,
(Hands on the belt.)
On the toes of gallop-gallop.
(Jumping in place on two legs.)
And then squatting,
(Squat.)
So as not froze legs.
(We stamp our feet.)
You and I turned into bunniesand therefore I want to offer you to make your own paper "Portraits" for Vanya. Do you agree? Then proceed.
What do you see on the table? (children's answers)
My darlings hareslet's remember the rules of behavior at the table.
1. You can not wave a scissors
2. Transfer them by close blades.
3. Put the brush on the stand.
4. Be attentive.
Look at the board, this is a map of our portrait production.
(operational map)
Manufacturing sequence:
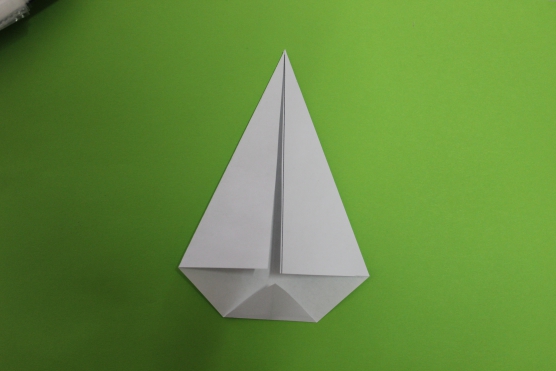
1. Bend the square on the floor, side to side, corner to corner.
well, iron the fold line. The result is a basic form. "triangle".

2. Now open your square. Fold the sides to the intended line. The result is a basic form. "kite".
3. Fold the bottom corner so that the three corners meet together.
4. Now take the scissors, and cut the workpiece from top to bottom, a little before reaching the middle of the figure.
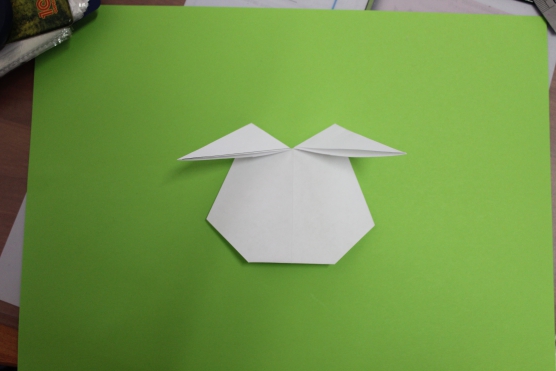
5. Turn the figure to the other side.
And now let's have some rest.
Fizminutka: "Friends"
This finger Manechka,
This little finger Vanya,
This finger Tanya,
This little finger, Sanya,
This finger I'm
That's all my friends!
And so that our portraits look even more like us, let's paste our photos instead of the faces bunny.
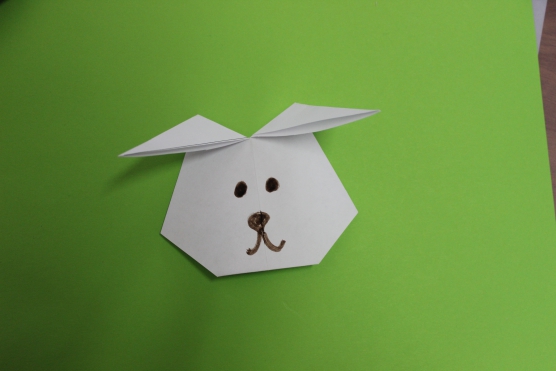
Show each other how you turned out? What do you think, what mood will Vanya have when he gets your surprise? Will he rejoice at our gift? (children's answers)
Tell me, how can Vanya receive our gift? Who can help us? Who sends letters, parcels?
Of course - the postman!
(Knock on the door). The postman enters.
Hello! Will you send mail?
Yes, please send our letter to Vanya, he is ill, and he will be very happy to receive greetings from us.
Be sure to deliver your letter. Goodbye.
Do you guys do good or bad things? Why good? What is our mood, and what will Vanya have when he gets our surprise? (children's answers)
A game "Sunlight".
Children stand in a circle, stretch their arms forward and connect them in the center of the circle. Stand quietly, trying to feel like a warm sunshine. (The sound of the song sounds "Friendship")
I also prepared a surprise gift for you, so that you always have a good, kind, joyful mood, and you were friendly and never quarreled. (The teacher gives a box with finger theater, made in the technique Origami)
GBOU school № 10 g.Chapaevsk Samara region
Structural division "Kindergarten" Birch ""
Additional educational program
"The magic world of origami"
Medium group (4 - 5 years)
2012 - 2013 academic year
Educator: Kanakova Elena Viktorovna
Explanatory note
The program of additional education "The Magic World of Origami" is a program of artistic and aesthetic orientation, created on the basis of methodological manuals Sokolov S. "Origami Tales", Sokolova S. "Schools of Origami: application and mosaic"; T.I.Tarabarin "Origami and child development" (a popular guide for parents and teachers); Beech R. “Origami. Great illustrated encyclopedia and practices of working with children preschool age on learning the basics of the art of origami. ”
At preschool age, the child’s connection with the leading spheres of being is established: the world of people, nature, and the objective world. Curiosity develops, interest in creativity is formed.
To support this interest, it is necessary to stimulate the imagination, the desire to be involved in creative activities. In the classroom in drawing, application, modeling children develop emotional and aesthetic feelings, artistic perception, and the skills of fine and constructive creativity are improved. Watching the children came to the conclusion that children love to play with toys made with their own hands. In the summer, paper planes were made with children, paper cups were folded with girls. This is how the idea of working with origami children appeared This type of activity is not only accessible and interesting to children of preschool age, but also contributes to the development of general abilities in children, which will be useful to them in life and in the process of teaching other subjects. Origami classes allow children to satisfy their cognitive interests, to enrich their communication skills and acquire the ability to carry out joint activities in the process of mastering the program. And also contributes to the development of fine motor skills of hands, which has an important influence on the development of the speech of children.
The originality of the composition is achieved by the fact that the background, on which the figures are glued, is decorated with additional details, made in the technique of application.
Purpose of the program - comprehensive intellectual and aesthetic development of children in the process of mastering the elementary techniques of origami, as an artistic way of designing from paper.
Tasks of the program:
Educational:
To acquaint children with the basic geometric concepts and basic forms of origami;
To form the ability to follow oral instructions;
Teach various paper handling techniques;
To acquaint children with the basic geometric concepts: circle, square, triangle, angle, side, vertex, etc .;
Enrich the child’s vocabulary with special terms.
Developing:
Develop attention, memory, logical and spatial imagination;
Develop fine motor skills and eye;
To develop the artistic taste, creativity and imagination of children;
To develop the ability of children to work with their hands, to accustom them to precise movements of their fingers, to improve the fine motor skills of their hands, to develop an eye;
Develop spatial imagination.
Educational:
Foster interest in the art of origami;
Expand children's communication skills;
To form a work culture and improve labor skills;
To promote the creation of game situations, to expand the communicative abilities of children.
The program "Magic World of Origami" is designed for 1 year. For the successful development of the program classes are held with children in the amount of 10 people. Classes are held 4 times a month from October to May, in the afternoon (on Fridays).
number of children in the circle
per month
in year
Methods used in the classroom circle : conversation, story, fairy tale, poems, viewing of illustrations, showing a sample of the sequence of work.
Form of employment : thematic joint activities.
Expected results:
As a result of training in this program, children:
Learn how to handle paper;
Will know the basic geometric concepts and basic forms of origami;
Learn to follow oral instructions; create origami products;
Will create compositions with products made in the technique of origami;
They will focus attention, memory, thinking, spatial imagination, fine motor skills of the hands and an eye, artistic taste, creative abilities and imagination;
They will improve their communication skills and acquire skills in working in a team.
Forms of summarizing the implementation of the additional educational program:
Making an album of the best works;
Holding exhibitions of children's works.
Perspective plan
Theme
Oh k t i b
1. Introduction to origami
2. Familiarity with origami symbols and tricks
3. "House"
4. The basic form. ▲ "Mushroom"
To acquaint children with a new kind of art - "origami". To acquaint with the symbols and basic techniques of folding paper.
Using the basic form of "little book" to make a house.
Exercise in folding a square sheet of paper in half and diagonally.
N o i b
1. "Hedgehog"
2. "Glass"
3. "Kitten"
4. "Fish"
Secure basic geometric concepts (angle, side, square, triangle) with children.
Develop the ability of children to work with their hands, to accustom them to precise movements of their fingers.
To help master various techniques and methods of action with the paper (bending, cutting, gluing)
D e to and b
1. "Christmas tree"
2. "The Princess - Herringbone" (composition)
3. "New Year's card"
To consolidate the ability to independently form the basic form ▲, prepare blanks on a specific topic, combine the parts into a single whole, create a composition of the winter forest; making a new year postcard. To improve the fine motor skills of hands, to develop an eye.
I am in
1. Bunny
2. Fox
3. In the winter forest (composition)
Using the basic form ▲, continue to develop the ability of children to make crafts. To form the ability to follow oral instructions. To promote the creation of game situations, to expand the communicative abilities of children.
F e p r a l b
1. Airplane
2. Ship
3. Yacht
4. "Ship in the stormy sea"
Secure basic geometric concepts (angle, side, square, triangle) with children. Develop the ability to consciously apply familiar tricks, transfer learned skills in folding to new crafts.
March
1. The sun
2. Flowers for mom
3. Butterfly
4. "The girl's face"
Exercise children in folding paper different ways, from the familiar base form ▲, fold flower petals, butterfly, “girl's face”, connecting the details, combining the tops of the corners and the sides of the details.
Enrich the vocabulary of children with special terms.
A PRILE
1. Dog
2. Cat
3. Frog
4. Grasshopper
To exercise in folding a square sheet of paper diagonally, to find a sharp corner; bend the triangle in half, lower sharp corners down. Develop fine motor hand and eye.
May
1. The basic form of "kite"
2. Composition “Two funny geese”
3. The final lesson
Using a new basic form to exercise children in the manufacture of parts of models of geese, combine them in a certain sequence using an application. Create a collective composition. Registration of an album of children's works for the period of study. Development of communication skills and ability to align their interests with the interests of other children.
Used Books
T.I. Tarabarin "Origami and child development" (a popular guide for parents and teachers).
T. Serzhantova "Origami for the whole family"
S.Sokolova "Origami Tales"
S.Sokolova "School of origami: application and mosaic"
R. Beech “Origami. A large illustrated encyclopedia and practice of working with children of preschool age to learn the basics of the art of origami. ”