Another master class in our collection of baskets for eggs for Easter is a felt base. One of the most exciting activities on the bright Easter holiday is decorating eggs. This process delays not only children, but also adults. But to design beautifully decorated eggs to have a complete look, it is very important ...
0:37, January 18, 2017Another master class for the New Year contest in the nomination “Golden Hands”. Master class “Symbol of 2017 - The Cockerel” from caprone Author: Alexander Alexandrovich Parygin, 10 years old. He is a graduate of the children's association “Rainbow of Creativity” MBOU TO “Children's and Youth Center. Pn Granatyuk ”Pavlograd ...
17:23, January 15, 2017 16:14, 4 January 2017Master Class “Cockerel-Golden Scallop” At our competition “Pantry of Winter Fantasies”, nomination “Golden Hands”. Author: Ilina Yulia Vladimirovna. MBOU TO “Center for Continuing Education” in Kyzyl, RT, Russia, Tyva Republic, Kyzyl. The cockerel is made of: foamiran (fom, artificial ...
15:55, 4 January 2017Christmas tree toy “Cockerel” Master class for the competition “Pantry of winter fantasies”, nomination “Golden Hands”. Author: Kiseleva Lyubov Alekseevna - a teacher of mathematics and technology, a teacher of additional education at the Municipal University of Economics Dovolenskaya Secondary School No. 2 named after. S.I. Lazarev. Tools and materials: viscose napkins yellow and ...
22:55, 28 December 2016Master class in the nomination “Children's crafts” of the competition “Pantry of winter fantasies“. Herringbone from the tape Gnybida Alena, 11 years old. The head of the group “Fireworks of Fantasies” of the Gonts Inna Y. The House of Creativity “Dyvotsvit”. Ukraine, Kiev. 1. We will need: Foam cone, green satin ribbon, width 5 ...
23:05, 24 December 2016Master class in the nomination “Golden Hands” of our New Year's competition “Pantry of winter fantasies“, how to make a rooster out of ribbons with your own hands. Author: Svetlana Gorbacheva, 12, head of pdo Golden V.A. Cock of satin ribbons Weaving of ribbons has been known for a long time, but, unfortunately, very few works in this ...
11:30, 21 December 2016Master class for the contest “Pantry of winter fantasies” “Cockerel - symbol of 2017” Author: Anna Utkina, 10 years. Leader: Semova Yulia Valerievna, teacher of additional education, Municipal Autonomous Educational Institution before the MDGs of the Kamensky District of the Penza Region. Materials: dense felt yellow, red, ...
19:27, 14 December 2016Cockerel from fabric On the eve of the new year 2017 - the year of the rooster in the oriental calendar, the hand-made article - the souvenir “cockerel” is more than relevant. I suggest you create such a craft by following these prompts. You will need: paper for the pattern; soft knitted fabric; thread and needle for sewing; synthetic winterizer for stuffing; thin felt green, ...
2:17, 10 December 2016Work on the contest “Pantry of winter fantasies”, nomination “Golden Hands”. The author - Laurenchikene Lyudmila Nikolaevna. I work in kindergarten №16 kindergarten “Baby” of the city of Serpukhov. Christmas tree toy Fairy "Businka" The fairy "Businka" is made specifically to decorate the city tree of Serpukhov. For the manufacture of...
13:08, November 29, 2016Work for the competition “Winter Fantasy Storeroom” Master Class “Magnet on the Petushok Refrigerator” Author: Semova Yulia Valeryevna, teacher of additional education at the Municipal Educational Establishment of the Children's Development Center of the Kamensky District of the Penza Region. Materials: thick beige felt, yellow, red, ...
13:43, 6 November 2016Children probably have a lot of useful things that need to be stored somewhere. But what if you offer the crumbs to make together an original handbag in the shape of an owl, in which it will be very convenient to fold small toys or candies? Master class from Anastasia. Children's handbag from “Owlet” fert In order to ...
20:56, 3 November 2016CASE OR A CLAMP FOR A PHONE FROM FETRA “PANDA” The author of the work is Natalia I. Kolmogorova, an additional education teacher at Secondary Medical School No. 2 named after V. Maskina railway st. Klyavlino of the Samara region, joint venture “Prometheus”. Now on sale you can find any shades of felt. This material is good because it does not fray when working with ...
20:03, 3 November 2016When we buy scissors, a case is not always included in the kit, so you need to search and purchase it separately. I suggest that you go back and sew a beautiful case for scissors with your own hands from felt. Do-it-yourself case for scissors For sewing the case, we need: Felt (green 2 sheets of 20 x 30 cm each); Little...
0:35, 15 October 2016This souvenir toy is made of fabric in the technique of grounded textiles using the painting under the "Gzhel". The author of the master class is Semenova Natalia Anatolyevna. Soft toy elephant For work we take materials: white dense fabric, sewing machine, scissors, thread with a needle, pencil, filler for toys, a little ...
12:32, September 26, 2016CAT-PRINCIPLES TO GUILLING TECHNIQUE The author of the master class - Natalia I. Kolmogorova, teacher of additional education of Secondary School № 2 named after. V. Maskina railway st. Klyavlino Samara region. Perhaps, in your house there is a synthetic fabric from which it will be possible to make a cat-tack for curtains. And you can do it ...
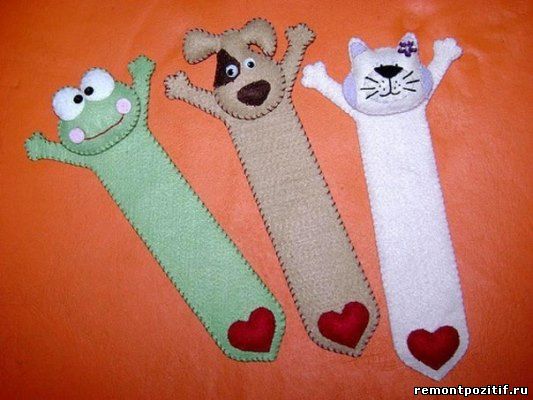
17:05, 30 August 2016Silk bookmark for books. The author - Natalia Klimova. In this master class you will learn how to bookmark your own books. Such an elegant and stylish thing can be a wonderful gift! And, most importantly, we will make a bookmark for books not from paper or cardboard, but from very unusual materials ... Beautiful ...
19:19, 15 August 2016The author of this work for the competition “Dolls and Toys” Zyryanova Viktoria Vladimirovna, a student of grade 11 Evening (shift) secondary school No. 8 - Voskresensk (Moscow region Voskresensky district, the village of Horlovo). Leader: Nina G. Lytova, physics teacher. Polar bear in the technique of the northern ...
14:18, 1 June 2016We continue our floral theme. Master class from Yana, how to make a satin rose from ribbons. Girls constantly invent something to decorate their hair. There are a lot of beautiful hairpins in the shops, but either expensive or not what you like. I decided for a long time what to wear on my hair, so that it is not only beautiful, but also comfortable. Today is your ...
16:37, 17 May 2016Another master class on how to make a hair tie is a flower made from satin ribbons from Marina Sivtsova. Scrunchy ribbons, do it yourself Hello! Spring has finally arrived, we remove outerwear and hats, and we can make all sorts of hairstyles for hair, and also decorate them with beautiful hairpins, ...
0:43, 4 May 2016A master class for the Easter Gifts Contest was prepared by Valentina Ivanovna Obabkova, head of the Joy Workshop group. I love the wonderful doll “Easter dove”. I saw MK Zoya Pinigina many years ago and now I always do it myself and with the children before Easter. At production I add ...
14:23, 2 May 2016Good day to all! I present to you the master class of Marina Sivtsova for creating your own simple flower made of satin ribbons, with which you can decorate the bezel, hairpin or hair tie. Flower of satin ribbons. Master Class For the manufacture of such a flower, we will need the following materials: satin ...
14:31, 23 March 2016Bows - this is the best gift for your princess. Today we will try to make such beauty with our own hands. The main thing, dear needlewomen, we do not need much time for this, but we need to be patient with patience. Such bows of satin ribbons can be a wonderful gift for a girl. You can also ...
Today we will talk with you on - crafts made of fabricdo it yourself What can be made of fabric? Yes, anything. It can be figures of different animals, applications on any topic, flowers, frames for photos, and even decorative tableware. Their production is especially popular in children. Since they are simple and very interesting to make.
We want to offer you step by step instructions handicrafts for childrenpreschool age. Since at this age the kid still does not know how to use a needle and thread, we have selected the most optimal variant for such a craft - this is an appliqué.
So, crafts made of fabrics with their own hands - application
We list all the necessary materials:
Shreds of matter (it must be thick - felt, flannelette or wool);
Cardboard sheet;
Safety scissors;
PVA glue;
Buttons.
Job description in steps.
Step 1. We draw on the details of the material that we need for our application. In this example, it will be a tree. Ask your child to do this. Apply the picture can be chalk or a piece of soap. The crown of the tree - on one piece of matter, for example, green, the trunk - on the other, the grass on the third.
Step 2. Cut our blanks in turn.
Step 3. Prepare the background for our crafts. Paste on a sheet of cardboard cloth or colored paper, and you can immediately take a color cardboard, it will be even easier.
Step 3. Glue on the finished background: first the tree crown, then the trunk, and only then weed. Let's leave our creation to dry.
Step 4. Cooking frame. It can be cut out of cardboard of a different color. You can also use any other material for the frame. This may be a satin ribbon, striped suede or fur, thin strips of lace. It can be made from anything. For example, to impose buttons of different sizes, beads, or even pieces of foil.
Step 5. We proceed to the closing moment - glue the buttons. They will depict fruit on our tree. Buttons can also be replaced by another material. For example, cut out flowers from paper, or use to decorate a bead.
Try for the child to do more work on their own. It will be useful if he himself fantasizes over some details. Thus, the baby will feel more responsible for the work done and value it more.
You can replace a tree with something else, for example: a bear, a duck, a cat, or whatever. Such applications can be hung on the wall, donated to loved ones or do some more similar work and come up with some interesting gamesThey can also be used as a decoration for the group’s interior. Your son or daughter will definitely find a use for his masterpiece.
Handicrafts for home
Now let's talk about other things that can be made from fabric. Of course, there are a great many different ideas that will help bring beauty and coziness to your home. You can come up with anything you want - these are photo frames, chair covers, and pillows, of various sizes and shapes, decorated with appliqués, and even decorative tableware.
We suggest you make a soft bowl. It can be used for fruit, sweets or for yarn, so that our needlewomen do not "run away" balls of thread.
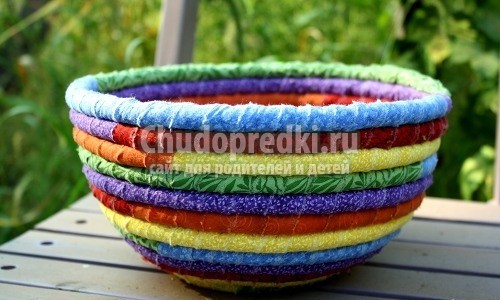
This bowl will turn out to be quite tough, due to the fact that it is based on a cord, on which we wind pieces of matter.
To make such a bowl we need:
Twine or cord;
Pieces of material of different colors;
Needle and thread;
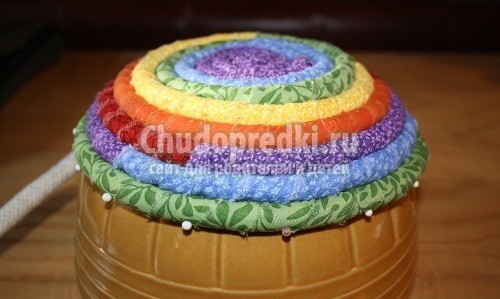
Deep salad bowl (the basis of our crafts);
Scissors;
Crafts from cloth scraps,bowl - a description of the work.
The fabric can be taken in the same color or multi-colored, so our salad bowl will not look so boring. Cookware of this type does not have to be used for its intended purpose, it can also serve as an element of decor. DIY handicrafts Perfect for decorating our house, garden or balcony.
1. We take our base, that is, the cord. We start to wrap it with a ribbon of material. These tapes can be pre-cut or even pick on the shreds, so its edges will not crumble.
2. Slowly fold the cord in a circle, and later we will lay on the base of the salad bowl. To switch to another color, you need to impose a new ribbon, twisting the edge of the patch.
3. Take pins and chop around, it will facilitate the work. Then stitch the needle through.

4. Put the base plate upside down and, carefully sew, continue to wind our craft on it, giving the desired shape.
We will wrap the end of the cord with a braid and fix it with the transition, as indicated above. Our bowl is ready!
Denim Crafts
Surely, each of us in the closet there is at least one pair of old jeans, or even two or three. Wait, do not rush to throw them away. Let's try to remake the jeans that are annoying to you into something useful. This will not necessarily be a wardrobe item. We will tell you how many useful things come out of old denim clothes.
Women's jeans handbag.

There are many options for making such a bag, we want to describe one of them to you.
For sewing, we need:
Old jeans;
Scissors;
Sewing machine;
Pins.
Description of work.
1. Just below the pockets we cut off the trouser jeans. Then we cut all the seams around the edges. This will be the main part of the bag.
2. Turn our stock inside out and sew around the edge with a dotted stitch. Fasten the bottom of the pins and stitch on the typewriter.

3. Now we will turn out the product on the front side. The base of the bag is ready.
4. It remains to add accessories. We take the old unnecessary tie, it will serve as a handle. We pass it in the side and front loops of our former jeans and fasten in the middle (in the area of the former fly) with a beautiful large brooch.
Everything. Now you are the owner of a new bag.
Denim flowers.
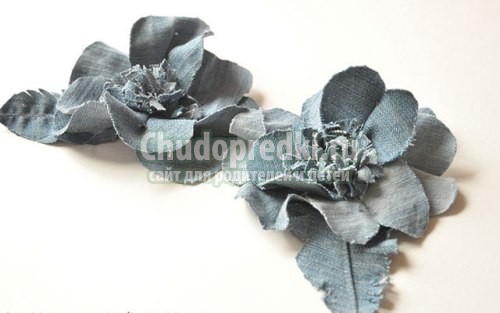
You can make a denim flower from the scraps of jeans that went to our bag.
We will need:
Denim shreds;
Scissors;
Threads with a needle.
1. Cut four petals out of cloth in the shape of a figure eight, one is round and one in the shape of a leaf. Cut the sheet so that the seam is in the middle.
2. Petals in the form of eight fold in half and sew. Round detail and leaves cut into fringe.
3. We sew all the parts together - a leaflet, petals and we impose a circle-center at the top.
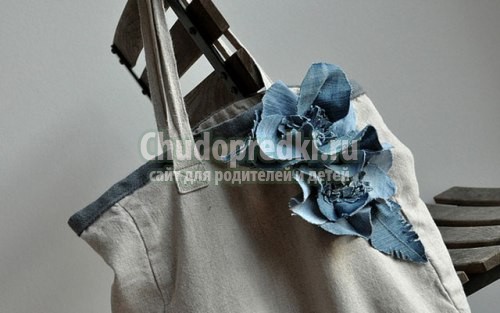
We can decorate our bag or any other with such colors from jeans.
What else you can make on this site.
If you like our site, express your "thank you"
by clicking on the buttons below.
Children's crafts from fabric and thread
usually created by babies under the direct supervision of adults. Children of primary school age already have a good needle and are able to do elementary stitches, therefore, their parents only need to adjust their creative activity. More young children can participate in creating handicrafts with their mom and dad, helping them to choose accessories for, choosing the characters that they would like to make. Thus, this type of manual work is uniting for the whole family - this is a great way to communicate with your child, when in the course of work the skills of accuracy, perseverance, and patience are unobtrusively inculcated to the baby; developing a creative beginning.
Fabric crafts
have one undoubted advantage over other types of crafts - from or - they are durable. But they also have a minus - it is more difficult to create such items, and mothers should have certain sewing skills to help their child. And yet, textile crafts are the most beloved of children - after all, they are so homely, cozy, soft, and they can even be taken to bed with their own hands or animals, so that they “guard” the sleep of the little ones. What crafts from fabric and thread can be made for children and with children
?
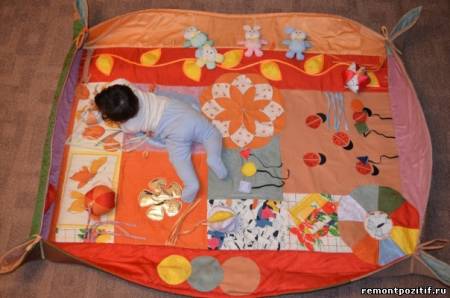
Perhaps the conversation will start with the thing that moms can do for the youngest children - this developing mat. Surely with a similar subject you come across in stores; at the same time, this is quite easy to do yourself. For this you need to take a blanket and sew the necessary elements to it:
Pockets with zippers, stickies, zippers on - the child will learn to open and close such pockets, which means then it will be easier to teach him to dress independently
You can put small pockets in the pockets - you can take each one, you need to call it - doll, cat, elephant, etc. - This will contribute to the development of the baby's speech. You can put colored pieces of felt in your pockets - by pulling out colors, or counting the details. In a word, the “fillers” of the pockets can be different - depending on the imagination of the parents.
They are sewn onto the rug and made from a different soft-touch material. For example, a cat face can be made from a piece of fur, and a frog can be made from silk fabric. When the child touches the images, you can tell him that "the kitty is fluffy, soft and warm," and "the frog is cool and smooth."

If you do not want to create a rug entirely by yourself, you can buy ready-made and then simply complement it to your own taste with the necessary details.

If it seems to you that your child is still small enough to cope with the work with the fabric, you can start with threads. The yarn makes great toys.. The first version of such toys is rather decorative in nature, because of their fragility - it is better to simply decorate with such objects. On the balloon of the desired shape, threads glued with glue are wound. When the glue dries, the ball is blown off and pulled out, and the thread base is decorated - from several such balls of various shapes and sizes you can make any character.

Thread toys can be created from colored pompons interconnected (the technique of making pompons can be found in any publication on needlework), as well as from threads wound on a wire (wooden, plastic) base.

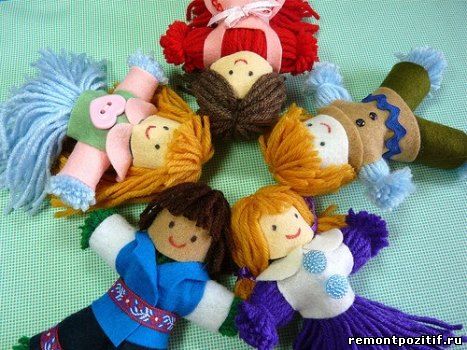
From the cut, stacked and tied together the threads, you can make some kind of similarity. But in this case it is not necessary to adhere to strict rules for the manufacture of ritual dolls - dolls from yarn can be supplemented with a head made of cloth, they can draw faces, etc.
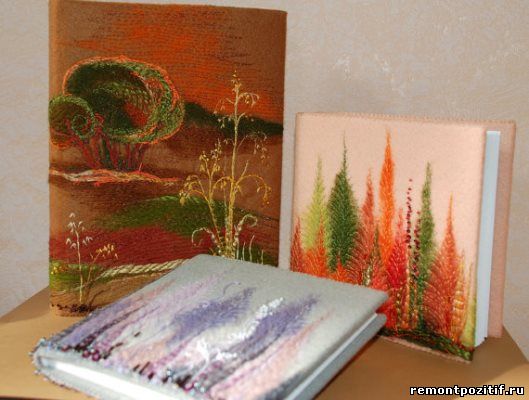
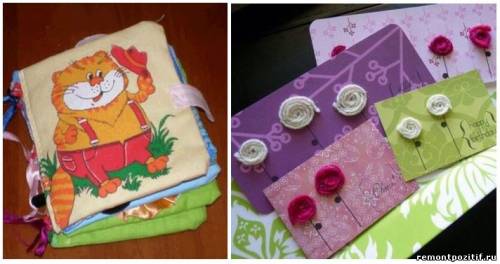
We continue the thread - even with a pretty little child you can do postcard with "thread items", and for older children - embroidered Covers. Or it can be an appliqué of threads - the threads in the form of a pattern are stacked and glued onto a textile base. To make the reading process even more enjoyable, it's very easy to do a felt tab with a picture of some.

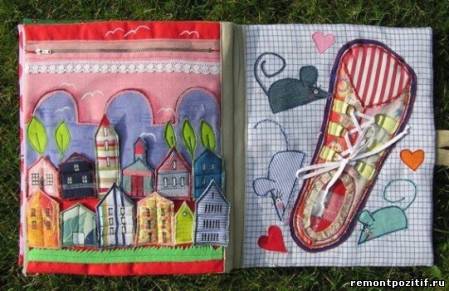
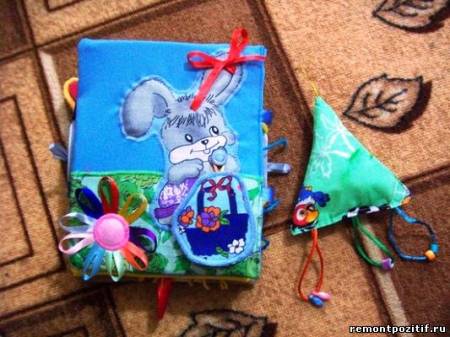
Not only book covers are sewn from fabric. The whole book can also be made from textiles - it will turn into something like an organizer, in the pockets of which various “girlish” trifles will fit perfectly: hairpins, little notes, tools for handicraft. Certainly, the little organizers of the organizers will find what to put in such a soft book (to give shape, you can lay a flizelin, a synthetic winterizer, a cardboard in the “frame” of the book).
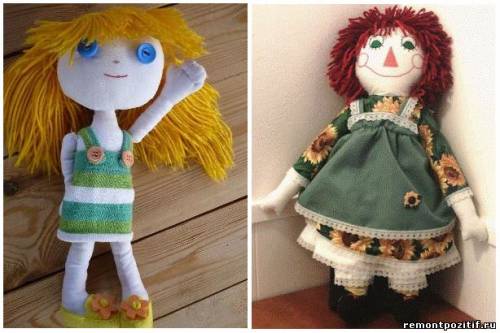
If you can sew, you can make a rag doll with your child. Now such items are very relevant, including in quality. The necessary information and patterns can be found both in print and online.
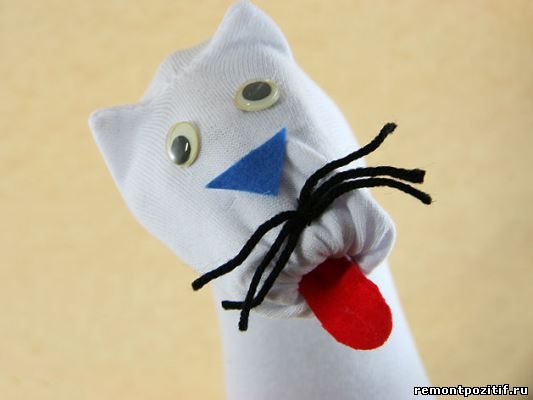
But if you are not sure about your sewing skills, then you can try to make textile sock toy. In this case, you will not have to cut it - you just need to give the product the necessary shape and supplement it with accessories.

Sock toys can be made voluminous by stuffing with a padding polyester, or you can put it on your hand and use it for home puppet theater.

It is possible to make handicrafts made of fabric and threads with children of any gender, but still the priority here is for girls - so we will end up talking about handicrafts made of fabric and thread with an indication of another type of handicrafts for girls: creating furnishings doll houses. You can make a dollhouse from different materials, but for him it is better to create from felt - practically any piece of furniture is obtained from this fabric.
Well, we have listed only a few options of handicrafts made of fabric and thread, which can be created for children and with children . In fact, for creativity in this area there are no restrictions. The main thing is your fantasy and desire to create with your child.
Many housewives in the house have a large number of different pieces of fabric "just in case." And if you do not know where to put them and what to sew from the remnants of the fabric, then you will come to the aid of some of the ideas presented in this article.
Stylish decor: curtains of the remnants of the fabric
At all times, handmade was highly valued, and today it is very fashionable to decorate your house with hand-made household items. Bright and extraordinary things, made of various materials, will fill the house with comfort and a special atmosphere. An unusual solution will be the curtains created from individual patches of fabric, especially since each house has a large number of them. This is not only pleasant, but also useful activity. All the same, it is a pity to throw out rags, and it is not necessary, because they can be perfectly used. 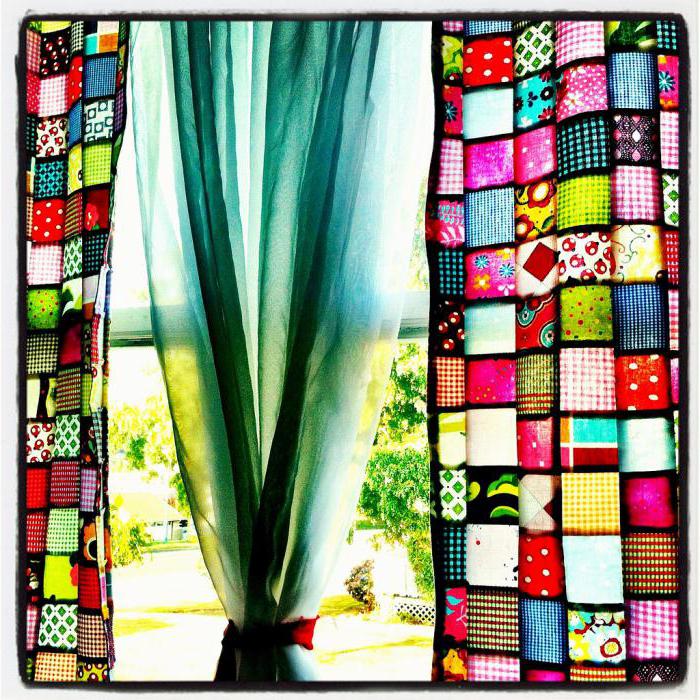
The principle of sewing patchwork curtains
Getting started, you need to select and draw the pattern you like. It can consist of all sorts of elements of different sizes. When sewing such a product, it is better and more convenient to choose large pieces of fabric, since working with them is much easier, whereas for connecting small parts you will have to make a lot of seams, which, in turn, will make the finished product heavier.
For more convenient work, it is best to make a pattern on thick paper without leaving seam allowances. Separate elements for convenience should be numbered. And although at first glance it seems that it is very difficult to sew such a product from the remnants of a fabric, but it is not.
The finished pattern is applied on the reverse side of the fabric and outlined, not forgetting about allowances of about 0.5-1.0 cm. They sew the parts facing each other, for convenience, they can be pre-swept.
After all the items are sewn, the finished curtain must be smoothed. A cloth of pieces of fabric is sewn to the base or lining - this way the ugly view of the wrong side is hidden.
The finished product can be additionally decorated using a ribbon, a beautiful ribbon or twine around the edges.
Patchwork: master class
When sewing products in the technique, you can use various geometric patterns you like. However, the easiest way, especially for beginning masters, is to cut out and sew rectangles, squares and triangles. The main highlight of such products is the exact proportionality of all the details and the ornament itself. 
First, triangles are cut out of flaps of fabric, they are sewn into squares, and as a result, the stitched details are combined into various patterns and ornaments. The protruding corners are neatly trimmed with scissors. For greater expressiveness and beauty it is best to use details of contrasting colors. In addition, squares made up of patches can be of different sizes - this will allow using as many different pieces of fabric as possible, and geometric patterns will come out more unusual and interesting. 
tissue residue
With the help of the remaining pieces of material, you can breathe life into old things and furnishings. For example, with your own hands with cloth scraps, you can transform an outdated chair. First you need to remove the seat and remove the upholstery. Next, cut a new piece of foam rubber, equal to the old. Then the prepared piece of fabric (it can be made using patchwork technique) is placed on a new piece of foam rubber and fixed with a stapler on the opposite side of the seat. As a result, excess fabric can be cut and glued with glue. It remains to install a new seat on the chair. 
The same can be done with the old stool, if there is one on the farm. The seat is covered with foam rubber and sew a cover corresponding to the size of a wooden product. The case is made in this way:
- cut out the pattern to the size of the stool, it is necessary to take into account the seam allowances;
- further on the edges of the elastic gum;
- ready cover put on the chair, where there is already a foam pad.
Useful items in the interior
It is possible to decorate with the remains of fabric the most various objects. With the help of small patches sew beautiful copyright things, for example, an interesting option will be covers on the pillows. Small segments often do not allow you to make a full-fledged thing, but you can use a little trick: to make a cover of silk, cotton, taffeta, etc. bands.
When starting sewing, the first step is to prepare the fabric (wash, bleach and iron). Then:
- Two parts are measured according to the shape of the pillow or they are combined from individual segments. This can be done using the patchwork technique, the master class for which was presented above in the article.
- Details are inscribed from three sides.
- Pillows from the remnants of fabric are decorated with various decorative elements.
Several pillows of the same fabric that hangs on the window will complement the overall interior of the room. You can go even further by tailoring a beautiful lampshade from the remnants of matter. Moreover, it can be made even without using a thread with a needle.
The fabric should be wrapped around a metal or plastic pattern and put labels. According to them you need to carve out the part. Next, a piece of cloth wrapped around the base, pre-inflicted on the edges of the point of glue. The tips of the matter with the need to wrap inside.
Original things for the kitchen
What to sew from the remnants of the fabric, if they are very small? In this case, things are also very interesting. If there are very small pieces of cloth in stock, then you can sew small bags for herbs. Flavored cases, filled with mint, polynya, bay leaf or other fragrant grass, will fill the kitchen with a special aroma and atmosphere.
It is not difficult to make such joys, moreover, you can add a small needlewoman to the case. The result can be decorated with decorative ribbons, twine, embroidery, etc.
The remaining patches - this is an excellent material for practicing creativity. Small pieces of fabric are used to make a variety of things using patchwork. Using small pieces of fabric, you can sew not only tulle or a cape on a chair. If you do not know what to sew from the remnants of the fabric, think about the fact that covers need jars for all kinds of bulk products, vegetables, etc.
Developed imagination and imagination will allow the child and his parents to make a huge number of different handicrafts with their own hands. For this you can use a variety of materials, one of the most popular among which is the fabric.
In addition, the ability to work with a cloth can be useful for small children, especially girls, and in later life. Having learned how to sew and cut, you can make beautiful outfits for the whole family, original interior decorations, as well as beautiful and bright gifts for your loved ones.
In this article we will tell you what children's handicrafts made of cloth for schoolchildren can be made with your own hands, and how to work with this material correctly.
Denim crafts for children
Denim - one of the most popular materials for the manufacture of handicrafts. To work with this type of fabric, it is absolutely not necessary to buy it, it is enough to take which are available in the wardrobe of the vast majority of people.
Denim pants can be used to create decorative pillows, soft toys, photo frames, hot coasters, or, in particular, a cute and original phone case. To make it, cut a suitable size of fabric from old jeans and sew a small “bag” out of it, completing the seams from the wrong side with a sewing machine or by hand.
After that, turn the product on the front side. The edges of the valve, designed to close the cover, completely handle the glue gun or sew a thick thread. This is done in order to give them extra rigidity and prevent early wear.
Sew a large button to the front side of the case, and on the valve, make a hole corresponding to the size and apply glue to its inside to avoid blooming. For decorating crafts, you can make a beautiful large flower from denim or use any other decorations.
Crafts of cloth scraps
The technique of making handicrafts from pieces of cloth, or has a long history. Today, not only small children, but also many adult women are keen on this type of needlework. Patchwork allows you to create absolutely incredible panels, decorative pillows, blankets, toys, as well as small items such as pot holders or needle cases.
In particular, practically any toy can be easily made from the remnants of cloth. Choose your favorite model and make a paper pattern. If you have basic sewing and sewing skills, you can do it yourself, but if you do not have the necessary skills, you can use the many patterns presented on the Internet.
Using a chalk, transfer the pattern to pieces of fabric and carefully cut out the necessary details. Gradually sew elements according to the scheme, not forgetting to leave small holes for stuffing. After that, stuff a toy with a padding polyester, close the holes, sew up the eyes, nose, mouth and decorate the craft to your own taste.
How to make a hand-made piece of fabric with fabric?
For the youngest children, a fabric handicraft made in the form of the sun is perfect, which you can easily do with your own hands. To make it, cut a sufficiently large circle out of cardboard, and on top of it lay out the same sized piece of padding polyester.
From a yellow fabric, cut a circle of larger diameter and, attaching it to the previously completed parts, assemble and pull it over the edge with a seam. If desired, the fabric element can be fastened with a glue gun.
Then, cut out a rectangle 3.5-4 cm wide from the same fabric. The length of this part should be 2-2.5 cm longer than the circumference. Carefully pull out a few threads from the rectangle so that it turns out to be a fringe, and glue this part all over. the length of the circle. Of course, if you fantasize, the rays can be made from other materials.