Everyone knows how to work with cardboard. AT kindergarten beautiful paper crafts teach you to create the smallest kids. Later skills are fixed in primary school, and older children learn from each other and make funny figures, delicate flowers and “valentines”, postcards and cardboard panels with their own hands. Among the paperwork technicians are appliqué, quilling, and origami, which allows you to create three-dimensional 3D crafts, and design.
Everyone knows how to work with cardboard. In kindergarten, beautiful paper crafts teach you to create the youngest children.
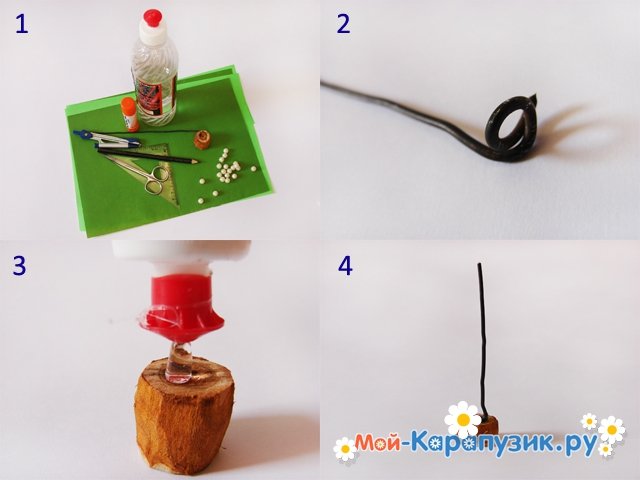
For paper masters complex tools are not needed. The most basic one can be found in any home, and what is not there is easy to buy in the nearest office supply store. So, will be needed:
- paper of various grades and types (white, color, corrugated and so forth);
- cardboard (thin, for child labor, sleeves from toilet paper, cards, etc.);
- scissors;
- wire;
- clerical knife;
- pencil is simple;
- paper glue (silicate, PVA, starch or other).
You can decorate paper crafts with your own hands with beautiful ribbons, beads or rhinestones, and sparkles. Can be useful and paint with a brush. As a colored paper, you can use the pages of glossy magazines or napkins of different shades. If you need to cut a lot of identical parts, it is best to prepare a template from a thin cardboard in advance.
Handicrafts made from paper do (video)
Paper flowers
They can be useful for the design of cards, creating bouquets and compositions for the decoration of other crafts. Flowers are the most indispensable element of any holiday and a special category in papermaking. You can make them from almost any kind of selected material.
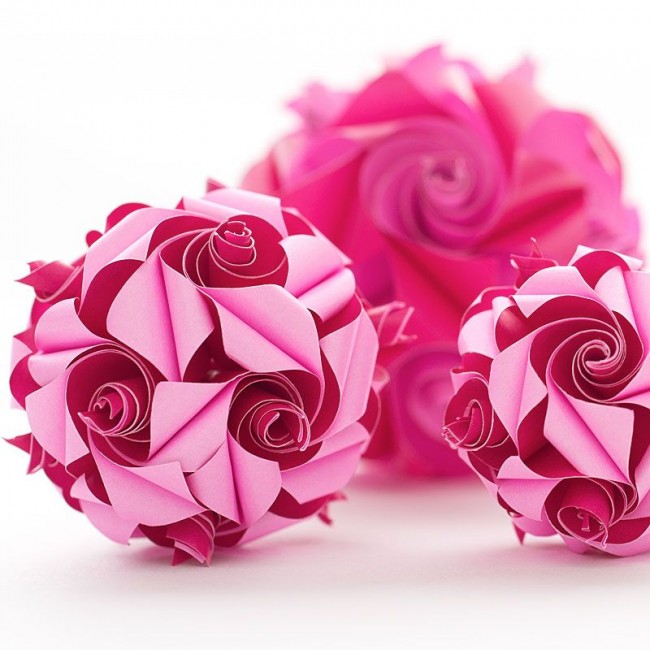
For those who like to work with their own hands, a master class on which roses can be created from two-sided colored paper will be very interesting. It will take circles of different diameters: the larger the billet, the more luxuriant and larger the rose will be. Do not try to cut the perfect shape perfectly. An uneven edge will give a natural look to flower petals.

Cut the finished circle in a spiral, moving from the edge to the center, leave a small circle in the middle. The resulting strip is now necessary to twist into a roll, also starting from the edge. Make the first few turns tight, and then wind the rest of the strip on this core, aligning the bottom edges of the paper. In the process, you can slightly fasten the coils with glue, especially if the material is dense and hard. After finishing the twisting, glue the bottom edge of the roll to the circle in the center.
Of these roses, you can make a panel with flowers. If you stick flowers on a cardboard heart, you will get a beautiful “Valentine” or a postcard. Attaching roses to natural branches, you can arrange the composition in the style of "ikebana".
Origami leaves and flowers
The Japanese art of origami allows you to make volumetric crafts out of paper on a variety of topics. Flowers and leaves can be made from modules that are held together with glue. By the Women's Day or another spring holiday, you can quickly make a souvenir in the old Japanese style.
A basket of snowdrops can be presented to someone even on New Year's Eve, if you use the instructions. All you need is white and green paper, a basket and wire. Origami snowdrops need to be done step by step from the “Trefoil” modules:
- For each flower, you need to make 3 modules of white paper, as follows from the diagram (top, left).
- Lubricate with glue one of the leaves, it is shaded in the photo on the right, above. Insert a piece of paper into a pocket on another module, from the inside of the same sheet.
- Also glue and 3 trefoil, and then connect the extreme modules of the same method. There will be a hole in the center (photo above, in the lower left corner).
It remains to make the stem and leaves of snowdrops. To do this, wrap the wire with thin paper (corrugated or napkin). Leave a free end about 2 cm long. Make a thickening around it by winding a little more paper layers. Lead the free part of the wire through the hole in the flower cup, inside it arrange the ring and bring the remaining tip to the stem. Wind up a few more layers of green paper, forming the base of the flower. Glue long narrow leaves, bend the stem and make a few more snowdrops.
From the same modules, other samples of handicrafts are created in the photo below: for a water-lily, you need to assemble a base of 7 green modules, connecting them exactly as for a cup of a snowdrop. The white flower consists of 3 rows with a gradually decreasing number of modules (from 6 to 3). For petals you need to have elements inside out. The handicraft “Bouquet of Fuchsia” consists of flowers, made in the same way as snowdrops, but from 2 tiers - white and pink. Using origami modules, you can make other crafts from colored paper, connecting them in different quantities by the same principle.
Origami leaves are made in another way. How to make paper of different types of paper:
- Draw a sheet. You can do this on folded paper in half so that the halves are symmetrical. If the material is not painted, brush and gouache will come to the rescue.
- The finished scan sheet folded "accordion", having folds parallel to the bottom, the long side of the pattern.
- Squeeze the folded workpiece in the middle and bend it so that half of the long side is near. Glue these pieces together.
- Small stalk can be made of twisted paper cord or wire. At the bend of the folded sweep there remains a small hole. In it you need to thread the finished element and glue the end.
Flowers and beautiful autumn leaves can be combined in a variety of compositions. But interesting paper ideas are not limited to this.
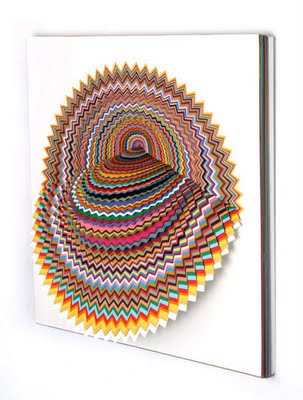
Gallery: beautiful paper crafts (25 photos)


![]()


Funny bookmarks for books
Another area of application of paperwork skills is making simple, but necessary things. These include such crafts with their own hands, like bookmarks. It’s nice to pick up a book or notebook in which funny cartoon characters, a funny monster or cute little animals will look out from the desired page.
The easiest way to make bookmarks with slotted details. For their manufacture is better to take thick paper or thin cardboard. Schemes can be enlarged and printed, or make the desired pattern by yourself. Further work is very simple: on the edge of the colored face of chanterelles, on the border with a gray stripe, you need to make a through slot. The stationery knife will help with it.

By the same principle made all the bookmarks in the photo below. For the design of the elements, you can use movable eyes and decorative wire (“brush”), appliqué and paint. Fantasy master can tell the most incredible ideas based on already presented products. Figures of birds and animals can also be used for the decoration of homemade cards, cutting holes along the contour of the branch (for owls and birds), depicting a snowdrift, because of which a fox looks, etc.
Corner bookmarks
Another option bookmarks - corner. For the manufacture of such gizmos you need to make a pattern, as in the photo. To create such a scheme, it is necessary to draw a square, and then add to it 2 more such figures on adjacent sides. Draw diagonals in the side parts.
Then you can act in different ways. Stopping at step 1 and cutting a polygon consisting of a square and 2 triangles, the master will be able to make a bookmark with a large backdrop (a toothfish or an evil bird). Continuing to draw, extending the lines formed by the hypotenuse of triangles and connecting their extreme points with a straight line, you can make a bookmark with a slightly protruding back (bunny or floral corner). In any of the options you need to roll the pattern on the sides of the triangles. Connect the triangles with glue. Between them and the back side of the tab there is a pocket into which you can insert a book page. Additional details and decor stick separately.
 Another option bookmarks - corner
 The corner can be done differently:
- From a postcard, a beautiful candy box, velvet paper cut 2 parts. It can be a heart shape or another figure.
- The sharp corner of the heart is stitched with a contrast thread.
- Decorate, if necessary, the front side of the romantic bookmark.
Those who do not use the books themselves, will be useful ideas for creating toys. Some of them the child can even do with their own hands under the guidance of their elders.
Paper Flowers (video)
Paper toys
Almost regardless of age, children love to play with models of buildings. They build houses from cubes, boxes, any available materials. Then these structures are replaced by the houses of Barbie and Ken and their many friends.
As early as the 18th century, the art of making paper and cardboard toy houses was common. These models were quite expensive and available only to rich families. Nowadays, when materials can even be stray, all parents can afford to make a paper house for a child.

To create a fabulous hut of logs will require paper tubes. They can be made by folding a thin cardboard, drawing paper or similar material according to a pattern (on a pencil). The edges need to be smeared with glue and put together. Together with the child, you can make a fairy-tale house with your child, glue shuttered windows, a roof and a door to it.
Another option crafts made of cardboard or heavy paper - models created on the development. This may be a model of the hut of Baba Yaga, your own house, a castle or some kind of fictional building. It is desirable that its walls are interconnected. The reamer should resemble a box unfolded: with only 1 seam connecting the sides. Glue the base and roof separately. Cutting a paper fence, you can fence such a house with a fence.
It is very convenient to make round towers of locks from cylindrical plugs from towels, toilet paper, cling film, etc. For them, you need to make a roof in the form of a cone, turning it from a circle notched along the radius. Having understood the principle of constructing such patterns, everyone will be able to independently create paper houses of a more complex construction.
Near the house you can always find some animals: cats, dogs, and if this is a fabulous forest hut, then a deer or even an elephant. Children love such paper figures. Older children gladly create them themselves, and younger ones need to be shown how to make the right animal out of paper:
- Draw the torso and head.
- To depict the legs or paws in the form of a symmetrical figure. This can be an arch, a corner, etc.
- Make slots on the body where the legs should be.
- Insert the details of the legs into the slots, fixing them perpendicular to the plane of the body.

To make a baby elephant, legs need to be drawn and cut along with the body. He can stand, relying on huge ears. This detail is also made symmetrical, and you can insert it into the slot on the head of the figure of an elephant.
As a basis for the figures of people and animals, you can use cardboard sleeves. After painting or pasting them with colored paper, you need to cut and attach the details of the face or face, headdress, hair, ears and horns.
The options for making various paper crafts are many. Masters with artistic flair create true masterpieces, collecting three-dimensional paintings from carved details. But even children can begin to acquire the skills of handling cardboard and paper, develop spatial imagination and perfect their taste.
Talk about secrets ...
Have you ever had joint pain? And you know firsthand what it is:
- inability to move comfortably and easily;
- pain during or after exercise;
- discomfort when climbing and descending stairs;
- inflammation in the joints, swelling;
- unpleasant crunch, clicking not at own will;
- unreasonable and unbearable aching pain in the joints ...
Please answer the question: does this suit you? Is it possible to endure such pain? How much money have you already “leaked” to ineffective treatment? It's time to end with this! Do you agree? Today we publish an exclusive interview with Professor Dikul, in which the doctor revealed the secrets of getting rid of joint pain, treatment of arthritis and arthrosis.
Attention, only TODAY!
The butterfly is a bright summer companion, a symbol of beauty and lightness. Each butterfly is unique and unique in its own way. Nature tried to mark every winged beauty with bright colors and patterns. These beautiful insects are an ornament of flower lawns, and in today's lesson we will try to decorate the room with a butterfly, which we will make with our own hands from paper. Making paper crafts contributes to the development of a child's attentiveness, accuracy, perseverance and imagination. And what a surprise the baby will experience as he watches an ordinary leaf turn into an amazing creature!
In order to make a paper butterfly, we will need:
- Paper;
- Scissors;
- Paints;
- Fantasy and great mood.
For crafts, an ordinary album leaflet will fit, but first you need to make it square. To do this, we fold the upper left corner diagonally; we cut off the section of paper that has been bent with scissors. We have a square with one fold on the diagonal. It is necessary to make another diagonal fold on the other side. To do this, bend the upper right and lower left corners.
At the resulting triangle we bend upwards the lower ends. Then turn the figure wide side up and turn down the tip of the triangle, so that its tip extends slightly beyond the edges.
The protruding tip is wrapped. Future butterfly fold a little in half.
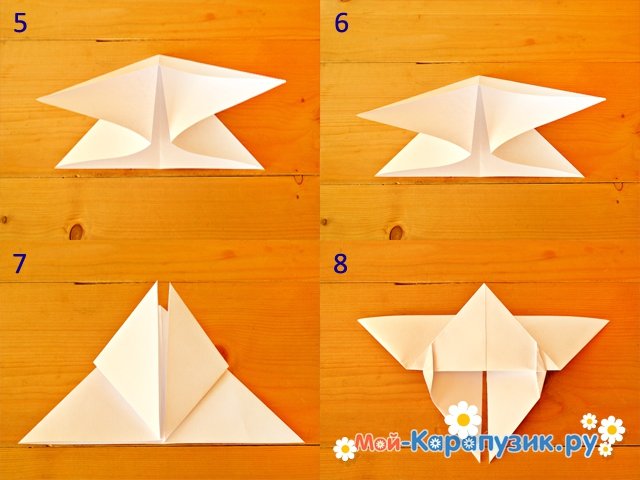
The butterfly figurine is ready, but so far we have it white and inconspicuous. Therefore, now the turn of the baby has come to show imagination and decorate a butterfly to your taste. This can be done with watercolor paint or marker pens. Drawing can be the most unimaginable: from colors, as in our example, to complex geometric patterns, the main thing is that the child enjoys the creative process. If you wish, you can make a few more butterflies, allowing the child to make handicrafts without your help.


Colored paper boat
Of course, each of us loves when he gets something. And especially, it is made by hand. And you do it just for yourself, for the soul, without even thinking about a particular benefit. Although it will still be. Crafts is a great way to show yourself that this is an interesting thing and brings many benefits. Especially when there is no cost and it turns out to make something beautiful out of scrap materials. And for kids it is a great joy to make yourself a bauble, even if it is not interesting for an adult, but to do it. And the task of each parent is to support his child, to praise for the fact that he himself was able to create. And also to help, to prompt and not to scold at all if the conceived does not work. Doing crafts, the child tries to know the world himself, with the help of his imagination. He remembers everything he has ever seen and tries to display it in his products. For lovers of marine subjects, we have prepared a lesson on crafts of a simple boat. Feel like a real captain of the most beautiful ship, and even made with soul and love. All we need is:
- empty matchboxes;
- colored cardboard and colored paper;
- scissors;
- glue;
- tubule.
Take the matchboxes and fold them so that the two are next to each other, and the third is on top of them. In order to give the ship the desired look and advertising inscriptions of the boxes, we did not spoil the future product, paste the craft with monochromatic paper, as shown in the picture.

Now we will do a stern of our ship. Cut out the base for crafts from cardboard, and make a bow of our ship out of two stripes. Now use the tube to build the sails. Take a rectangular piece of cardboard and fasten it on the tube as shown below. You can complete the image with small red flags at the end of the tube.

It remains to decorate the crafts from the side, that would not be visible matchboxes. If you have small Lego toys, then they can take their place on our beautiful deck with dignity.

Our boat is ready, you can safely go!
Russian paper oven
The stove was the main attribute in the house: it heated the house, they cooked food in it, it was given a special place. Therefore, the stove is always associated with satiety, warmth and comfort. In many Russian fairy tales we find the Russian stove. Recall Emel, the fairy tale "Geese-Swans," Baba Yaga. There is a stove in the old proverbs and sayings. And if the child was asked to make a craft - the Russian stove, then this is not a problem at all. A real brick stove is being built, and we are proposing to create it from cardboard. With such a child can easily cope. A small Russian paper oven is very realistic.
To make it work, you need to take:
- small packaging left over from toothpaste;
- colored paper (white, orange and black);
- some cotton wool;
- black marker;
- scissors;
- glue.
1. To begin, cut the packaging from toothpaste into two halves, one will be made bigger, the other smaller.
2. The one that is larger will stand vertically, the smaller half will be applied to the larger horizontally.
3. Fasten the construction with glue.
4. After a little dry, paste over with white paper, imitating whitewash.

5. Cooking a pipe on the stove, for this we cut a strip of cardboard, bend it so that we get a small pipe, glue it onto the base.
6. It is necessary to cut a small rectangular sheet of white paper. From the black paper to prepare the firebox, the orange bar will frame the firebox.
7. Carefully sticking it all on a white sheet. We are waiting for the glue to dry.
8. Glue to the oven at the appropriate place. Now we have a stove with a furnace!
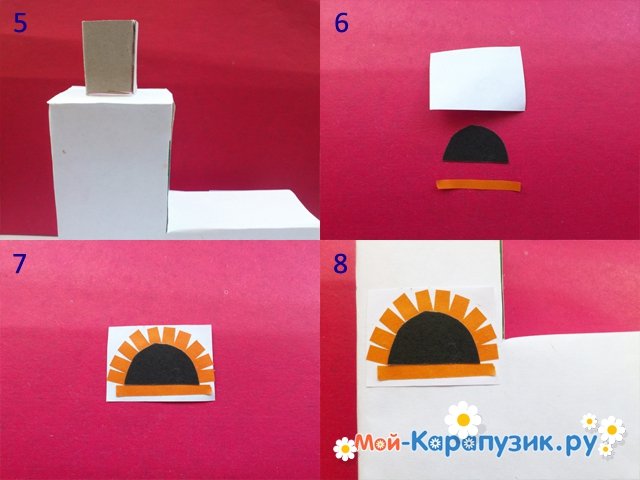
9. Pipe must be pasted with orange paper.
10. For naturalness, we draw small bricks on the pipe with a black marker and insert a small piece of cotton into the pipe, smooth it out, depicting smoke. For strength, so as not to fall out, it is better to glue the cotton wool on the inside of the pipe.

Such a Russian paper oven turned out! Already I want to warm on her side and remember the childhood, the village, the grandmother. Plus, the furnace of paper - it is small, light and does not take half a house, but gives a touch of comfort and warmth.
Chicken from a disk and paper
How nice to receive gifts made by our loved ones and relatives. Especially to make them yourself, including imagination and creativity. The hands, from improvised means, we can prepare a lot of the most various hand-made articles and toys. This is a very exciting experience. And if you make crafts with your family members or friends, you can get a lot of pleasure from communication and the result of working together. Today we will try to make a chicken from a disk and colored cardboard. It will not be voluminous, but because it can be hung above the table or even on the Christmas tree in New Year. Let's start!
For our toys we will need:
1. Old music or video disc,
- colored cardboard, we will need four colors - blue, white, yellow, red;
- scissors;
- pencil;
- glue;
- a small hank of yellow or beige wool thread.
2. First, where to start - we will cut fine threads, and more. They will replace us feathers chick.
3. Then, we place the disc well with glue and sprinkle it thickly with threads. After the disc dries, shake it to remove residual wool.
4. We cut out oval eyes from cardboard paper - they will be white and blue. Klyuvik and legs - let them be red. And the wings will make yellow. Oh, and do not forget the scallop. Our chick, though small, already has a scallop. Each step can be seen in the photo.

The work is done, our chicken is ready. You can hang it on a string, as we said earlier. Ask dad to make a hole in the disc, pull the thread and that's it. The craft turned out unusual, joyful. It looks like a chick flies up, wants to see, and what's happening above! Or maybe he wants to see - where are his friends?

Like this crafts, we can make a mom-hen or dad-rooster. And if you fantasize, then a bunny, and a pig, and a hedgehog, and a little bear, and other cartoon characters, for example. Moreover, we have spent not a lot of time and money on this activity. It remains only to find her place. Or maybe we will give our chick to someone?
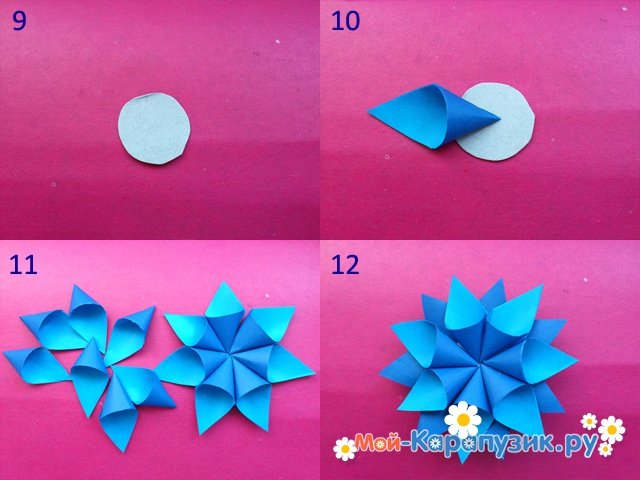
Paper ball
The creative process of creating various handicrafts, paper designs will entice both the adult and the child. After reading the following instructions, anyone can assemble a figure in the form of a beautiful colored paper ball.

Colored paper (two colors that can contrast with each other, but without disturbing the harmonious combination, for example, blue and violet).
Quantity: for each of the eight modules (circles) that make up the final shape, you need five parts (if the ball is planned to be made not large, you can cut out 2-3 such parts from one sheet of colored paper about the size of A4).
- 24 blue details and 16 details - purple or equally - twenty details of each color;
- Pencil;
- Ruler (in order to draw the sides of the template from cardboard);
- Pieces of cardboard (its size will depend on how big the shape of the wonderful paper ball is;
- Beautiful rope (not thick - with its help, the finished volumetric figure can be attached to almost any place in the interior for its decoration);
- Scissors (preferably with sharp tips, especially if the figure is small, otherwise it will be difficult to cut).
At the first stage of the creative process, you need to draw a sketch on the cardboard with a pencil, according to which all the details for the ball shape will be cut out soon. It should be noted that the side parts of the depicted figure must be straight (use a ruler for accuracy), and the top and bottom are also completely identical.
Both parts of the patterned figure look like a cook's cap or a cake with cream, but the main thing is that the edges of the upper and lower parts, respectively, should form comfortable “ears” for subsequent coupling into a three-dimensional shape. After completing the sketch, the pencil can be put aside, now it is time to carefully cut the figure-template out of cardboard along the contour.
It is necessary to take colored paper and draw (as close as possible to each other to save) the necessary number of figures and cut.

Next, you need to link the cut-out figures so that they alternate in colors, with each successive figure turning about ninety degrees from the previous one, so that with its narrow side it can be inserted into the grooves of the long side of the previous part. Thus it is necessary to concatenate in one circle five such parts.


If two purple and three blue parts were used to construct the circle, now, you need to link two purple parts to each other (provided that the order of precedence has been observed).
All modules are connected so that in each recess there are five "rounding", that is, the junctions of parts.


Greeting card for mom
The most memorable and expensive gift is a hand-made gift. The original postcard will be an excellent gift for your mother, grandmother or sister, because besides a postcard made with your own hands, you give a part of your soul, according to the belief of many nations, we put a piece of our soul into every thing created by us. And this is the most valuable!
And so we begin, for the postcard we need the following materials:
- Glue, preferably paper;
- Color paper;
- Scissors;
- Marker;
- Unnecessary magazines with beautiful pictures.
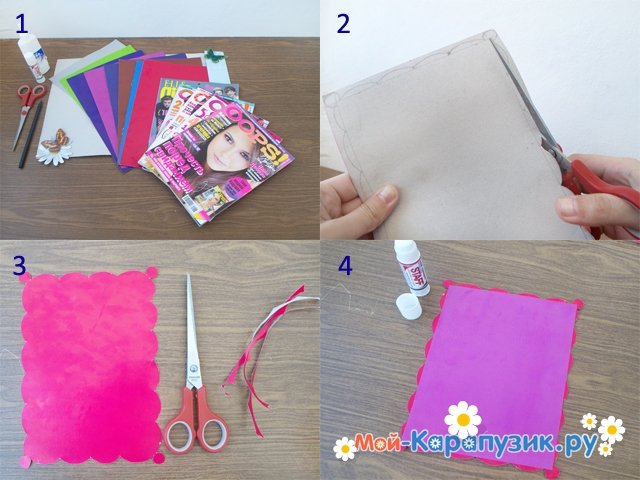
We make a postcard from cardboard, draw a pattern in the form of semicircles along the edges of our postcard. You can come up with another ornament, show your imagination.
Carefully along the lines we cut out our blank.
On our blank, glue a sheet of colored paper, distribute the glue gently so that the colored paper is well glued to the cardboard.

It is necessary to make blanks of daisies. Cut out two small circles from white cardboard - these will be the petals of our future chamomile, and from yellow cardboard it is necessary to cut two circles of smaller diameter for the middle of our flower.
We collect our daisies, we glue a little yellow center piece of chamomile to our white petals. Thus we collect four flowers.
Now for our daisies, you need to make stalks. We will do them as follows. On a sheet of cardboard, green, draw at a distance of 2-4 centimeters line, we have three daisies, so we need to draw three lines.
Exactly along the contour cut our stripes. The stalks for our daisies are ready.
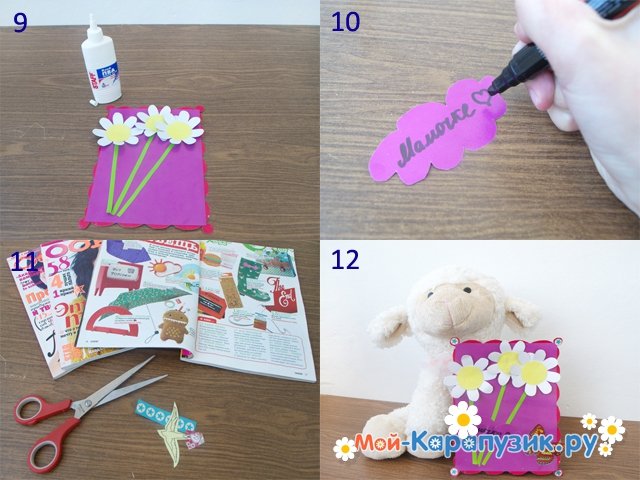
Now begins the most interesting, assembly and design cards. To our cardboard blank, we glue the daisies and stalks we made earlier; we place the flowers slightly tilted so that they fit together on our postcard.
We cut out beautiful pictures from old magazines to decorate a gift. At the corners of the postcard we paste the ornament found in the magazine. And on the right edge we will plant a beautiful butterfly.
Now the most crucial moment, we make an inscription with wishes for native person. Cut out a cloud-shaped blank from pink colored paper. On it we make the inscription "Mom" and glue on our card.
The original card is ready, it remains only to give it.
Paper pencil in the technique of origami
Origami is a fascinating technique that may interest all family members. It's amazing how from one flat sheet of paper at the next fold, without glue, scissors, or something else, a familiar object suddenly appears.
You will need a little perseverance and accuracy, and you will definitely be able to create voluminous crafts from paper. It is very easy and quick to do it yourself, for example, a pencil from paper.
Necessary materials:
- Color double-sided square sheet
We used yellow and green to make it clear that this is a pencil. And you, too, can make the first option so as not to get confused in the description, and then, when you learn to do it, you can use any colors. Or use one-sided color paper, then the pencil shirt and slate will be colored, and the stem will be in contrasting white.
Put the leaf on the table with the yellow side up. We apply the right corners of the sheet to the left, and after making sure that the line is smooth, we make a fold. Without changing the position of the sheet, unbend it again with the yellow side up.
In the same way, carefully apply the two upper corners to the lower corners and fold the sheet in half, carefully forming the fold line.
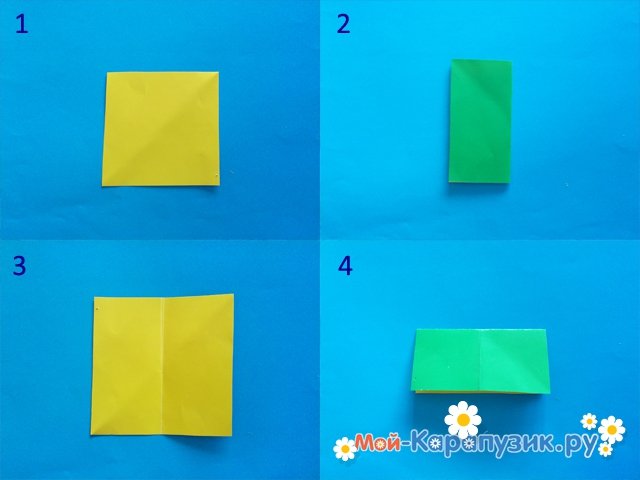
Again, unfold the leaf with the yellow side up. Now our square is divided into four equal squares by perpendicular fold lines.
Again, take the square at the top corners and bend in half our upper small squares. We pull the upper corners to the central fold band on the square. Again, straighten the full square with the yellow side up. And again we bend the upper corners so that the green color does not reach even the uppermost bend band. We get a yellow square with a thin green stripe on top, as in the figure below.

Now pay attention to one fold, which runs vertically in the center of the leaf. Take the sheet for the squares on the left and bend to this center. We repeat these actions with the right angles. Now we face a green rectangle with two horizontal fold lines.
We take the upper inner corners (which are at the vertical fold) and bend them to the edges. There should be pieces of yellow with green stripes on the edges. As shown in the figure below, we fold these strips to the sides as far as the paper permits.
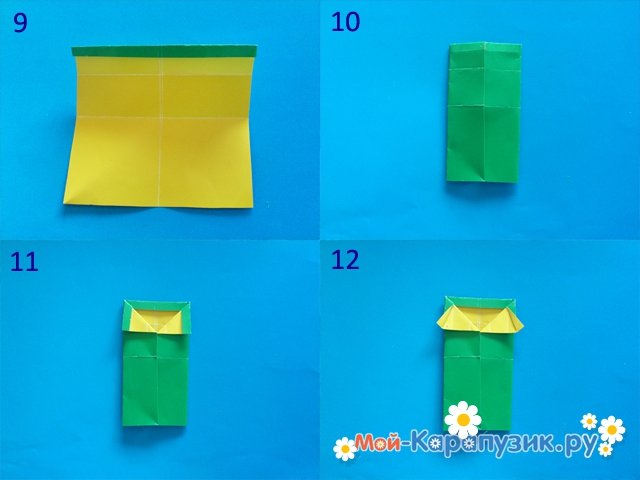
Now we bend alternately the right and left upper squares diagonally back. The pencil is ready.
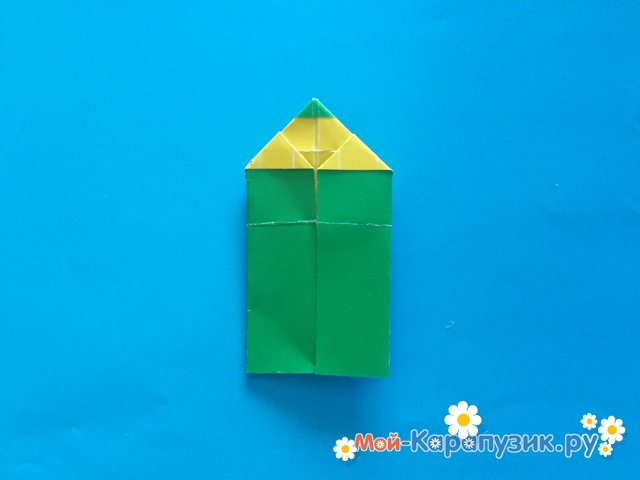
So pencils can find many different applications: use as a bookmark, as an element of decor when designing a school office, as a children's toy, etc.
Paper Fir Tree
The main attribute of the New Year is the Christmas tree. To dress up an artificial or living forest beauty everyone decides for himself. But besides the main Christmas tree, you can make several small ones yourself. You can decorate the rooms with such hand-made items or present them as a small souvenir that will surely lift the festive mood.
Necessary inventory:
- color paper;
- glue;
- wire;
- stand;
- pencil;
- ruler;
- scissors;
- compass;
- beads for decoration.
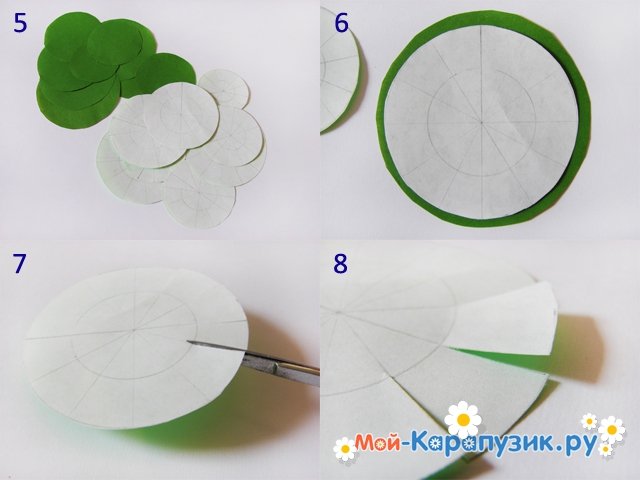
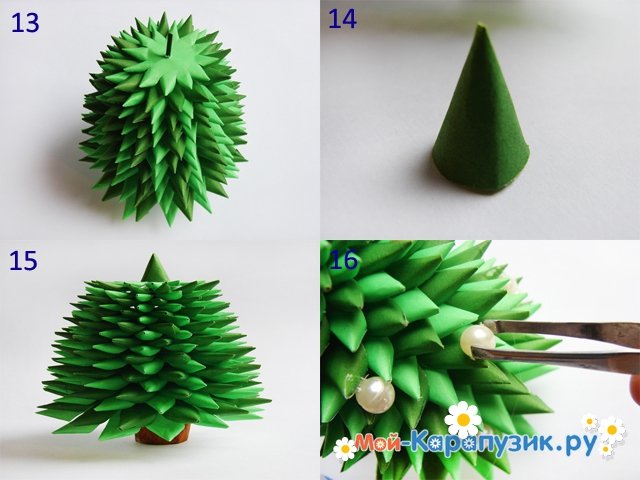
Twist one end of the wire into a spiral and glue it to a small, stable deck.
Using a compass, draw circles on the back of colored paper. The diameter of the largest should be 20 cm, and the smallest - 6 cm. Reduce the size of the circles in 2 cm increments. In total, you should get 16 circles, plus one circle, whose diameter will be 5 cm. It will be needed to make the tip in the form of a cone .
Each of the blanks must be divided into segments. And inside to draw a circle, the diameter of which will be on average equal to the radius of the workpiece. The centers of the circles must match. Use scissors to make notches reaching the beginning of the inner circle.
Grasp the edges of the segment and fold it with a straw, while securing the ends with glue. Hold each sector with your fingers until the glue grabs. We do the same with each section. In the center of each blank, make a hole for stringing on the metal frame. Collect the Christmas tree, ranging from larger to smaller diameter.

Cut a segment from the remaining circle and fold it into a cone, securing the edges with glue. Set the cone on top of the Christmas tree. Now it was the turn of the most creative part of the process - the decoration of the Christmas tree. Children like this procedure very much, so you can safely attract children to this activity.
As a decor, use bright beads, beads, tinsel, rhinestones and other colorful elements. You can fix them with glue, silicone glue is the right way for this procedure, it sets as quickly as possible and has a transparent texture, which makes it completely invisible.

Paper Christmas Garland
The New Year is a bright and long-awaited holiday for all children and for many adults. The smell of needles, soaring in the room, gifts under the fir and decorated house. A large number of people buy new Year decoration, because it is faster and easier, but you can show creativity and decorate the house with your own hands. For example, make a Christmas garland of paper. Many people remember the garlands and flags from childhood, they are light, comfortable, they are not difficult to make themselves and convenient to store after the holidays. A fun colorful garland will help decorate a simple gloomy wall, a long curtain and a regular chandelier.
1. What we need for a garland of paper:
- color paper;
- scissors;
- compass;
- glue;
- rope.
2. On the back of the colored paper with compasses draw neat circles of different sizes. Some circles will be bigger, others smaller.
3. Using scissors, cut out the resulting colored circles.
4. Combine several circles of the same shape, but in different colors. They need to lay out on each other and bend in the middle. It turns out one big and tight circle.

5. Now prepare the circle of the largest form.
6. Carefully make three small holes in it with scissors. Make sure that the rounders do not move.
7. Pass the rope through the holes.
8. We have a garland base ready.
![]()
10. On the rope strung circles in descending order from larger to smaller.
11. Fill the garland so that you can see all the colors of the paper and it seemed more voluminous.
12. Stretch the balls on the rope evenly, at the same distance from each other.

13. Also, the garland can be decorated with paints - to put bright dots in the form of multicolored scattered confetti. It is better to do this on large circles, since it may not be noticeable on small ones.
14. We ended up with a fun, fluffy and colorful garland. Now you can hang it on the wall at home and admire it all the New Year holidays!

Volume paper snowflake
Outside the window is the winter magician, the New Year is approaching, the most favorite holiday of children. All, especially children, live in anticipation of a miracle, and in your power to give it to them. It's simple - you need to pay more attention to them, spend time together, do pre-holiday troubles together. Children will enjoy working with their parents on festive New Year's décor, one of the integral elements of which is snowflakes. Everyone can cut them, but for children who are sure to want to participate, it will be more interesting to make volumetric snowflakes that can decorate a Christmas tree, you can make them mobile by adding different figures (Christmas trees, balls, angels, etc.) or put them into a garland. The craft is simple in execution, it is quite able to make a child of 4-5 years.
For work you will need: a sheet of double-sided blue paper (there can be any shade), a ruler, scissors, glue. Color paper needs to be cut in half. Then each half needs to be folded with an accordion: we put a ruler on the edge of the sheet and make a fold - this is the first strip, the rest are equal on it (it should be an accordion of 7 strips 3 cm wide). Cut the accordions and get 14 strips. From each strip we form a "needle": as shown in the photo.

The protruding ends of the strips are cut off. Get a cone with a sharp protrusion. For the base cut a circle of paper with a diameter of 3 cm.

Glue "needles" on the base with a cone to the center, as shown in the photo. First, on the one hand, then, when the glue dries - on the other, making sure that the "needles" are placed in a checkerboard pattern. It should make a snowflake with a diameter of about fourteen centimeters.
Unleash your imagination: you can use white paper or paper of two different colors, you can additionally decorate a snowflake with sparkles, sequins, etc. If you want a bigger snowflake, take two album sheets, having doubled the width of the strips.
Make New Year's crafts with children, give them and yourself the joy of communication, and then for you and for them this New Year will be truly unforgettable.
Paper crown
The carnival costume of a little prince or a capricious princess is unthinkable without an elegant shiny crown. A headdress suitable for a young crowned lady can be bought at a toy store, but if there is an evening in the courtyard, and the crown is needed for the matinee tomorrow, then there is nothing else to do but build it yourself.
To make such a self-made attribute of royal power, you will need:
- a roll of dense food foil;
- sheet of thin and thick white cardboard;
- glue thermogun;
- scissors;
- several packs of glue rhinestones of different colors;
- half a meter of narrow metallic silver tape;
- half a meter of white linen go hat hat;
- ruler and simple pencil.
Crown making
1. On a piece of cardboard, draw a rectangle 25x12 cm and a line parallel to the long edges, divide it into two strips, measuring 25x7 and 25x5 cm.
2. Divide the narrow strip into five squares with 5 centimeter sides and enter into the squares isosceles triangles with a height and base equal to 5 centimeters. It will be the teeth of the crown.
3. To one of the side, short sides of the larger band, draw a fastening tongue 1.5 cm wide.
4. Cut out the cardboard crown blank and wrap it with foil.
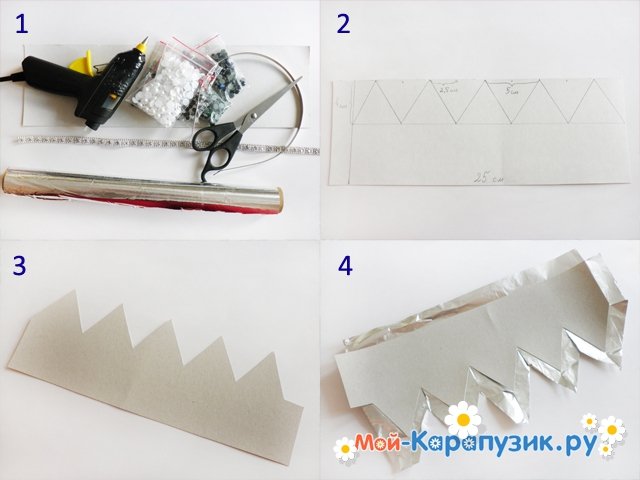
5. To do this, first with allowances of 1-1.5 cm, cut the "metal" lining of the outer part of the royal headdress, attach it to the cardboard and fold the excess foil on the wrong side of the crown.
6. Then cut the lining of the inner side (its dimensions should be slightly smaller than the dimensions of the cardboard base).
7. Put the back foil lining on the glue and close the crown into the ring.

8. Stepping back from the lower edge of the crown 1 cm, glue on it a edging of silver braid and decorate it with crystal crystals.
9. Decorate each tooth of the crown with a “flower”, assembled from multi-colored rhinestones and “pearl” semi-beads.
10. Make (glue, or even better, sew) a rubber band of such a size so that it is quite tight, but not tight, worn on the head of the child (in the position through the crown and under the chin).
11. Glue the crown to the rubber ring and try on a ready-made garment over the head of “their highness”.

If you find an error, please highlight a piece of text and click Ctrl + Enter.
One of the most common materials for children's creativity is paper. Paper craft for children is one of the entertaining activities for both children and parents. Co-creation unites and develops creative abilities.
Paper handling:
- develops fine motor skills in children;
- promotes concentration of attention;
- develops imagination;
- forms the artistic taste;
- develops the eye;
- stimulates the development of memory;
- activates thought processes;
- develops patience;
- contributes to the creation of game situations.
There are all sorts of paper handling techniques:
- Application It can be broken or cut, flat or bulk, from paper or napkins.
- Quilling is a type of application. Drawing is applied on a basis from dense paper. The image is filled with elements from specially rolled up narrow strips of paper.
- Mosaic (from French: folded out of pieces) - application made of geometric shapes.
- Paper plastic is an art modeling from paper.
Handicrafts made from paper for preschool children
From the early age children like to perform dIY crafts especially paper.
Butterflies
Butterfly 1
To cope with such work and two year old child . Of course, you can't do without your help. Fold a sheet of white paper in half and draw a half butterfly. The shape and size of the wings, you can choose any. It is desirable to make a big butterfly.
Then the butterfly need cut and expand. Give your child paint for drawing with your fingers and let him decorate one side of the butterfly. Until the paint is dry, fold the butterfly so that the unpainted part lies on the painted one. Press and unfold the butterfly, let it dry.
Such a paper masterpiece can decorate your kid's room.
Butterfly 2
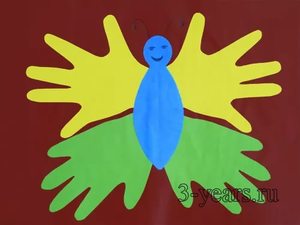 You can make a butterfly out of baby pen prints. Such an article can be made with a child of 3–6 years old. This will require the following materials:
- sheets of colored paper;
- a sheet of white cardboard;
- scissors;
- glue;
- marker, felt-tip pens, glitters, stickers and other elements for butterfly decoration.
On a colored piece of paper, use a simple pencil to circle the outlines of the right and then the left palm of the baby. Cut out the resulting patterns twice. It will turn out four wings palms of different colors.
Stick the cut wings on a white sheet of cardboard. On colored paper, draw an oval for the butterfly body. Let the child gently cut it with scissors and glue it to the junction of the wings. Butterfly eyes can be made in a different way: draw with a felt-tip pen or stick two small white circles in the center of which with a marker to put dots. You can also stick the finished eyes. Draw the antennae and mouth.
Suggest the child to decorate the wings of a butterfly. Let the baby show imagination. For decoration you can use glitter, stickers, or just paint with markers.
Mom will keep this paper butterfly with the palms of her beloved child.
Butterfly 3
To make this beautiful paper, airy butterfly with your own hands you need the following materials:
- paper (thin or napkin, plain color or for origami, you can use sheets of glossy magazine);
- wire or thread;
- scissors;
- glitters or other materials for decoration.
 Draw on paper two squares 10x10 cm and 8x8 cm. In the future, you can make any sizes of squares. To make the butterfly look beautiful, make a square for the upper wings 2–3 cm more than a square for lower wings.
Have your child cut these squares.
One square you fold diagonally “accordion”, and with the second let the child do it. The width of the folds you can choose any, the already folds, the more magnificent the butterfly will turn out.
Press the pieces of the pieces of wings to each other and fasten them by tying them thread or wire.
The belly, head and antennae can be made of paper, wire or beads. With scissors you can round off the wings. The resulting butterfly is an elegant hack that can decorate a baby’s room. It will look even more impressive if it is decorated with glitter or other decorative materials.
Mosaic appliqué
 This type of craft will be interesting for children of any age, although a three-year-old child will cope with this work. To create a mosaic application, you will need the following materials:
- rectangular sheet of white cardboard;
- color paper;
- scissors;
- simple pencil;
On a white sheet of cardboard, draw in a simple pencil the outlines of a small fish, a mushroom, a sun, or another simple object that would have enough space inside for gluing. mosaic elements.
From colored paper, cut strips approximately 2 cm wide. Then, from these strips, invite the child to cut small squares, triangles or other geometric figures. With the resulting mosaic elements let the child stick the inner space of the drawn figure. At the same time, paper mosaic elements should be glued close to each other. This crafts can be an original gift to your mother or grandmother.
Volume application ladybug
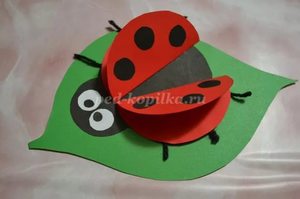 Such a craft can be made by a child of 4–5 years old. The main thing is to tell the child the sequence of actions correctly. It is even better if together with him you will do this craft, showing you how to perform each action correctly.
First, prepare circle templates with diameters of 10 cm, 5 cm and 1 cm, colored paper, white sheet of cardboard and glue.
Let the child draw two large circles on a red sheet using the template. On a black sheet of paper will circle one large circle, one smaller and 6 small circles.
With your own hands using scissors let him cut out all the drawn circles.
Now in the middle of the white cardboard will paste a large black circle - the body. The circle, which is smaller, you need to stick so that he went a little on the big one. It will be a head.
Now let him decorate the wings with black small circles, gluing them with glue.
Having learned how to make such a craft, a child can diversify his work by sitting ladybug on a leaf or flower.
Handicrafts made from paper for children of primary school age
Nose bookmarks

This craft is very easy. The preschooler will cope with it, but it will be especially pleasant for a first grader to make such a bookmark for his first textbooks.
This will require the following materials:
- colored cardboard;
- scissors;
- ruler;
- blue (fluffy) wire;
- glue;
- eyes.
Cut a rectangle of 6x12 cm from a sheet of colored cardboard.
Depart from the sides of one and a half centimeters and draw two parallel lengths of 8 cm. Make scissors along the outlined lines.
Medium strip will serve as nose. Draw a rounding on it below with a simple pencil and cut it out using scissors.
Now glue the eyes (if not ready, you can draw them).
At the top of the head hole punch, make one or two holes. Pass the blue wire through them and give it the shape of horns or antennae.
Having shown imagination, the child will be able to make bookmarks of various shapes and sizes with his own hands, as well as decorate them at his discretion. The main thing should remain unchanged - this is a long nose at the bookmark.

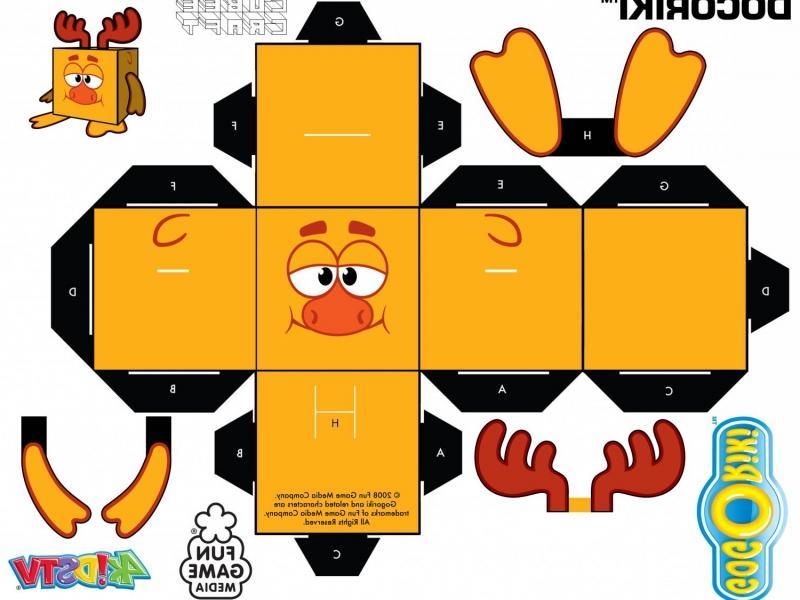
Special enthusiasm among younger schoolchildren is caused by voluminous toys made of paper. Make them easy. Need to print templates, cut them and glue. Kids like it a lot. And then they enjoy playing with their own toys.
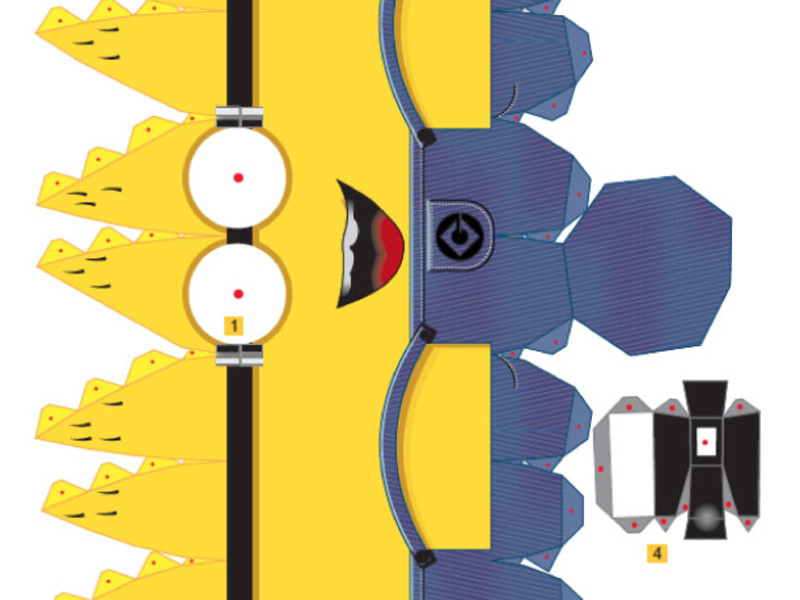
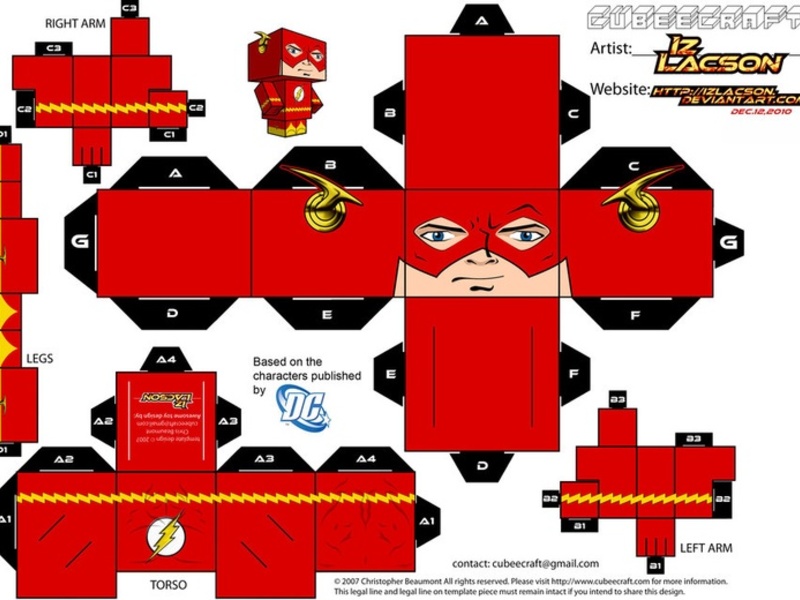
Here are some schemes of the heroes of favorite cartoons in the style of papercraft.
Papercraft style schemes


Paper crafts for children of secondary school age
For children of secondary school age, it will be interesting to do with your own hands a puppet toy. To make one toy you need:
- roll of toilet paper;
- rope or twine;
- two caps from a plastic bottle;
- awl;
- scissors;
- glue;
- wand (control bar);
- acrylic paint;
- fishing line.
To make this craft you need:
- Orange paint paint covers and a roll of toilet paper.
- For arms and legs, make an awl with four holes on the sides of the roll.
- In the center of each cap make an awl hole.
Cut two small ropes of the same length. At the end of each of them tie a knot. From the inside of the roll, thread the loose ends of the strings through the hand hole and tie knots at the ends. Handles are ready.
Similarly, make legs. Only the strings need to be cut longer and the ends to be threaded into the hole of the lids, fixing them in a knot.
On a piece of paper you need to draw the head and tail of a fox. If you can not draw, you can use the template, paint them with colors and cut. After that, glue them to the roll-torso.
Now it is necessary to tie it to the legs and head (roll) along the fishing line and fix them on the control bar.
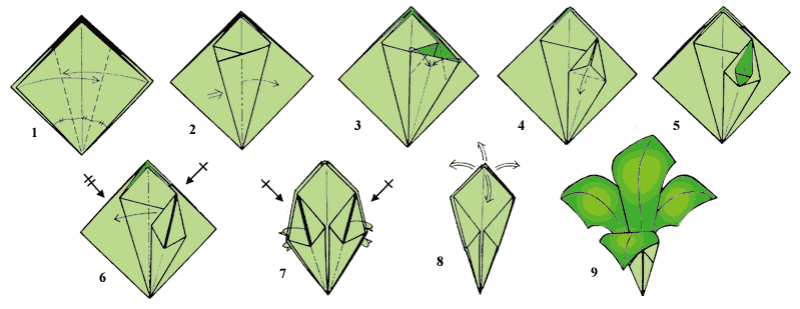
Origami lotus
 Children can give this simple and original craftwork with their own hands to their mother or grandmother.
For making the lotus, you need origami paper in green, white and yellow. Scissors and durable thread or wire.
Cut out 5 rectangles of 7.5x15 cm in green and 10 of the same rectangles in white, as well as 3 rectangles of 4x10 cm in size in yellow.
Let us analyze how to gradually collect the lotus flower - this wonderful paper craft.
Fold the green rectangle in half on the long side. Extend the paper and fold the triangles toward the center with one side and the other.
Alternately, both long sides bend to the center.
Do so 5 green blanks.
Now fold the white rectangle on the long side in half. Turn it upside down and bend the triangles as they were folded in a green rectangle.
Long sides bend to the center, then bend in half. It should be a boat.
All actions are repeated with the remaining white leaves.
Fold the yellow rectangle in half lengthwise and across again.
Scissors cut into narrow strips, but not until the end, so that you get a fringe. These will be stamens. There will be three such blanks.
Now you can collect the flower. Green billet folds in half and alternately we put on it two white billet. From above we fasten a yellow stamen. Repeat these steps two more times. As a result, you get three sets, each of which consists of a green, two white blanks and stamens.
Assemble the two remaining sets according to the same scheme, but without stamens. Now collect the blanks. Take the set with the stamens first, then without the yellow stamens, again with the stamens. Put the resulting sets on each other, alternating the sets with and without the stamens. First take a set with yellow stamens. All these blanks in the middle are tied with wire or wire. Now straighten the workpiece.
Start collecting flowers with stamens. In those petals where there are stamens, we bend them so that the "tails" look up. Now lift up and straighten the white petals through one. Get the first row of petals. Collect the second row. The remaining petals also lift up through one. Do the third row similarly to the first and second.
Lift up the last row of petals. And finally flatten the green leaves. Here is your original lotus.
Show the children how to make a fan, a rose made of paper. Make a sakura branch along with them from the same material and place them in a paper vase.
Rose paper with their own hands - 2 options for performance
This flower is able to quickly transform the room, decorate the banquet table. You can twist a few roses and make an artificial garden out of them.
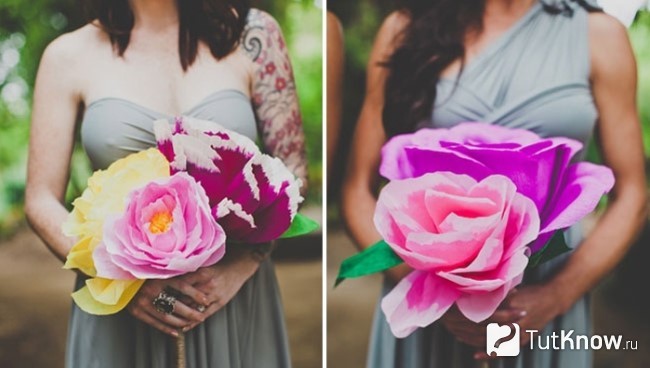
Show your child how to make roses with your own hands, using one of the easiest ways. For such crafts will need only 4 things:
- color paper;
- pencil;
- scissors;
- office glue.

Such a wonderful rose made of paper with your own hands or with the palms of your baby will work.

Wonderful artificial plants are also made from soft tissue paper. Here's how to make corrugated roses.
Before you start creating, prepare:
- green and red corrugated paper;
- electrical tape or glue;
- wire;
- wooden stick.
To facilitate the work on making the petals, fold the paper several times in a stack. Then you will immediately make several elements, and you will not cut one petal one by one.
Draw a heart on the top sheet of the pile, cut the petals along this contour. They need to add volume, for this it is necessary to put the thumbs of both hands on the right and left side of the petal, to press. Now, each piece must wrap the left and right edge. To do this, bring the part to the stick, twist one and the second upper edge of the petal back with the help of this simple device.
Wrap the stem with a strip of green corrugated paper, sticking it at the same time. Cut out a pair of blanks for leaves from the same paper. Place 1 sheet face down on a table, grease the inside out with glue, place the wire here, and on top - another sheet blank face up.
Here's how to make a rose of corrugated paper further. Take the stem, grease its top with glue, tightly wrap the first petal on its top. Grease the lower part of this petal with a small amount of glue, wind the second petal. Thus decorate the entire flower, pasting the petals.
Cut a strip of green corrugated paper; with a scissors, make one of its long sides zigzag. Scroll this element on the lower part of the flower, placing its teeth on the bud.
Master fan with their own hands
It can also be made from paper. Such a device is useful when it is hot and you can make such a useful thing in literally 10 minutes.
If the child is small, then show him a simple version of the manufacture. For this he will need:
- color paper;
- figured punches;
- satin ribbon;
- glue.

Here's how to make a fan out of paper to the kid. An older child can use a more complex option. Here are some materials needed for needlework:
- a4 paper;
- scotch;
- wooden sticks;
- beads;
- elastic.
To make a fan handle, for which it will be held, screw the tape up to a width of 2.5 cm. Also, use this adhesive tape to attach wooden sticks to the right bottom side of the product. So that the fan can be folded, cut a strip of the desired length from the elastic, stretch the beads on it, tie into two knots. Put the elastic on the bottom of the two wooden sticks.

Here's how to make a fan out of paper in the Japanese style.

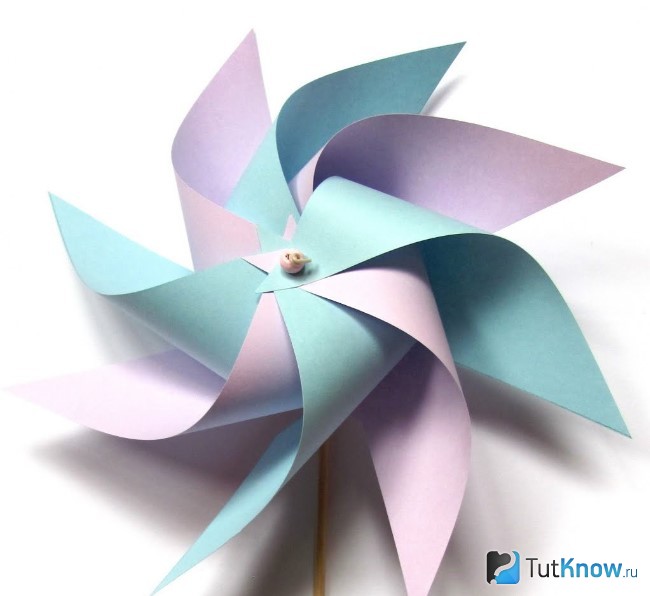
How to make a turntable?
It is also made from very affordable material. If you show your child how to make a turntable, he will be happy to do interesting needlework.
See how many different options such vetoduev can be.

The child will love to play with the turntables, and you can place them in the country, thus decorating the country plot.
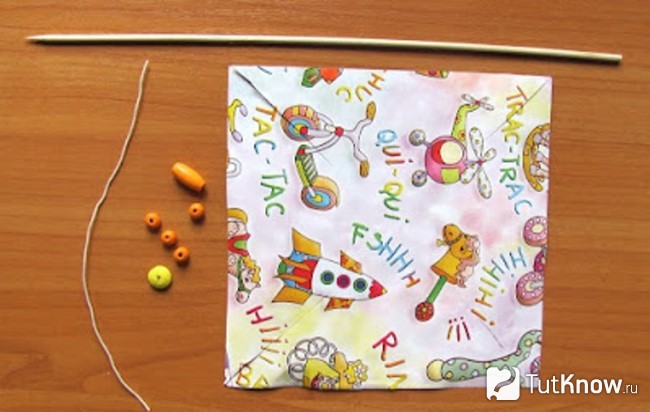
For manufacturing is taken:
- a sheet of double-sided paper or two-sided, size 14x14 cm;
- bamboo skewer;
- beads;
- awl;
- wire;
- ruler and pencil;
- cocktail tubes.
If you have two sheets of one-sided colored paper, glue them together with the wrong sides. Better understand the principle of creating products will help you scheme.
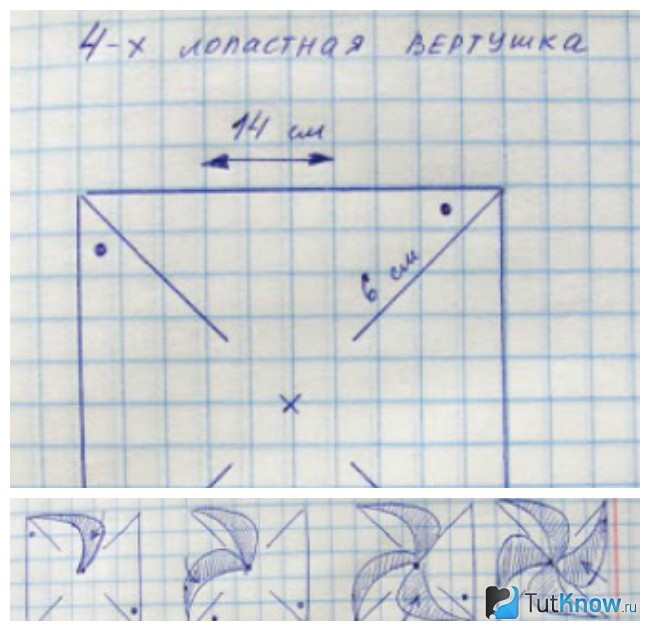
Let the child draw a square sheet of paper diagonally with a ruler and pencil. Then, not reaching the center of 6 cm, cut along these lines.

The next stage of work take over. Sew a hole in the center, as well as at the top, through the corner. The diagram shows exactly which areas need to be processed in this way.

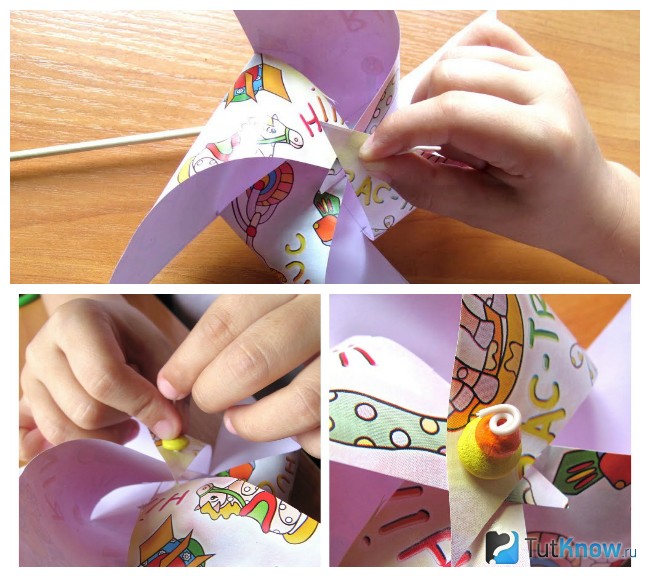
Now again, the child can take up the job, to whom you will explain how to make the turntable further. Let the wire be wound on a stick, stringing a bead on it, which is used as a stop.
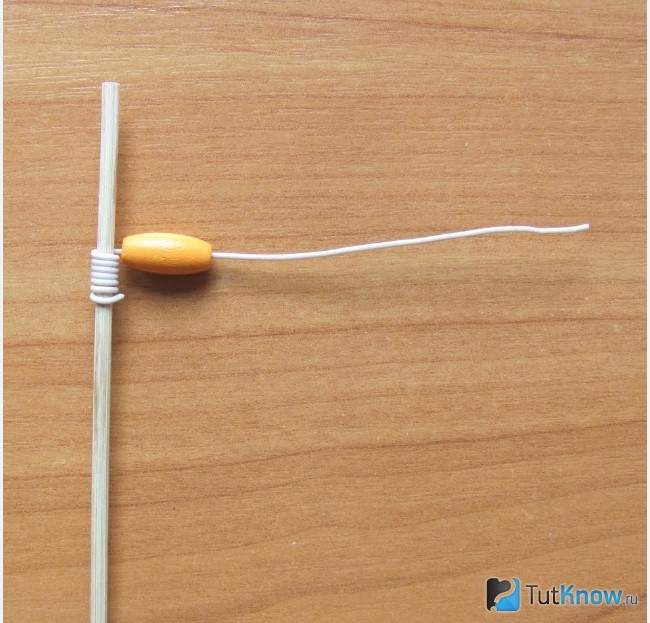
After that, the wire must be threaded into the central hole of the paper square, on the other hand, also secured with beads.

It remains to take turns to put the edges of the paper square on the tip of the wire and fix the blades with beads. Make sure that they do not overtighten the main element, and it rotates well.
If a child easily mastered this technique and wants to know how to make an eight-blade turntable, tell me that it is made using two four-blade, but the grooves are made in a slightly different way.
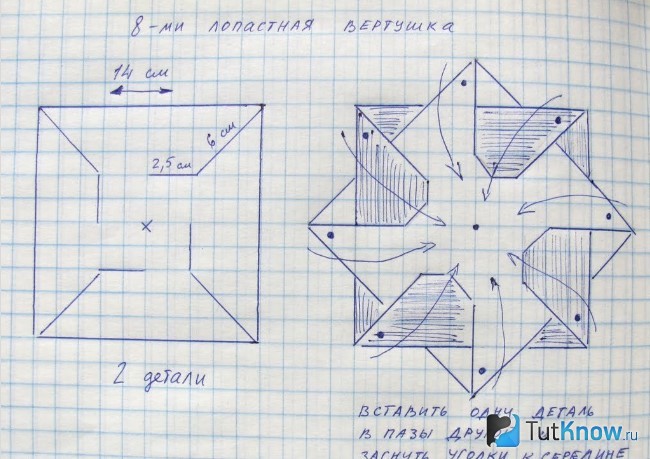
Focusing on the schemes, cut out two such blanks from two square sheets and insert one into the other.

The diagram shows where to make holes in the center and at which upper edges. Make holes, fasten the pinwheel on a stick with a wire, focusing on the previous description.
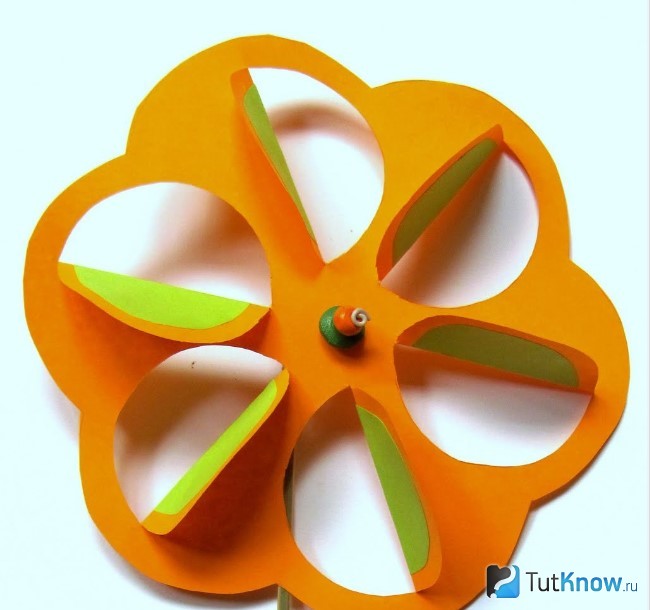
The pinwheel of paper in the shape of a flower also looks great and performs its functions. It is also cut from a square sheet with sides of 14 centimeters, only the edges are made semicircular.
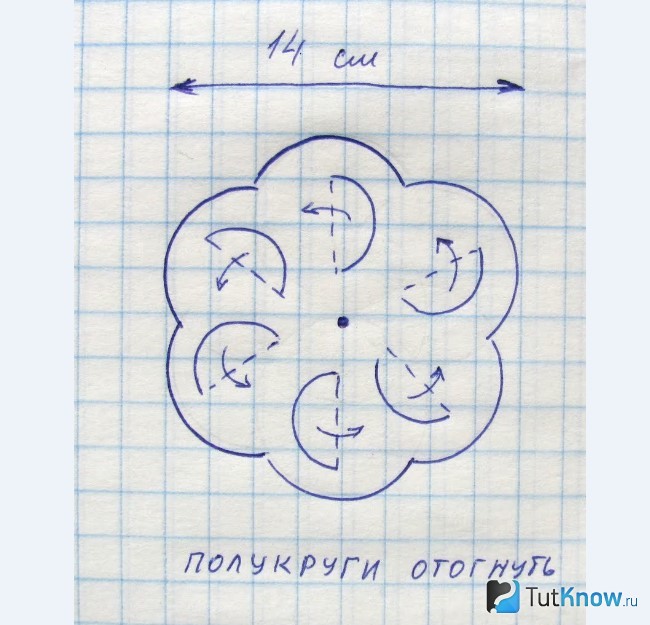
Looking at the scheme, it will be easy to make internal slots, bend these elements as shown in the photo.
If you want to return to the flower theme, find out how the branch of sakura is made of paper, read about it right now. Stocking up the necessary, you will quickly create this elegant home decoration.
Sakura branch with their own hands
It will resemble Japan in the spring and will never wither.

In order for the cherry blossoms to settle in your house for a long time, this is what you need to make an exposition:
- dark and light pink corrugated or papyrus paper;
- glue gun;
- dry twigs;
- scissors.

Now take a darker flower, put a light pink on it, sliding it so that the lower contrast petals are visible. Put a little glue in the center, with hands in thin rubber gloves, press on this place. Slightly doubt the preparation, so that the sakura flower looks like a real one.

Now take a dry branch, revive it, gluing the workpiece.

You can make small recesses with a knife, glue the flowers in there, or tape them with floral tape or tape to match.
That is such a beautiful blooming cherry tree you get out of paper. You can make not only one or several branches, but also a whole tree. If there is not enough space in the house, make it small. Such a decoration will perfectly fit into the room and will remind you of spring even in winter.

Sakura branch may look different. For such flowers are made in a slightly different way. First, 6 large petals are cut out of bright pink paper, as much but smaller size is made of light pink. For such crafts you need more yellow paper, stamens are made from it. Cut out the mug from it, cut its ends into fringe. Glue them up in the center of the flower.

Sakura branch can be an ornament to a large space. For this, the flowers are glued to the wall.

If you prefer the desktop version, then think about what you put the artificial branch.
Paper vase
In such a beautiful capacity, the composition will look great. It can be used for its intended purpose - to fill with water and put fresh flowers.

For this useful work you will need:
- corrugated or plain colored paper;
- glass jar;
- scissors;
- pVA glue.

The second and each subsequent stick just above. As a result, you get a beautiful vase of paper.
This can make a child of kindergarten age. He will be interested to learn and how to make a vase with his own hands so that it will turn out so original.

In it, a branch of Sakura will stand and look perfect. For work, use the list of the following materials:
- cardboard tube;
- unnecessary newspapers and magazines;
- pVA glue;
- transparent lacquer fixer;
- cardboard;
- golden tint;
- paint.
A cardboard tube of medium diameter is taken for the base of the vase. You can buy it at a hardware store or make it yourself from 2-3 sheets of cardboard, twisting and gluing them together.

- Depending on what height the paper vase will be, you will cut the cardboard tube to that height. Lay it on the bottom of the cardboard sheet, circle the bottom and cut it out. Attach this part to the bottom of the pipe with super glue.
- From old newspapers and magazines cut strips, fold each in half, twist into tight rolls, lubricating parts of parts with glue so that they do not unwind.
- Tape over them the outer surface of the cardboard tube, including its top.
- Fill the gaps between the parts with beads, beads, buttons or beans.

When the glue is dry, start decorating a vase made of paper. To do this, first cover it with scarlet paint, let it dry. Then apply black and immediately after that, without letting it dry out, wipe off the excess with a sponge. It is needed only for toning.

Here's how to make a vase with your own hands on. When the paint is completely dry, cover the product with a translucent gold paint. When it dries, apply a varnish fixer on the surface in 2–3 layers and leave to dry. After that, you can put a branch of sakura, dried flowers or decorative grass in a vase.
Here's how much good can be made from cardboard and plain paper. At the end of the article, as always, you are waiting for interesting videos on this topic.