Wedding glasses, perhaps the most important accessory of the celebration. As a rule, newlyweds get two pairs of glasses in advance. One of them is broken for happiness, and the second is used during the festive banquet, her spouses keep all their family life. And if the first pair of glasses can be saved, then the second one should be chosen very carefully. In wedding salons and shops selling dishes, you can find very beautiful wedding tableware options decorated with rhinestones and lace. But why not try to make glasses for the wedding with your own hands, it's so easy!
Simple decorations for glasses
There are many different ways to decorate the main wedding accessory. To do this, you must purchase ordinary glass champagne containers. Degrease the glass surface with alcohol or acetone, or alcohol-based wet wipes. You also need to buy contour stickers in the shop of needlework and hobby goods, vintage paints, hair dryers, thin brushes, napkins, silk ribbons. From this simple set you can create a real miracle.
Choose stickers with floral patterns, doves, hearts, rings. Carefully peel off the substrate, put stickers on the side surfaces of the glass wine glasses. Then take a brush and paint the patterns with bright colors. Blow dry. And tie the leg of the wine glass with silk ribbons of red, white, pale blue color. Also, wedding glasses with their own hands the bride and groom can decorate with rhinestones, gluing them with a special gun. You can use silicone glue, PVA. Best suited to transparent cyanoacrylate glue, which will last long, if you do not often wash glasses.
Before embarking on the decoration of wedding glasses, be sure to practice on simple glasses.
Lace fantasy
If the bride chose a luxurious dress of lace and rhinestones for her wedding, then it makes sense to decorate the glasses with lace too. You will need cyanoacrylate glue, lace and tape. Wrap a glass with lace ribbons, measure the desired length, leaving a few millimeters on the glue. Glue the lace gently to the glass surface. By the way, cyanocrylate glue is very poisonous, so you should take care of good ventilation of the room.
Make a skirt from the laced remains to decorate the legs of your wine glass. To do this, it is necessary to sweep the laces along one edge, and carefully bind the basting thread.
Ribbon decoration
 How to decorate glasses for a wedding with your own hands with ribbons? Enjoy the snow-white, blue, pink ribbon or ivory embellish with rhinestones. Next, wrap the ribbon around the glass in a spiral, securing a flower-shaped bow on top. For the bow is suitable kapron, satin, silk ribbon. It needs to be glued to the glass. Decorate the surface of the wedding accessory with rhinestones and beads. Flowers made of ribbons are complemented by lace mesh.
From a wide satin ribbon an excellent bud is made. Roll it in half, face out. Sweep the ribbon along the edge, pull the thread tighter, forming a skirt. Next, with a gathered tape paste over the bottom of the glass.
Feather decor - an original decoration for a wedding
If you are going to turn a wedding celebration into a themed party in a medieval aristocratic style, then why not make your own wedding glasses with feathers? From bird feathers, which can be bought in stores for hobbies and handicrafts, make interesting bouquets by adding beads, rhinestones, ribbons, and combining feathers of various colors and shapes. Next, the created composition must be attached to the wine glass with hot glue.
Unique glasses, decorated with bright feathers, will cheer up the newlyweds and guests.
Live and artificial flowers
Flowers - one of the main decorations for any wedding. You can safely decorate them even wine glasses. Consider that fresh flowers wilt quickly, so by the end of the celebration will have to remove them from the glasses. To make the flowers on the wine glass last longer, use a taping technique - hold the plants for several hours in clean water, and as soon as they are saturated with moisture, cut the stems, putting it to the cut point cotton padmoistened with water. It must be closed with green tape. Spray the flowers in front of the banquet.
It is best to choose artificial flowers and leaves. Creating a composition, note that it must be in harmony with the bouquet of the bride and the groom's boutonniere.
So, the easiest option is to spread the flower on the petals and carefully glue them around the legs of the wine glass. You can add a composition of rhinestones and beads, imitating the dew on plants. Under the same receptacle of artificial petals should be placed a lush bow of lace or nylon. Be sure to watch the video glasses on the wedding with your own hands, where experienced craftsmen will help you create a real masterpiece.
We create masterpieces of polymer clay
 Typically, wedding glasses decorated with ribbons and artificial flowers. But to decorate glasses with polymer clay, a wonderful plastic material that is used for sculpting small items: flowers, toys, steel, relatively recently. To decorate the wedding attributes of clay, you will need pieces of polymer clay of different colors, stationery knife, needles big size (they are also called “gypsy”). To prevent fingerprints on the product, wear gloves. Work with
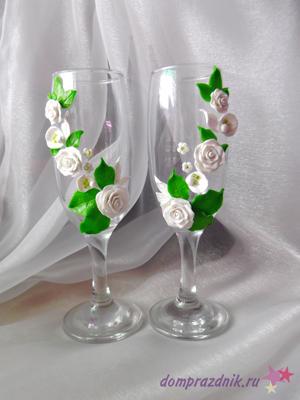
Most often they make roses from clay, but they will look great on wedding glasses with their own hands from polymer clay and delicate violets. Roll the sausage of lilac-colored polymer clay, cut it into small pieces. Of them, roll the balls. Next, turn the balls into cakes, flattening them on one side - this is how the violet petals come out. Collect five of these petals with a needle, strengthening them on one of the cakes - base. In the middle of the violet make a small depression, gluing a bead there. Now the flower can be baked. Glue several colors onto the glass surface, filling the space between them with beads, beads, and apply contour patterns.
White lilies and delicate pastel roses will look exquisitely on the glasses. You can attach flowers to the glass itself and to its leg.
Wedding is one of the most special and solemn moments in the life of the newlyweds, for which they prepare in advance, thinking through every detail. Wedding glasses are no exception. There are many examples of glass design, it is important to determine what you want to end up with. You need to start with the selection of glasses. It is better if it will be champagne glasses. The leg should not be too short - it will not look very nice, and preferably not very thin - not practical.
For registration of glasses, we need:
- champagne glasses;
- printout with a pattern;
- polymer clay or finished decorative roses;
- rhinestones (acrylic or glass);
- glue-gel "Moment" universal;
- silver glass contour;
- degreaser (either nail polish remover or alcohol)
- cotton swabs, cotton disks.
1. Degrease the glasses. We print or draw two identical patterns.

2. Cut out the patterns as close as possible to the drawing and make cuts diagonally in several places. This is necessary for the convenience of placing the picture inside the glasses.

3. We put the patterns inside the glasses and fasten in several places with tape.

Important! It is desirable to arrange glasses at the same time, constantly making a comparison. It is necessary to begin with the central element as in the figure (shown in red).
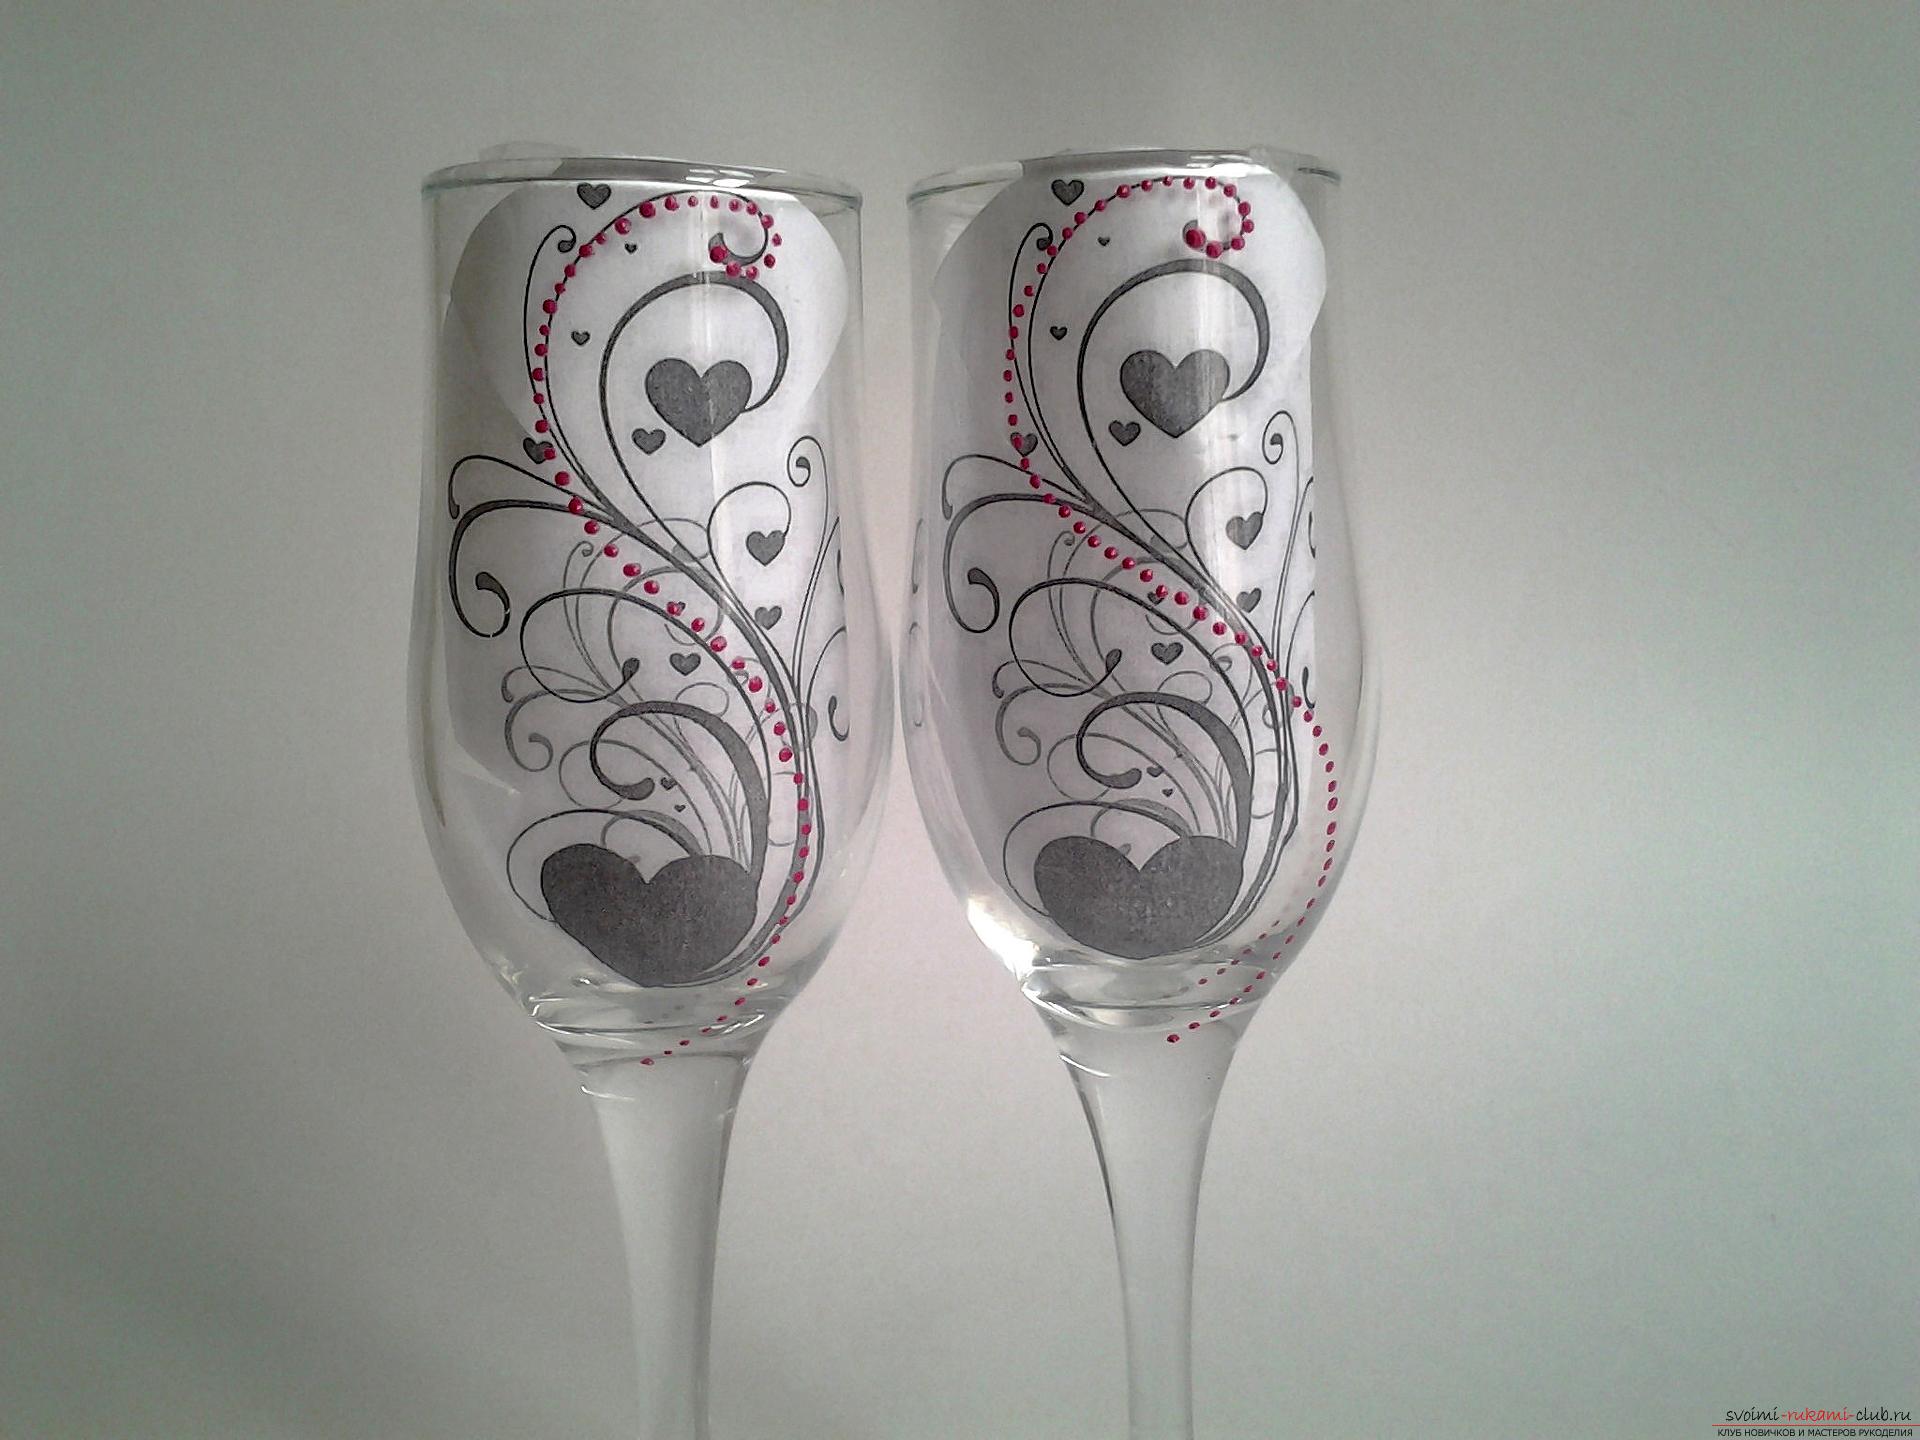
4. We draw a pattern in the technique of “dot painting”, if it is necessary to correct it - we erase the point with a cotton swab until the drawing is dry.
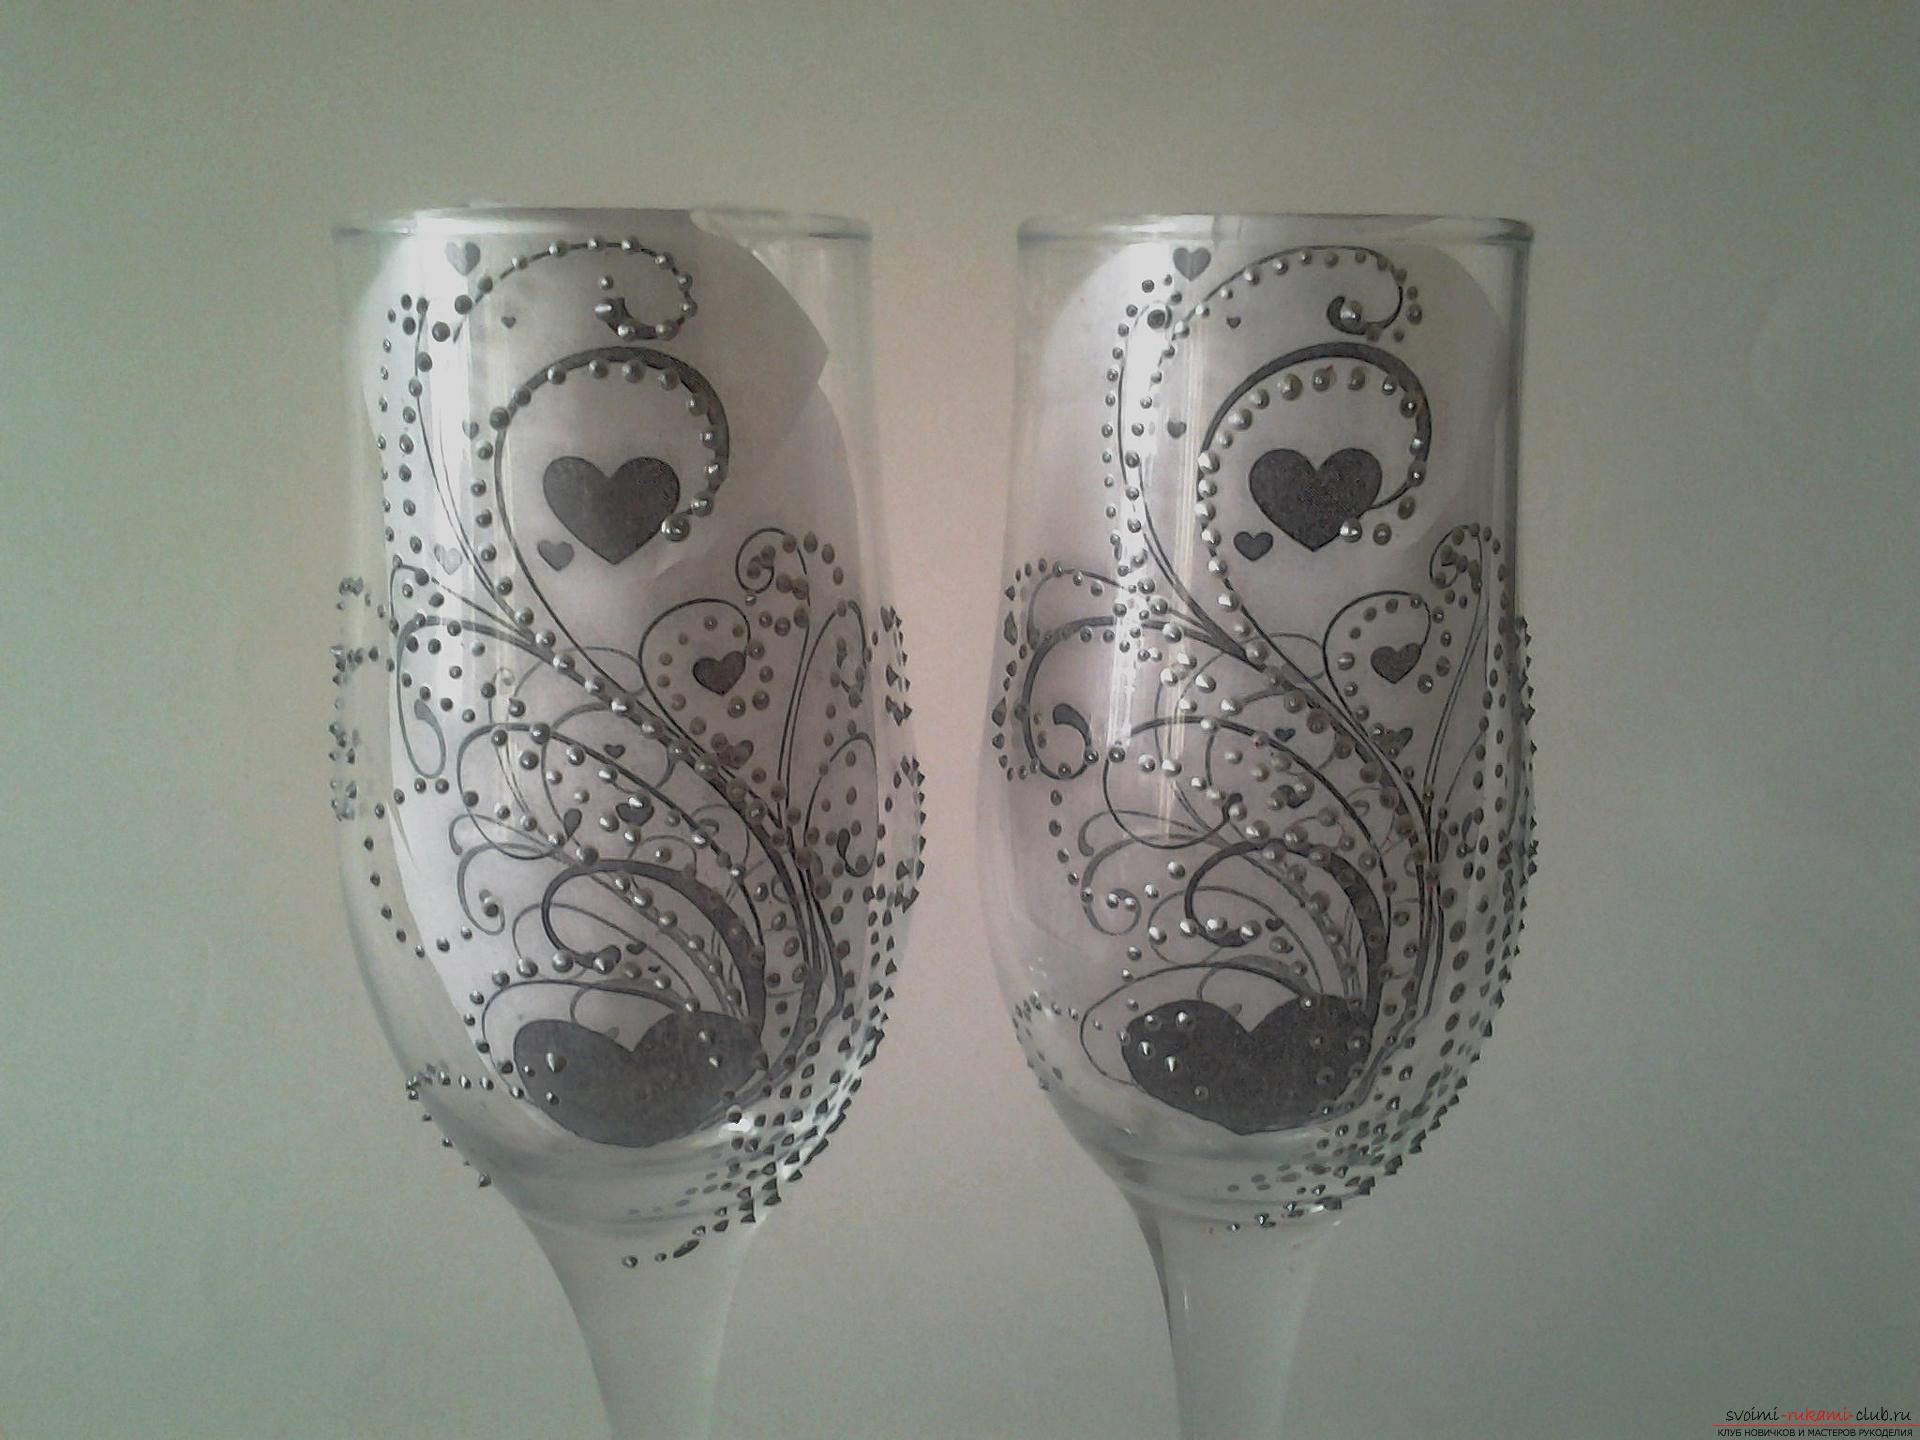
5. Set the glasses aside and let the drawing dry.

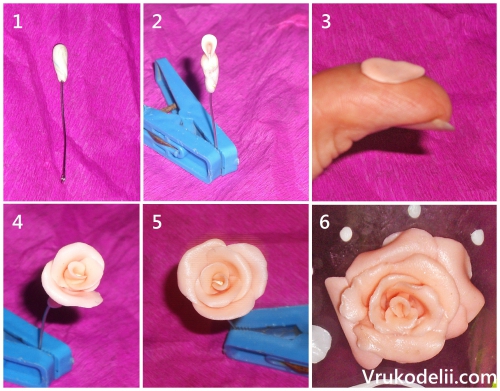
6. Decorative roses for decoration of glasses, can be purchased in stores for creativity, and you can make yourself. This requires baked polymer clay. From clay we roll a few balls. For one small rosette you need 4 balls of polymer clay.

7. We form pellets from the balls. We roll the first cake in a bag, and then fasten the remaining 3 in turn to it.


For large central roses, the number of petals should be, respectively, greater in both quantity and size. After the roses are molded, they must be baked in the oven at a temperature of 120 degrees, about 10-15 minutes. After cooling - varnish for polymer clay.
8. Glue the big roses, while keeping the glasses horizontally. We maintain the horizontal position of glasses in the process of gluing decorative elements, and during the drying of the glue.
![]()
9. Decorate the leg of the glass. Glue on 3 small roses on each leg of the glass. During the gluing of decorative elements to the glasses an important role is played by the pressure force on the element, i.e. the element must be “pressed” into the glass.


10. Glue rhinestones on the pattern. Rhinestones are acrylic and glass, attached and glue. Glue rhinestones, in turn, are divided into products of cold and hot fixation. Acrylic rhinestones with an already applied adhesive layer can also be used for applications, but there is a possibility that they will fall off after the first wash.
For work, we need cold fixing rhinestones. Which rhinestones to choose - acrylic or glass - you decide. Acrylic is more like plastic. Glass rhinestones are more expensive, but they look more attractive.
So, the process of gluing rhinestones. A small amount of glue with a toothpick is dotted on the glass. With a cotton swab dipped in water, we pick up the rhinestone and drop it onto the glue point. The cotton swab must be wet, but in no case wet, otherwise the rhinestone will not grab.

11. Wipe the glasses with a soft dry cloth.

Making wedding wine glasses with their own hands is gradually becoming a good tradition at Russian celebrations. Of course, in the shops you can buy very beautiful and original glasses for young people, but a thing made with your own hands not only looks stylish, but also carries the warmth of a home. About all the simple and interesting waysThe decor of the wine glasses for the wedding will be described in this material.
Making wedding wine glasses using polymer clay
Polymer clay, which is plastic, is very simple to use and is also very inexpensive material that can be bought at any stationery or art store. Learn to sculpt out of it indistinguishable from real flowers, as well as hearts, pigeons, rings and other details that can be decorated wedding glasses, not at all difficult. Moreover, it is possible to make a mass, in its properties similar to polymer clay, with its own hands from starch, glue and other ingredients. Many options, one of the recipes, as well as the technology to create very realistic roses, are shown in the video:
Flowers and other decorations made from cold porcelain are attached to wedding glasses with the help of a glue gun or transparent glue of the “Moment” type. From flowers of different sizes laid out drawing, which can also be supplemented with beads and rhinestones. You can also combine this decor with a pattern painted with a brush. Polymer clay jewelry is also well combined with satin or lace ribbons.

However, one should strive for harmony and observe the principle of proportionality. Jewelry should not be too much, the emphasis should be placed on one thing. It is not necessary to glue the entire glass with flowers and beads, it is enough to decorate one of the sides. The ribbon can be tied with a bow on the stem of the glass. Or let on the edge of the glass.
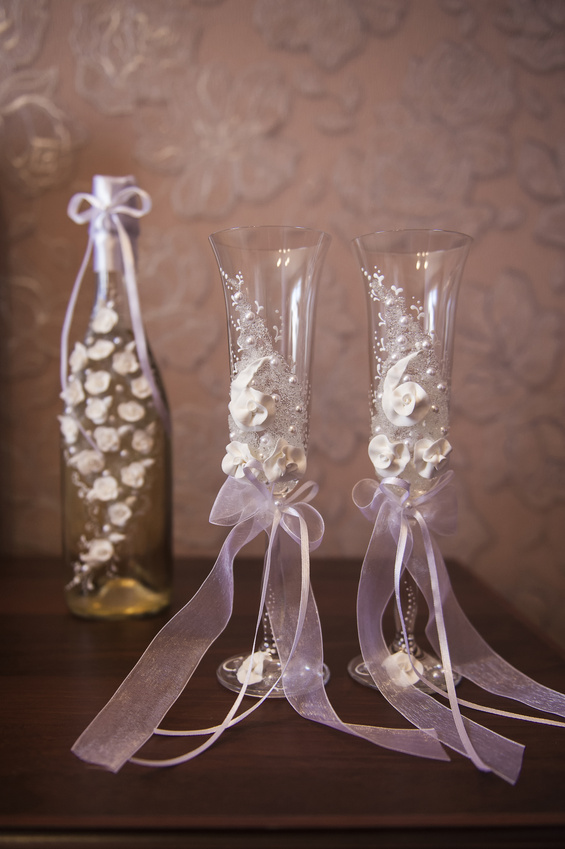
Do not forget about the other decoration of the table of the bride and groom - wedding champagne, which the newlyweds should drink on the anniversary of the wedding or at the birth of the firstborn, if this happens earlier. Champagne and glasses do not have to be decorated in the same way. However, it is better to use the same technique (or the same combination of techniques) and the same color scheme.
When creating jewelry for glasses of fabrics and ribbons you need to remember about the correct selection and combination of colors. As a rule, the bride and groom choose the colors of the wedding in advance: they are repeated in the bouquet, the decoration of the hall, the accessories of the lovers, as well as items such as wedding champagne, glasses, a book of wishes and so on. Everything should be designed in the same style.

A simple but effective way to decorate wine glasses is to “dress” them in the costumes of the bride and groom. There are many options. First, you can make the decoration of wine glasses for a wedding as in the photo above - use a wide lace. It looks festive, spending money and time are minimal. The photo below shows another simple way to create a groom glass: it is enough to put a butterfly on it and fasten symbolic buttons, reminiscent of a dress coat. Color will give poured into a glass of champagne or wine.

Also, an interesting glass can be made by pasting a narrow tape with an overlap around the entire wine glass, from bottom to top. For women's glasses need a white ribbon and lace. For men - black and white ribbons, white will go to the manufacture of the shirtfront. You need to wrap the glass by about one third: the wine glasses look beautiful, in which you can see how champagne is splashing and playing.

Another option for decorating wedding wine glasses with your own hands is to make flowers with ribbons and fix them on the glass with glue, as in the photo above. A master class on creating ribbon colors is shown in the video:
It is not necessary to come up with complex decor options. A glass decorated with a simple lace looks like touching and tender and festive as in the photo below.

Painting and decoupage wedding wine glasses
Decorating wine glasses for a wedding with your own hands with the help of painting is one of the most complex technologies. Need a firm hand and the ability to draw. However, those who are not gifted with artistic abilities can also use this method. Just need to print on paper layout, fix it inside the glass and circle the borders of the picture or a thin brush, or a special outline.

Decoupage is a simpler technology: even if some mistakes are made in the process of decorating the wine glass, you can easily hide them. However, this process requires a lot of time, as well as patience and accuracy. The essence is simple: you need to find a beautiful picture and stick it on the glass in a special way, and then further decorate it so that it looks natural. Pictures can be found on the Internet and printed out on the printer, but the easiest way to work with napkins. The choice of napkins in stores is very large, so making an interesting composition on the basis of the details carved from the napkins will not be difficult.
How to decorate the glasses for the wedding with their own hands using decoupage technique is shown in the video below.
Glasses with white roses made of polymer clay
Such a wonderful gift made for plastics can be presented for any occasion, be it an anniversary, a birthday, a New Year.
Age: from 7 years
We will need:
Polymer clay is white, pearly white and green;
Toothpicks;
Mold sheet;
Dumbel;
Green beads;
Super glue;
Varnish for polymer clay;
Golden sparkles;
Silver sparkles;
Brush;
Glass goblets;
Tweezers;
Step-by-step instruction
1.
1) sculpt roses
From white polymer clay, make a small petal and twist it in the form of a straw, it will be the heart of a rose. Then make a few more petals and stick around the middle. In this way, make 2-3 layers of petals. For one glass, you will need three roses of different sizes, the first - 1 cm, the second -1.5 cm, the third - 2 cm.
2.
2) Bake Roses
Using a knife, cut the excess plastic from the bottom of the roses, put them on a cardboard or paper and put them in the oven for 10 minutes.
3.
3) sculpt leaves
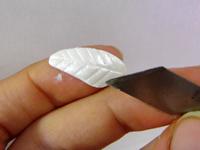
Blind from green polymer clay three oblong leaves 1.5-2cm long. Then make streaks on the leaves using a mold or draw them with the tip of a toothpick.
4.
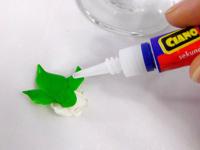
4) Stick the leaves to the glass
Stick three green sheets near the edge of the glass, as shown in the photo. Press them down at the base, and lightly in the center so as not to smear the texture of the veins.
5.
5) Making pearl sheet
From white nacreous clay blind a sheet 2 cm long, and then with the back of a knife push a vertical groove and on the sides there are small grooves diverging to the sides.
6.
6) sculpt shell
Make a white oval cake out of white pearl clay, and then slightly sharpen its underside to form a shell. With the back of a knife, make recesses on the shell converging at its base.
7.
7) round the shell
Place the shell on the palm of your hand and lightly press it with a dumbell or felt-tip pen with a rounded end so that the shell becomes concave.
8.
8) Stick rose and other elements
Take the smallest rose and stick it on top of the base of the three green leaves on the glass, press it down properly. Below, stick a pearl sheet, and on top of it stick a seashell. Attach a small ball of nacreous white clay to the underside of the shell.

9) We continue the decoration of the glass to the bottom
Below, moving a little to the right, stick two more green leaves, stick a medium-sized rose at their base, and stick a shell under it.

10) Making flowers
From white pearl clay make six small balls, and then collect them in the form of a flower. Make two such flowers.

11) Sticky flowers
Stick ready flowers to the right of the rose.
12.
12) Stick the last elements
Now you need to make three large green leaves, their length should be about 4-5cm. make streaks on them, and then with a toothpick, give a slight waviness to the edges of the leaves. Stick the leaves on the bottom of the glass so that the two sheets are directed to the left, and the third - up. The lower ends of the leaves should fit together. Now on top of the junction of green leaves stick a third, the largest rose.
13.
13) Bead
Using tweezers, place a few green beads in each shell and press the beads into the shell deeper. One by one bead press into the center of small flowers. In this way, decorate the required number of glasses and put them in the oven to bake for 20 minutes
14.
14) Glue the decor to the glass
When the glasses are cool, carefully remove our plastic decor from them, wipe it on the back with alcohol, and wipe the glass with alcohol too. Then put on the back side of the top element superglue and stick it to the place on the glass where it was originally located. By the same principle, glue to the glass all the other elements.
15) Apply glitter
In a small container, mix a small amount of polymer clay varnish with silver glitters and apply it on the edges of white roses. Then separately mix the varnish with gold sparkles and apply it on the green leaves. Now the glasses are fully prepared.
I also want to add something to this MK from myself. Before glueing flowers and decor, degrease the glass, glue the decor, put in the COLD oven for 20-25 minutes at a temperature of not more than 120-130 degrees. More temperature can not be burned and burst. When the glass comes off, we remove the flowers, degrease again (wipe with alcohol), degrease the glass and glue it on the glass (sold in hardware stores, it needs a gun for foam and sealants). This sealant is better glued than superglue.
Being engaged in polymer clay, I was interested in the issue of decorating glasses and glasses with it. Since the young family in the house still does not have the whole set of dishes, that is, glasses without a pattern, I decided to try on the glasses. I learned from my mistakes, so I’ll reveal to you a few secrets of working with polymer clay.
There are several ways of attaching polymer clay products to a glass:
1
. To stick a “raw” flower on a glass is simple, without glue, and bake everything. But, unfortunately, it will be only your decorative work. Such patterns at the slightest application of force fall off. Unless you fix from then on with a special varnish.
2
. Stick raw flower to glass with super glue. The downside is that after heating, the glue starts to hold the flower badly.
3
. Stick already baked flower glue. This is the most reliable way. Such products can be washed afterwards and used.
I made a decorative glass.
This is my first job of such a plan. Then I will take into account my mistakes and will make more complex elements.
For the work we need the following materials:
1. Polymer clay (baked). By the way, not baked clay and cold porcelain are not suitable for such work. They will not withstand the ingress of water on them. So if you make a glass for use, and not for the showcase - take baked.
2 . Tools (toothpicks or other items of this shape) for making petals.
3. Hand cream (so that the clay does not stick to the hands).
4. A glass or a glass. (If you bake a pattern with a glass, do not be afraid, it will not burst).
5. Super glue.
6. Varnish from the manufacturer of clay or special for similar products. Such a lacquer will not only add shine to the pattern, but also fix it on the walls of the glass.
Well, let's get down to work.
First you need to make a pattern. I made a simple pattern, maybe a little primitive, but easy.
I have polymer clay from two different manufacturers. I can’t say the names, because one has lost the packaging, and the other is sold simply with such chopsticks. But it is impossible to make thin and elegant items from the first one; it then breaks, and the second is suitable for this, but these are very fragile and delicate things that are difficult to hold in your hand. Therefore, I take the first clay as a basis, and make the flower itself from the second. In order not to damage my work, I simply pin the base on the pin and fasten it with a clothespin so that it is convenient to put it on the table.
I crush the clay and make rose petals in my hands, and alternately sculpt them onto the base, to make it as close as possible to a real rose.
I fixed my flowers on the glass different ways, to check which one will be most convenient.
I attached the rose, still raw to the glass, with super glue. But it is very difficult not to damage the flower, as it is fragile, the clay is crushed. I finished 4 more lower petals to hide the errors that appeared after I made a flower on a glass.
I sculpted a white flower practically on the glass. I nalepila a piece of clay, then she stuck a half-ready flower to it and finished it already on the glass.
The third flower was already glued pre-baked and cooled. In the end, he turned out to be the most persistent.
The main thing is not to overdo the clay in the oven and not to exceed the temperature. If the flowers are thin, 15 minutes can even be a lot. She will lose her color or burn. In addition, if you bake with a glass, at a high temperature, it can not stand. Immediately pull out the glass is also not worth it, if it gets water, it will burst in your hands.