Workshop on the Fluttering Summer application
Head: Natalia Filinkova, educator, MBDOU, s / c "Friendship", Volgodonsk. Rostov Region
The master class is designed for children of middle and older preschool age; for teachers and parents.
Purpose: interior decoration and gift-making.
Purpose: development of creative imagination of children in the process of working with paper ".
Tasks:
Develop imagination, spatial thinking, fine motor skills,
Develop artistic taste, sense of composition,
To form the ability to apply previously acquired skills,
Foster self-reliance, initiative initiative.
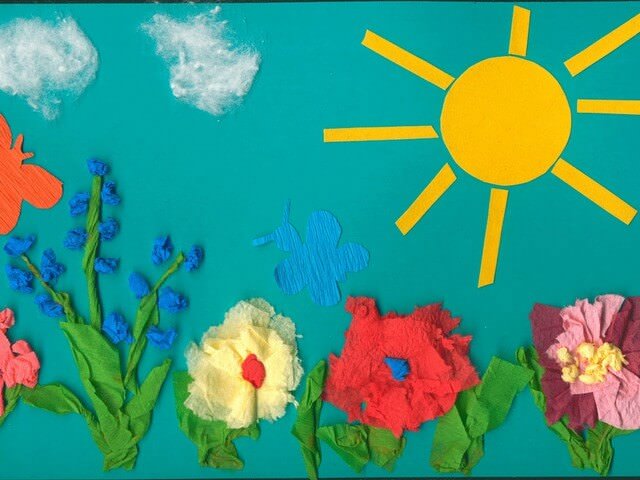
What a wonderful time
A butterfly fluttered in the morning,
Wings all waved
Polka danced nicely
The flower whispered all she
- “Oh, how I'm in love with him,
Its more beautiful not in the world
I'm talking about summer now! ”(Erato.E)
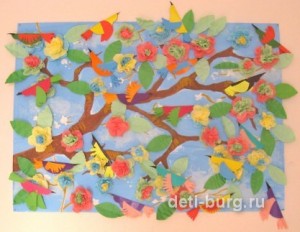
Step-by-step work process:
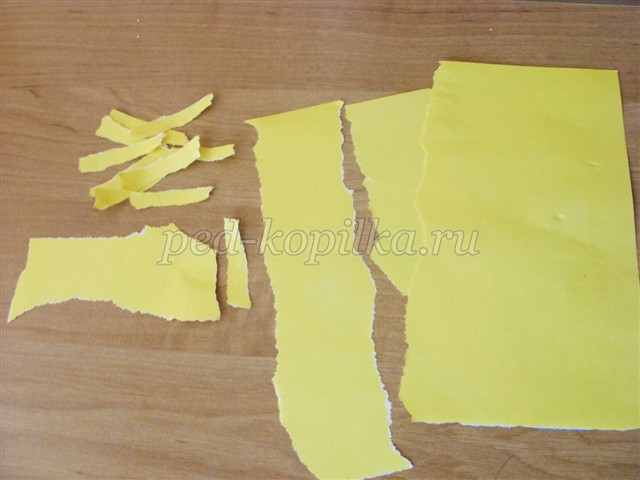
1. To work we need a bilateral colored paper, scissors, glue.
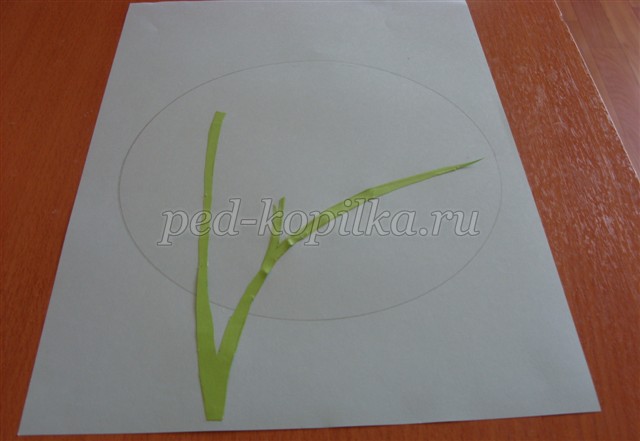
2. Using the breaking technique, we will prepare blanks for work:
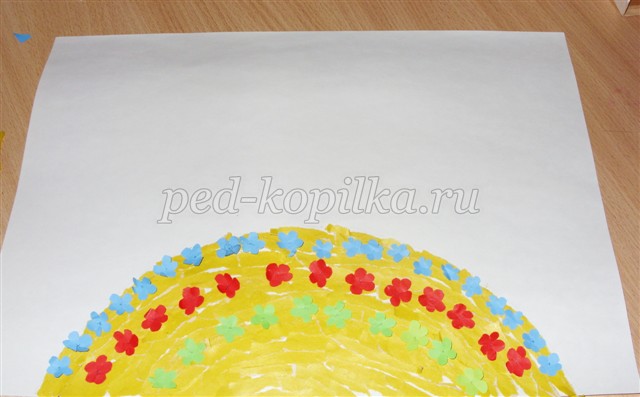
2.1 For the sun, we tear the paper sheet into strips 5 cm wide, then tear them across into thin straight strips;
Cut small flowers out of folded accordion to get several pieces at once using colored double-sided paper;
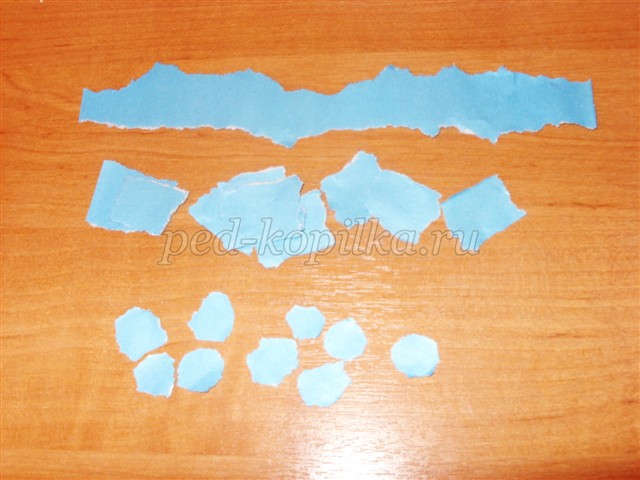
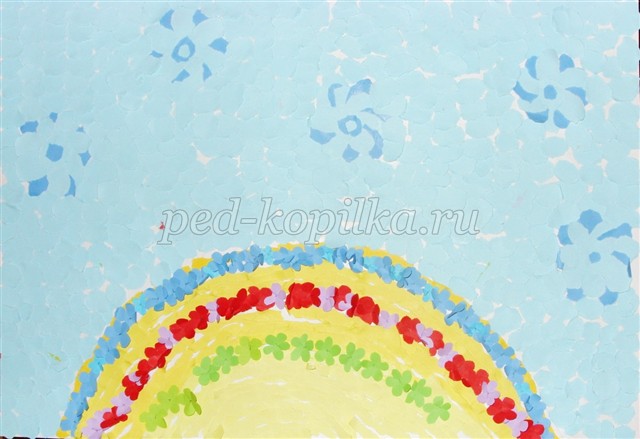
2.2 For the sky, we use clipping in a circle. We take, tear the paper sheet of light blue shade into 1.5 cm wide strips, and then the strips into small squares and from them circles.
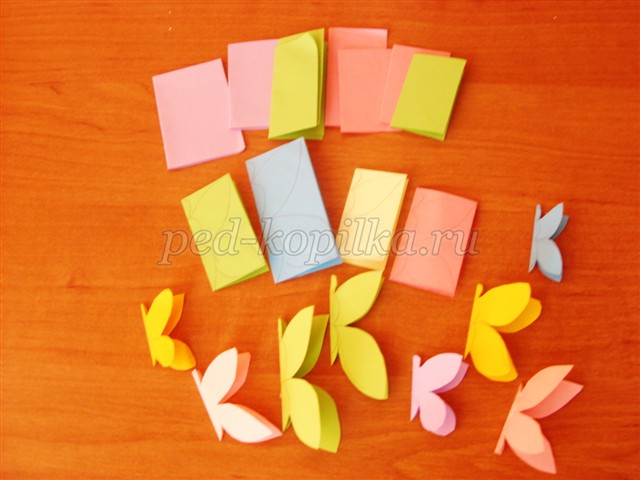
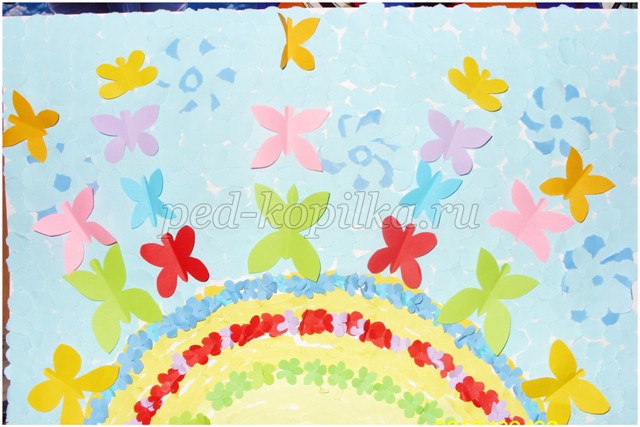
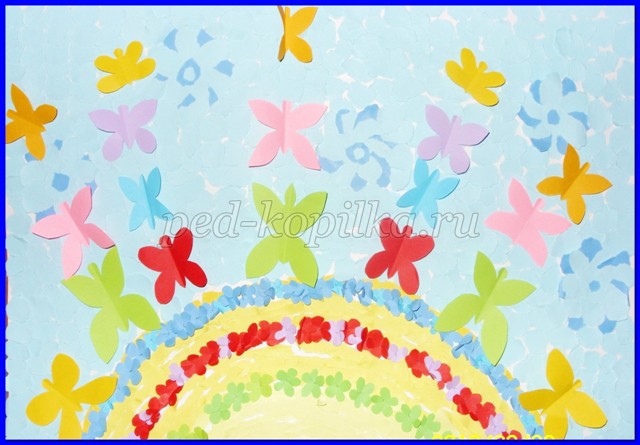
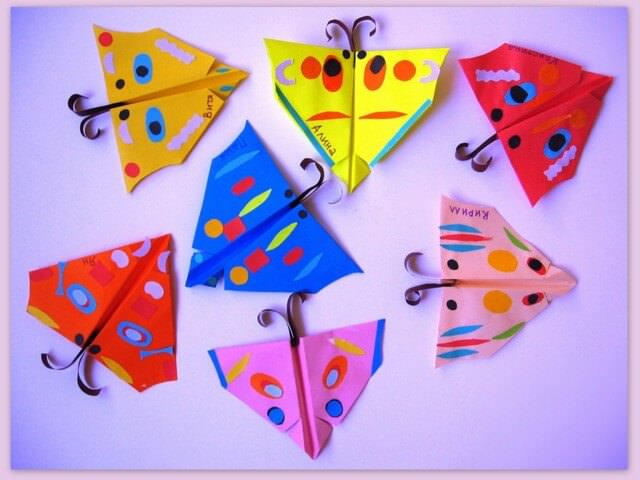
2.3 Cut out different-sized butterflies from paper folded in half. To do this, fold the rectangular sheet of the desired size in half, draw on the one hand the silhouette of a butterfly and cut out, open, we get a butterfly.
3. We collect work:
3.1 Draw a sketch of the sun and begin to glue our short, thin strips of yellow. Having pasted several rows of yellow stripes, we glue a row of small flowers of any color and continue to glue yellow stripes, and so alternate until the end - the sun is ready.
3.2 Using cooked circles, we begin to lay out the sky. You can spread from any side. Using a few circles of a darker shade of blue, clouds can be formed, in the work they are in the form of flowers.

4. Lay out the cut out butterflies in the form of divergent rays, alternating large ones and smaller ones or from large to small ones, as you like more, and glue fluttering butterflies by glueing only the abdomen so that the wings remain raised.
So it turned out our "fluttering summer."
Work in the frame
From the picture, it seems to take off
Creations of heat are ready ...
They are not stone, and not copper -
But weightlessness is the basis.
In continuation of this theme we are creating a new summer application.
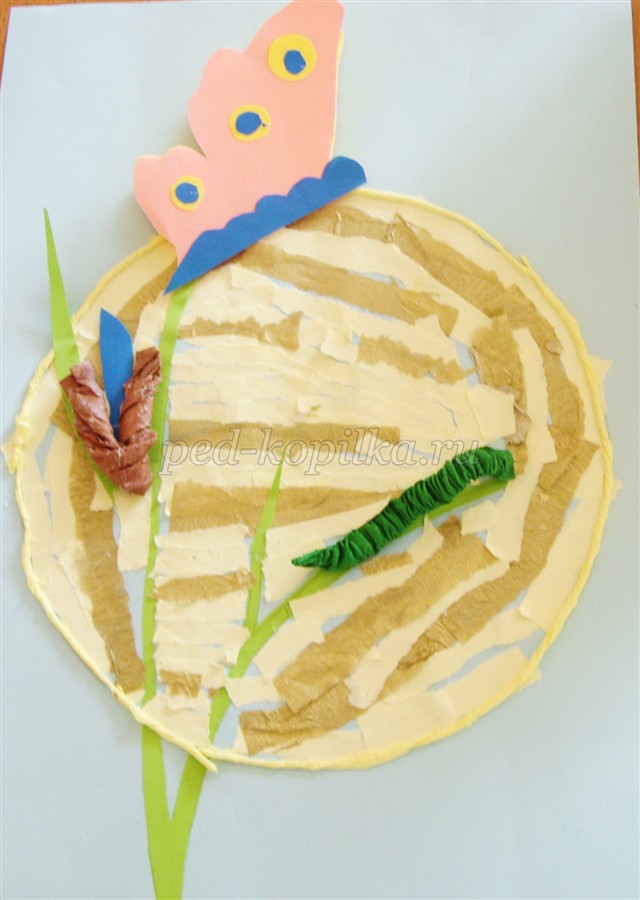
Using these methods of working with paper, another pupil of Valery Menshikova created a job that she called “The Birth of the New”.
For work you will need: double-sided colored, green and gold creased paper, scissors, glue, wooden stick.
1. To work, choose the blue paper for Xerox - this will be the background. Draw a sketch.
2. For the sun: tear the paper sheet into strips 5 cm wide, and then cut them sideways into shorter and thinner ones. We use yellow colored and golden crimped papers, which we glue alternately, one row of yellow and another golden.

2.1 Cut a twig out of green paper and glue it.
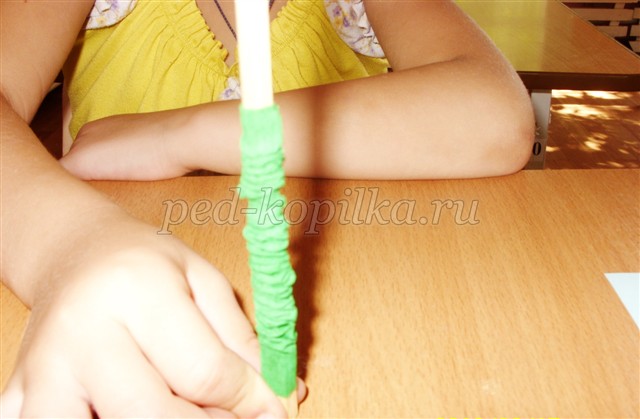
3. We take a green paper, 5 cm wide and 10 cm long, and a wooden stick.
3.1 We glue the edge of the paper with glue and wrap the paper on the stick.

3.2 Then, holding the wand with one hand, we begin to squeeze the paper down with the other hand. It turns out harmonica, from it we make a caterpillar and glue it on a sprig.
4. Make a bundle of brown paper by twisting, which we fold in half and in the middle of it we paste in a blue shape resembling a butterfly's torso. This is a butterfly pupa.

5. We take a rectangle of yellow and pink paper, glue them together, fold in half and draw on one side the silhouette of a butterfly. Cut out and get a butterfly, decorate it and glue it on a sprig. Glue the frame.
Summer is a great time for vacations and holidays! Many mothers are wondering, can a child have a summer vacation and well ... these developmental activities? But think about how much interesting and new things a baby can see only in summer!
Help to convey to the child what he saw in the work.
If your baby is just beginning to be engaged in creativity, then now is the most convenient time for this. I will explain why, if the baby is just beginning to learn how to draw, and you are afraid that he will remake himself and all his clothes, then you can undress the crumb and paint naked. If the baby has already stopped dragging everything in its mouth, it's time to start. Well, older children can offer on summer. In the summer also there is a great opportunity to make crafts from natural and scrap materials.
So today we will deal application on the theme of "Summer". And summer is the sun, flowers, trees, rain, etc.
I bring to your attention several paper applications. The child first draws a drawing, and then pastes the main large elements:
The same shapes are cut out of paper, it can be squares, circles, etc. And from them the application is laid out.
A sheet of paper is smeared with PVA glue and a pattern of threads is laid out. Such an activity, of course for older children, and it develops hands very well.

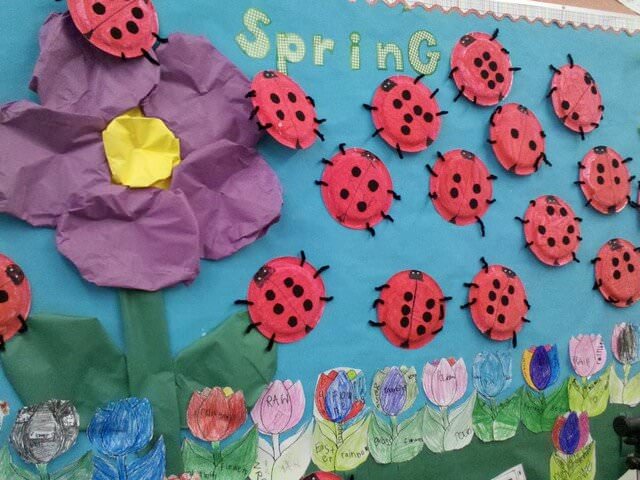
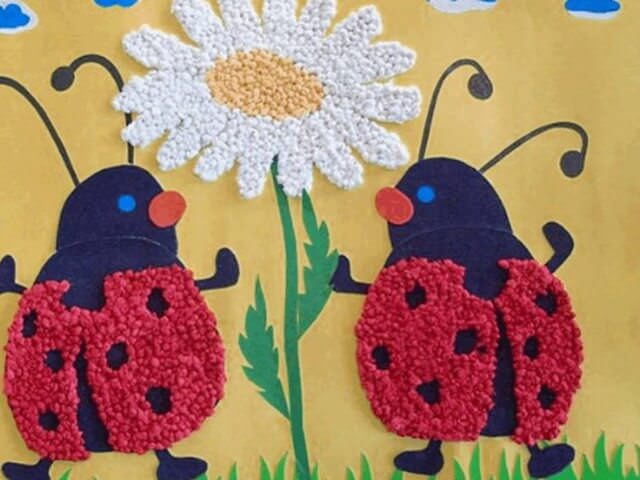
Classes, which are based on a variety of graphic activities, prevail in kindergartens. Art application on the topic "Summer in medium group"- a mandatory component of the curriculum. The picture can be depicted of wildflowers, freestanding chamomile or cornflower, ladybug, caterpillar, like a traffic light, sitting on a green leaf. Other “seasonal” topics - winter, autumn, spring - are also repeatedly affected during the school year. Depending on the content of the image, the teacher makes a detailed summary of the lesson.
Goals, objectives, materials
The application lesson on the theme of summer has a strictly defined structure, which is subject to the goals and objectives set by the teacher:
- The goal of the activity is to create concrete work from paper, to consolidate the skills of making applications, working with scissors, glue, and paper forms.
- Tasks: to acquaint children of medium-sized groups with the seasons, to teach them to talk about summer, its distinctive features, to recognize plants, insects. Also during the application of pictorial activity fine motor skills, speech, thinking, imagination, perseverance of children develop. The guys learn to interact with each other, work together, help each other.
Proper selection of materials and other content is very important. As a rule, the summer theme is accompanied by bright and vivid colors, the paper is selected in saturated tones, natural materials must be fresh, intact.
To complete the application, you will need tools for each child:
- Different types of colored paper.
- Scissors
- Glue (pencil or pva).
- Templates for cutting parts.
- Figured punches, if you need carved elements to decorate crafts.
- Green leaves, blade of grass, flowers, seeds, if the crafts will contain natural material.
- Markers, paint for drawing.
- Multi-colored napkins or corrugation - for three-dimensional images.
For the emotional coloring of the activity and drawing the group's attention to work, giving it a playful moment, you need to pick up the appropriate poems for the plot, short fairy tales, tokens, riddles, songs, classical music.
During the lesson, the middle group needs a compulsory physical exercise, finger exercises, a moving game. It is difficult for babies to focus attention for a long time, being in a fixed position, therefore the kindergarten focuses on physical activity during training.
Variations of the plot and the work in stages
The lesson lasts 20 minutes, that is how much a child of 4-5 years is able to hold attention, purposefully performing the same type activity under the guidance of an adult.
At the beginning of classes on making an application on the theme of summer in the middle group, the teacher conducts an introductory conversation with the pupils, which is based on a specific plot topic of the creative “lesson”:
Whatever the plot of the crafts, the first stage of the lesson is a preliminary conversation. The task of the educator is to set up the group for an interesting thematic work, to awaken the desire to create. Mini-fairy tales, riddles, leading questions, songs will help to bring the children to the topic.
What else can be depicted in the summer picture:
- Various insects on flowers.
- Bouquet in a vase.
- Glade over which the sun shines.
- Butterfly.
After the tutor announces the topic of the lesson, the kids begin the assignments. Children cut out all the necessary details, using templates, prepare a sheet of paper or cardboard for the base.
Fizkulturnaya minute. The teacher offers the kids to get up and play a little. Usually they pick up a cake, a rhyme or a song according to the theme of the work - a butterfly or ladybug flies and flaps its wings;
Having completed the warm-up, preschoolers begin to create a composition: they glue all the details, finish drawing, make a frame.
At the end of the lesson, an exhibition of applications is organized, the children examine and praise each other's crafts.
Unusual ideas for summer applications.
In children's crafts, you can use packaging material and even plastic utensils:
- To create volumetric leaves or wings of insects, paint disposable spoons with acrylic paint, cut off the handles and glue to the base.
- The usual plastic cup is suitable for making hearts of flowers or the sun, if you exactly cut off its bottom.
- Transparent or color package will serve as an excellent material for rustling grass, fluffy flower, summer rain.
- Foam rubber will help to create a feeling of lightness: small pieces are painted with colors, they draw clouds, dandelions.
- Sunflower seeds are placed in the center of sunflowers, planting them on thick PVA glue.
- Leaves of flowers, wings, grass can be raised above the base - bend with scissors or use the technique of quilling.
Kindergarteners 4-5 years old do well with co-creation. The summer composition can be arranged in the form of a collective panel, on which each pupil sticks his figure.
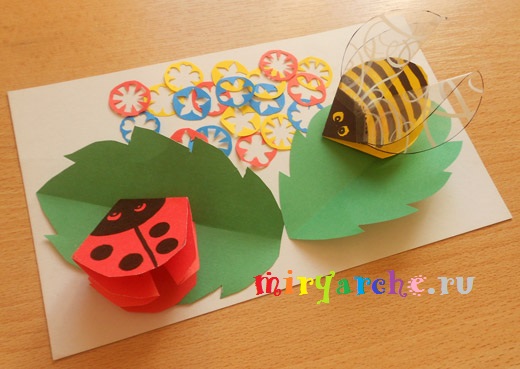
Summer is in full swing, the street has become summer-like warm and sunny. Walking in the fresh air brings a lot of pleasure, and I want to preserve these warm memories. Today, my daughter decided to make volume application imprinting insects on the meadow.
Daughter always loves do crafts with mom or dadso today we have teamwork. The creation of crafts was divided equally: the daughter does ladybug from colored paper, and I entrusted to make a bee or wasp.
How to make a bee or a wasp out of paper with your own hands?
For work we need: a square of yellow colored paper (preferably double-sided), a piece of film (for wings), scissors, a black felt-tip pen.

1. Fold the square diagonally, smoothly fold the fold line, and unfold it.
2. Then we fold the square along another diagonal, iron it and unfold it.
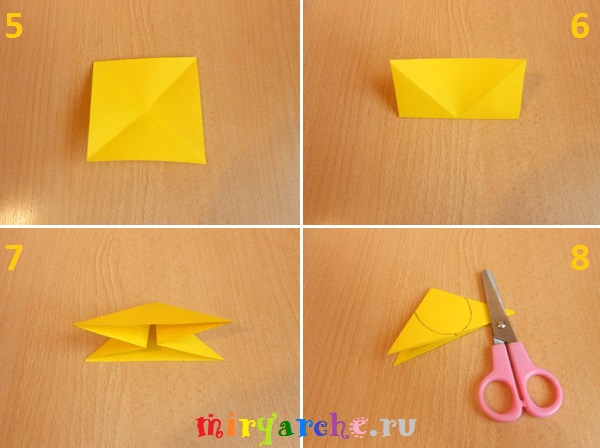
3. Now fold the square in half, well iron and unfold.
4. Form a triangle from a square, tucking folds along the fold lines inward (see photo).
5. Cut off the excess to get a round body of an insect.
6. With the help of a black felt-tip pen we draw the head, eyes and stripes on the body.
![]()
7. Cut two circles from the film. We used the film for packing flowers.
8. Fold the circle in half, slightly cut off one edge and fasten the wing with a piece of scotch to the body of the insect. Also doing with the second wing. Our dragonfly bee is ready!
How to make a ladybug from paper with your own hands?
For the work we need: a square of red paper (preferably two-sided), scissors, black felt-tip pen.
I repeat, the daughter of God made the ladybird, so the photo workshop from her 😉 The principle of folding is the same as that of the wasp-bee, I won’t repeat here, see the photo

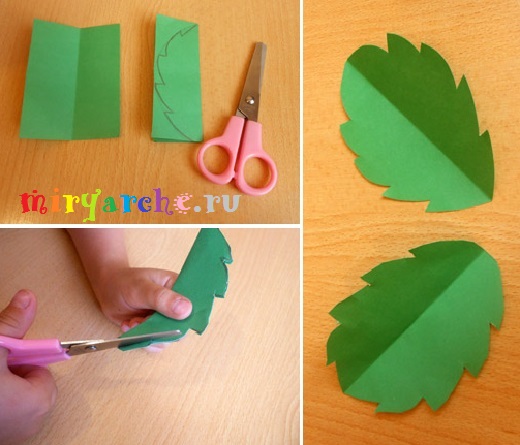
Our insects are ready, we decided to plant them on leaves, therefore, using symmetrical cutting, we cut out leaves from green colored paper.
Taking a sheet of cardboard, and placing the insects and leaves, my daughter said that she lacked a flower glade, so we took punchers and began to glue our three-dimensional appliqué. Here's what we got:
Outside the window, cold, rain, and someone even snow. On such days, you want to sit by the fire with a mug of hot tea and think about summer. For example, where does it go? Perhaps in the southern countries? Let's fantasize on this topic by making a clay application - a window to the world of eternal summer!
Materials and tools for the master class "Application" Where does the summer go? ”
We will need:
+ a piece of yellow cardboard for the base
+ plasticine - blue, black, white, brown, orange and green
+ checkered paper
+ simple pencil
+ scalpel
+ knitting needle
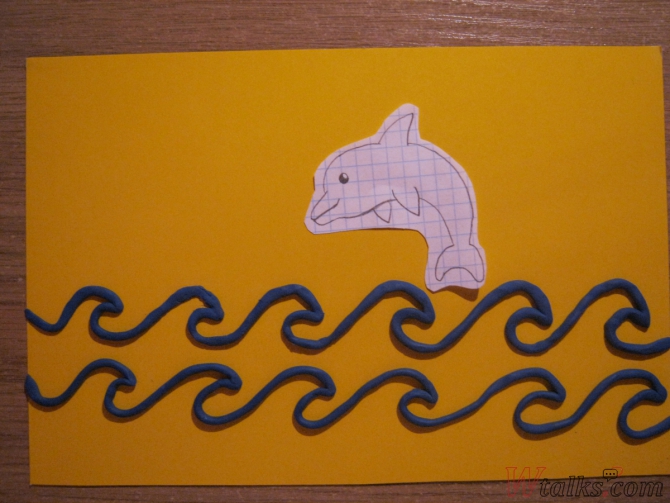
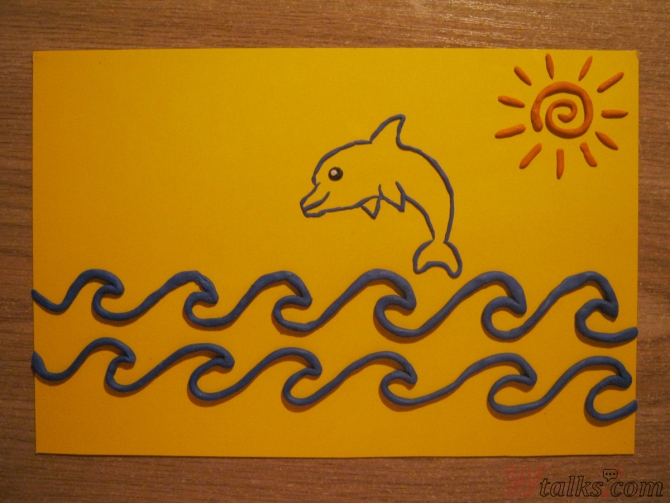
1. Take a piece of yellow cardboard measuring about 14 by 21 cm:

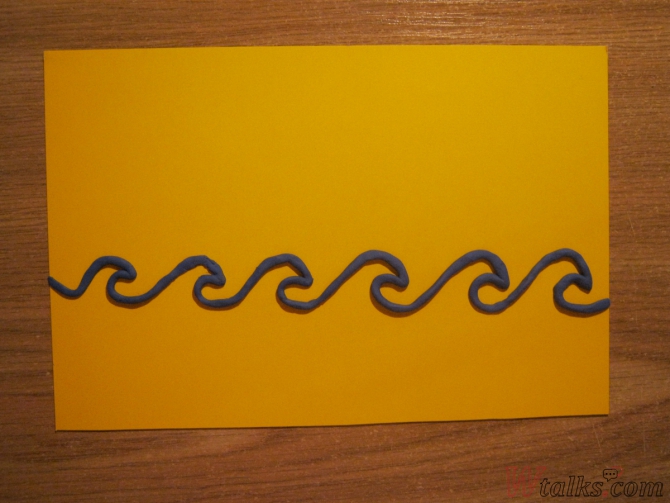
2. We roll a thin long stick out of blue plasticine and lay waves on cardboard:

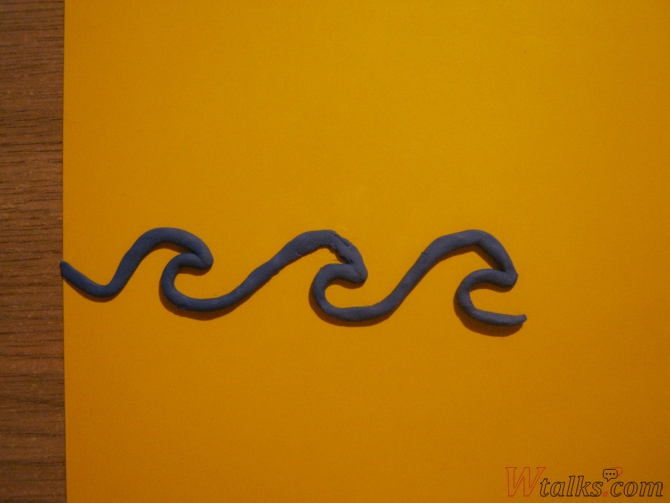
3. If the wand is not enough to lay out a series of waves to the end, we roll another one, attach it to the previous one and continue to lay out the waves:
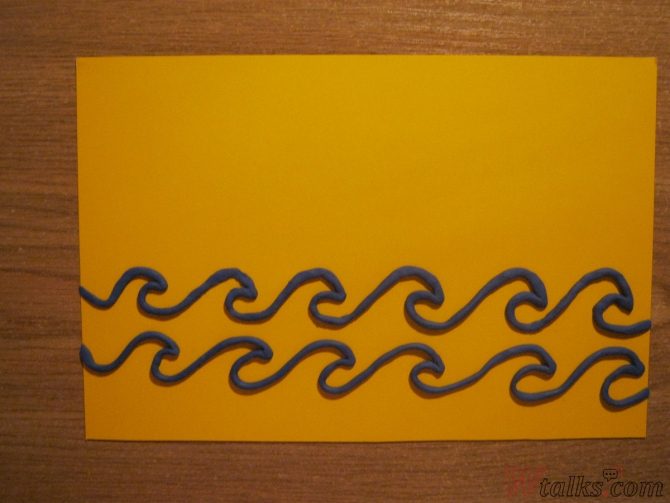
4. In total, we make two rows of waves:
5. On the checkered paper we transfer the contour of the figure of a dolphin:

6. Cut out the figure, apply to the cardboard and draw each line with a pencil so that the impression on the cardboard is:
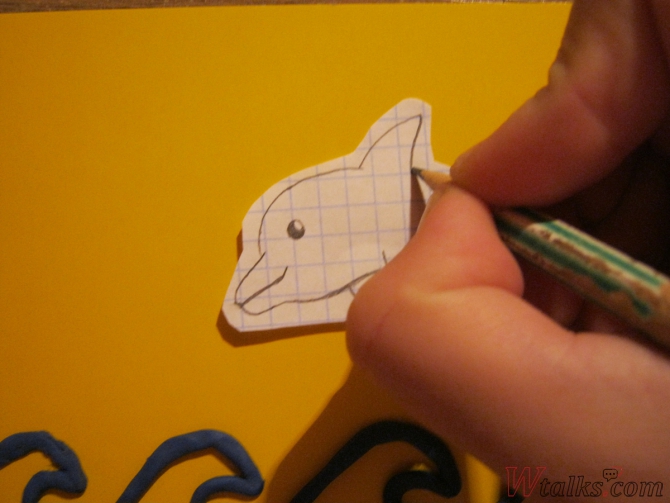
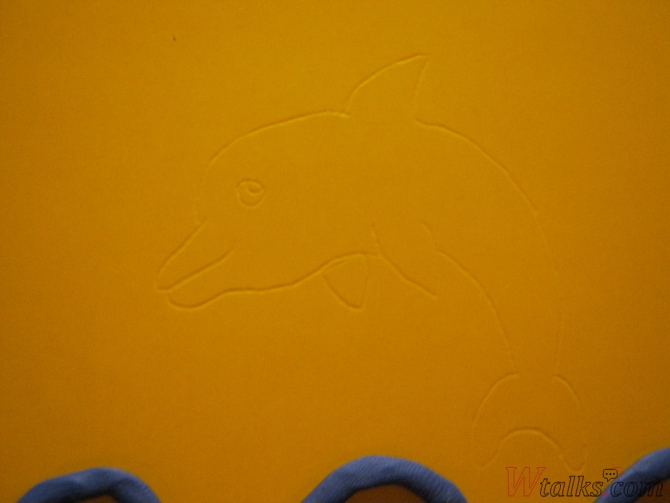
7. Direct the print lines with a pencil:
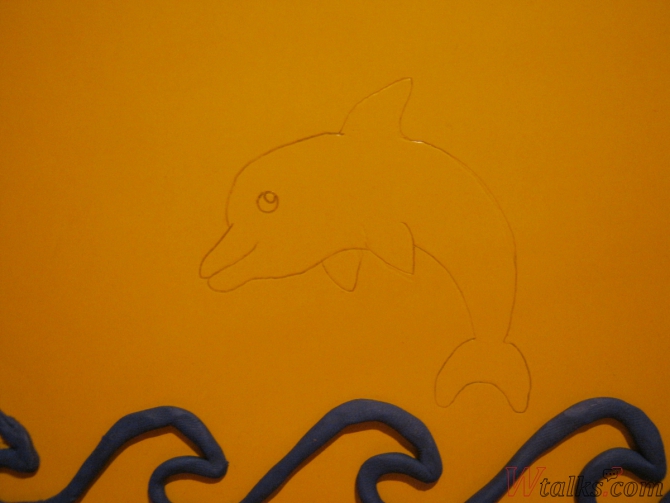
8. We roll up short thin sticks of blue plasticine and lay them along the lines of the pattern (except for the eyes):

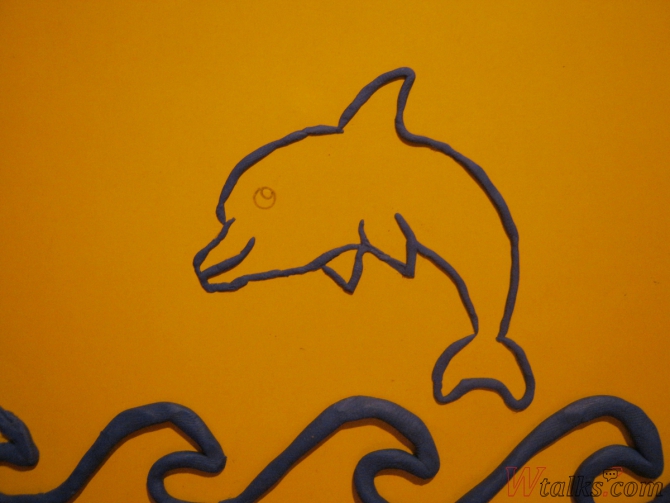
9. We roll up a small ball of black clay and even smaller - of white. From them we make the eye of a dolphin:


10. Roll up a long stick of orange clay and lay out a spiral in the upper right corner of the appliqué:


11. Make 10-11 short sticks from orange plasticine. These will be the rays of the sun:

12. We roll one long stick from green plasticine and many small curls:

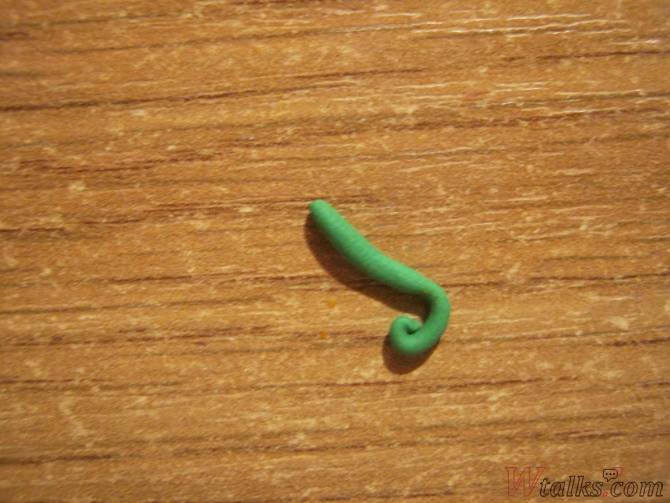
13. From these elements we make a green island in the ocean (the wand is the contour of the island, the curls decorate the inside of the contour):

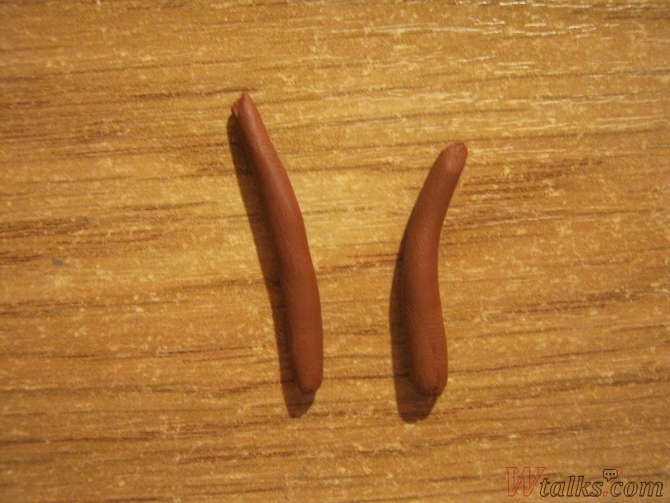
14. Make two thick sticks of brown plasticine and make palm trunks of them:
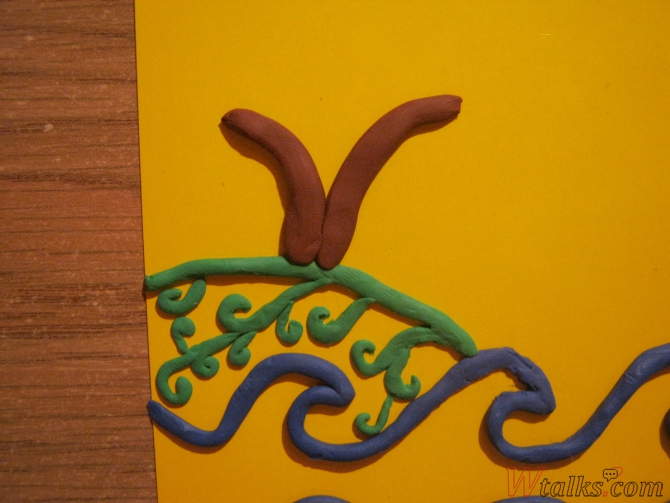
15. We make leaves from small pieces of green plasticine (approximately 7 pieces per leaf):

16. Each palm will have three sheets. For the decoration, we will complement each with two curls - the same ones used in the decor of the island (see paragraphs 12-13):

17. Slightly pressing with a scalpel, draw a "mesh" on the trunks:


18. Rolling small sticks of orange plasticine and, if necessary, slightly bending them (as well as flattening the ends), we make marine inhabitants - jellyfish, fish and starfish: