Paper-facing makes it possible to make fluffy crafts, extraordinarily beautiful three-dimensional paintings. In this technique, you can make postcards and even topiary.
The content of the article:
Paper gives a vast scope for creativity. She draws on it, it is folded, making unusual crafts. You are already familiar with many of them, but not everyone knows about trimming. This needlework technique is quite simple: pieces of paper are twisted and glued or attached to the base. As a result, volumetric and air compositions are obtained.
Paper facing: machinery, master classes
This needlework is of several types:
- Contour. When with twisted pieces of paper frame drawing on a previously applied contour. This technique is sometimes used together with scrapbooking.
- On the plane. This is a trimming technique in which the blanks are placed next to each other, filling the entire surface with them.
- When facing in layers the parts are glued into each other. At the same time, the combination of elements of different shades helps to create interesting effects.
- Volumetric trimming most often done on the basis of clay. Twisted parts are attached to the fashioned blank, which allows making complex compositions.

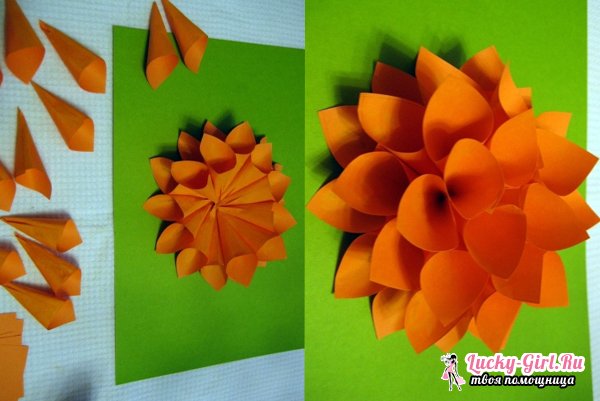
To make such a violet, take:
- corrugated paper;
- cardboard sheet;
- simple pencil;
- scissors;
- glue bottle with spout.
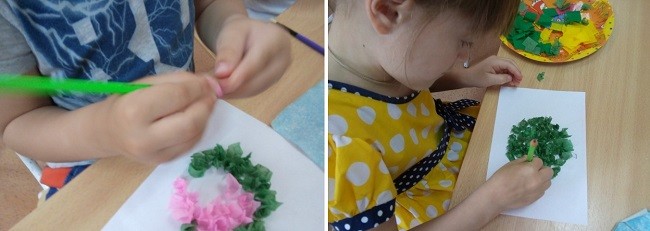
To fold the paper elements you need to use a special wand for facing. If you do not have one, you can replace it with a pen case, sharpened with a pencil.
- One of these tools, hold the small paper blank in the center, wind it on the stick.
- Roll your fingers without removing from this tool. Lubricate a small area of the contour with glue, attach a twisted workpiece directly on the stick, carefully remove this tool.
- Create the second element in the same way, paste it next to the first one. Having outlines, go to fill the inside of the petal.
- When blanks are glued to all the petals, roll the same elements out of the squares of yellow corrugated paper. Glue them to the center of the flower.
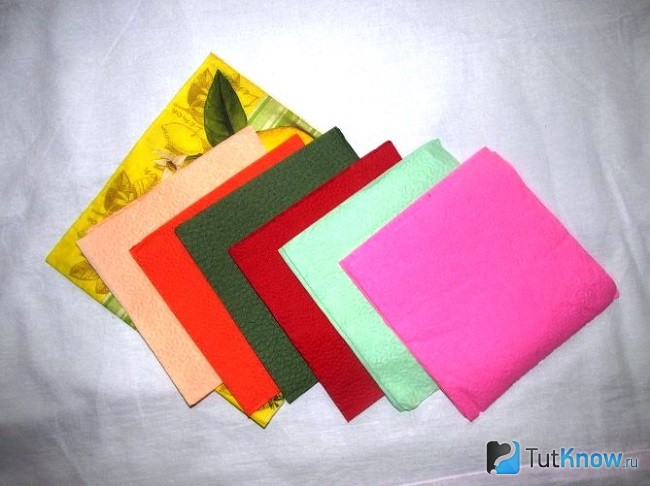
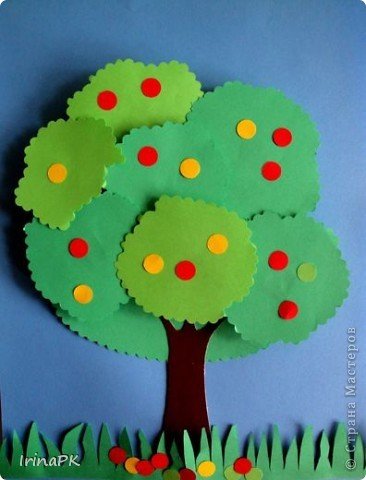
To do this work, take:
- bright napkins;
- scissors;
- cardboard sheet;
- gouache;
- wand for trimming.
On a white sheet of cardboard, draw the outline of a tree. Apply glue to a small area so that it does not have time to dry.
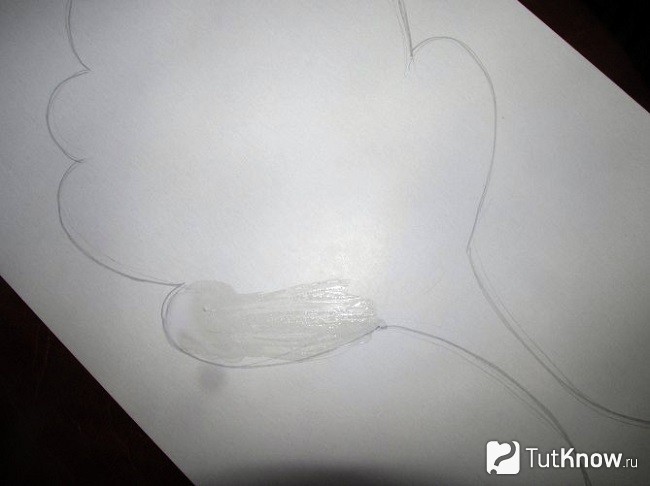
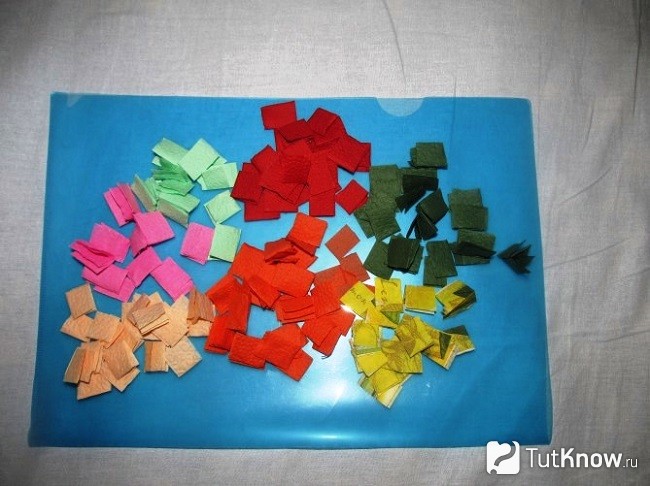
At this time, take a small square from the napkin, wind it on the tip of the chopstick, glue it to the plastered contour. Next stick another one and the others.

Take napkins of different colors to make the tree bright and cheerful. Fill the entire crown, paint the trunk with brown gouache.

Since you have made the foliage of the tree from elements of different colors, make a picture frame from one napkin.
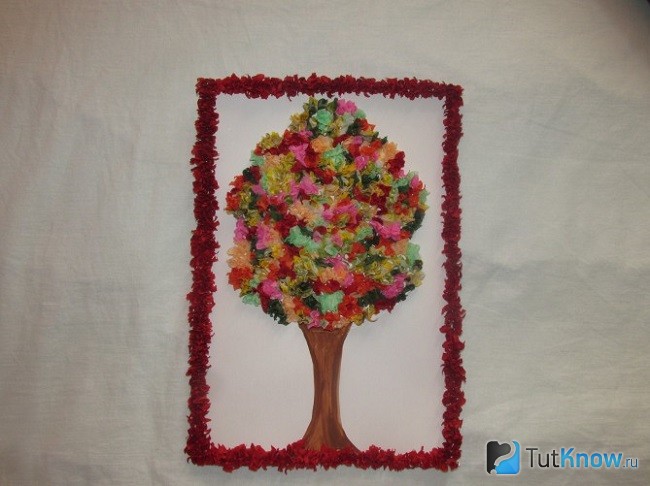
Make blue background from blue napkins. Elements for this are also created using a trimming technique.

You will have a wonderful picture that will amaze and delight everyone who sees it.

Using this technique, children and adults can do a lot of other amazing work by performing a face or planimetric trimming.

For such, corrugated paper of yellow, orange, lilac, green, white and blue color was used.
First, glue a piece of blue paper onto the white cardboard, then draw the outlines of the fish, algae. After that, the blanks for trimming are twisted out of yellow squares, fill the tail of fish with them. From the orange make her body, from the lilac head. And white and blue will create the eye of the fish. It will remain to fill with similar elements algae and admire the wonderful work.
See how you can make interesting craftsusing another trimming technique.
Templates of volumetric paperwork and plasticine
Such flowering cacti will also help create trimming. For these handicrafts take:
- well-ground pencil;
- plasticine;
- corrugated paper;
- toothpick;
- packing tape or satin;
- pin with a bead;
- colored cardboard.

Stick a toothpick into the cactus and its other end into the potty. Attach the base of the flower to the cactus. Fill his body with beautiful volumetric blanks. To do this, put a pencil in the center of the paper triangle, wrap it around the rod, stick it in the plasticine base.
Perform the first row, placing the elements closely, then go to the second and next.

To make the petal the desired shape, leave its tip free, twist only the part that will be attached to the clay.
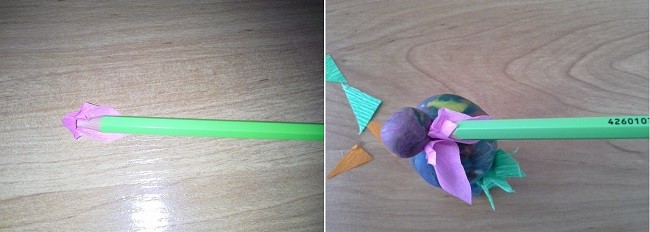
To decorate a flower, you need to make 1-2 such petals, then make its middle with triangular blanks of orange paper.

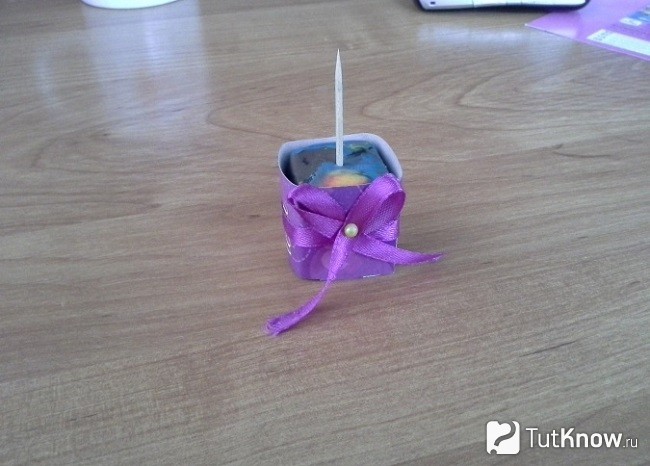
See how the pot is decorated. It must be wrapped with a strip of colored cardboard or wrapping paper and tied with a ribbon.
The cactus, made with the help of clipping from corrugated paper, is created.

Look at the process of making another work with the use of volumetric technology. It will help the child to develop creative thinking, fine motor skills, imagination. Children have an interest in working with paper, as a result of which such wonderful models appear.

Prepare the following:
- corrugated paper;
- scissors;
- album sheet;
- pencil.

Covering small areas with glue, let him attach small squares here to make a fabulous rejuvenating apple.
You can draw a sprig or glue a thin strip of brown paper instead.
It is possible to glue one blank of a different color into the one already attached, thereby obtaining the effect of facing in layers. The following two works are devoted to this technique.
Corrugated paper facing patterns
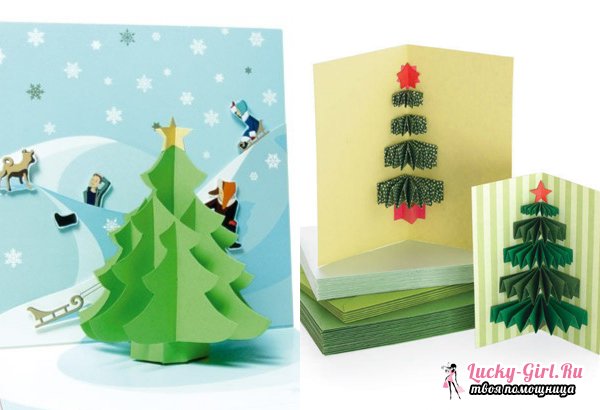
Not far away New Year. Children together with their parents will certainly prepare for this holiday. They will be able to make a postcard by laying out a Christmas tree on its front side.

Prepare with children:
- corrugated paper;
- drawing Christmas tree;
- glue and brush for it;
- pencil;
- thick sheet of paper.
First, the child will fill the contours of the Christmas tree with green squares wound on a pencil. Then, in some places on top of them you need to glue the blanks of other colors. They will decorate the Christmas tree.
But you can not do facing with layers, but along the plane. Then you will first need to glue colored squares, which will become toys, and then fill the surface with green.

Mom or grandmother can give a souvenir shawl. They will certainly be delighted, especially since their beloved child has done such a job.

To make a scarf, you need to take:
- red cardboard sheet;
- corrugated paper of different colors or napkins;
- glue with brush;
- scissors;
- pencil;
- pattern pattern.

Starting with small areas, let the baby fill the picture with small squares of different colors. They will need a lot. If the child does not have enough patience to twist trimming, help him in this, so as not to reduce his interest in work.
The result is such a wonderful shawl. The following work was done with the child by his mother. A great example, which is to adopt. The result will be mushrooms and autumn leaves, made by means of facing with layers.
To create the autumn forest, take the corrugated paper in red, orange, yellow. You can also make blotches with brown, green.
For crafts, take:
- colored paper, cut into squares with a side of 2 cm;
- patterns for application;
- butt stick or pencil;
- glue;
- scissors.

You can take your favorite templates of mushrooms and leaves from the Internet or use the presented ones. You can draw them yourself on a thick cardboard, cut.

The most painstaking work is cutting squares and forming twisted blanks. To give the desired shape, put a square of paper on the left index finger. Hold it with your thumb. Put a pencil in the center of the blank, twist it.
As you can see, this is another option for the formation of parts. We will also glue in another way so that you choose the most suitable for you.
Pour glue into the bowl. Dipping here trimming, attach it to the template leaflet. Having pasted red, directly on it attach with the help of PVA yellow. The result will be an interesting effect. It also sticks yellow to an orange blank, use green and brown squares as the base.

To make the mushrooms, lay the foot white buttocks, and the hat brown, yellow or red.

Children's pictures of corrugated paper
The trimming technique will also help to make them. Such children's pictures turn out very nice and touching, they will remain for a long memory, will decorate any corner of the house.
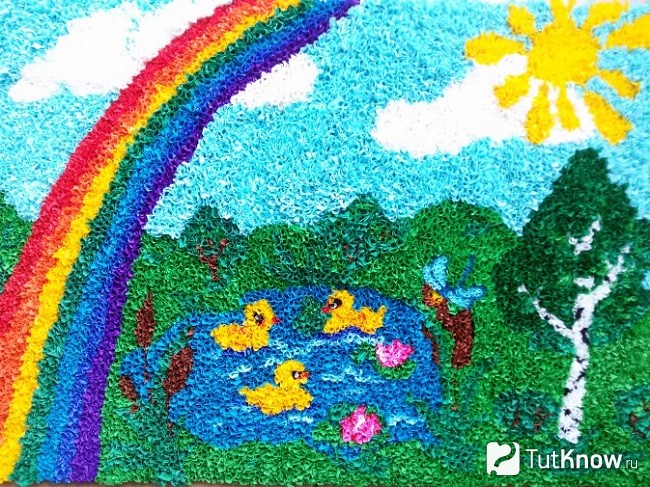
If the child can, let him draw a round lake, reeds along its banks, bathing ducklings. Depicts where the birch will be, rainbow, draw the horizon line. If it is difficult for a child, then adults will help.
For this work, squares of corrugated paper with a side of 1.5 cm will be needed.
The larger the size of the paper blanks for trimming, the higher the pile at the finished work.
Cut them, you need to start pasting. In this case, it is best to fill the space on the left side. First dab the rainbow with multicolored stripes, then make grass around it, glue green trimmers. Also on this side, decorate the sky, fill it with twisted blue squares. Leave a place for the clouds, stick here the white blanks.

Also, on the left side, begin to glue brown parts in the form of reeds, make the chickens yellow, and lay out the blue lake.
Moving gradually to the right, decorate a white birch trunk with black splashes twisted from paper of this color. Fill the whole space with volumetric blanks, after which you can enjoy the view of the colorful picture. For kindergarten such an article will be the perfect option. Having brought it there, the child will certainly take first place in the competition.
But there are more complex works that schoolchildren can do.
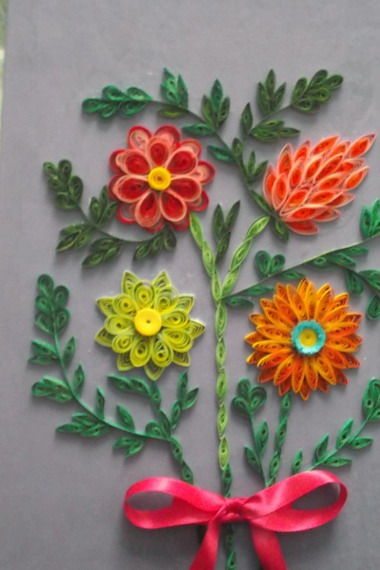
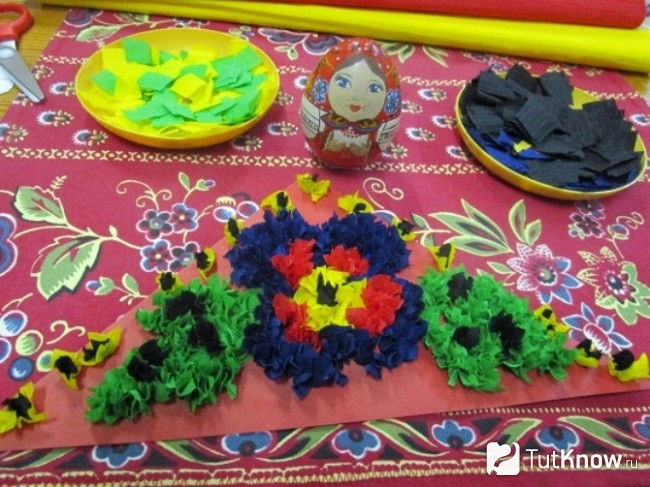
These viols were created by students in grades 1–8. Such teamwork unites the guys.

On a sheet of drawing paper you need to draw a viol with a pencil or transfer another image here. Then each of the guys will fill in the flower with twisted trimmers of a certain color.
By the New Year, you can make winter pictures.
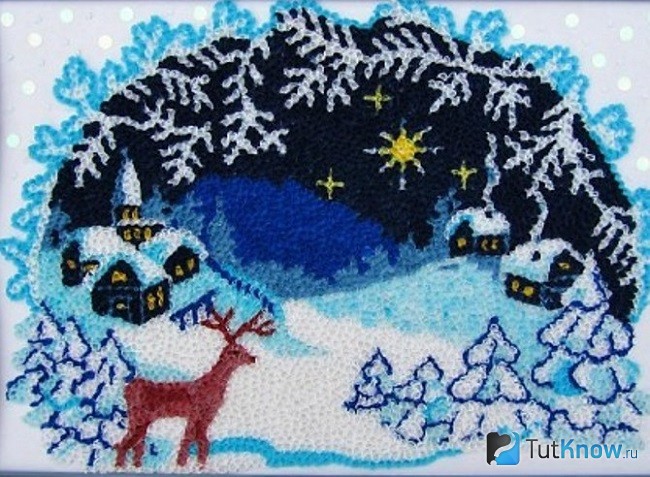
If you draw well, draw on the cardboard with a pencil the future of art, if not, then just redraw it. A good template are the embroidery patterns. They are transferred onto a sheet, drawn up with twisted paper pieces of a certain color.
Note that the contours of the trees are made of blue elements. This technique allows them to keep their shape and look fluffy, snow-covered.

In conclusion, look at how to make a New Year's garland, which will also help the trimming technique to create.
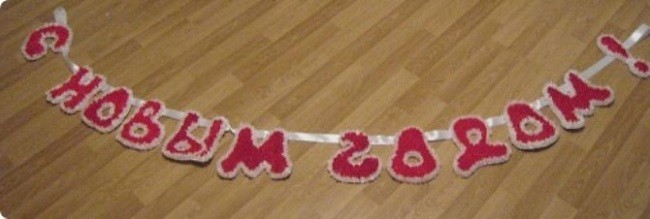
For it on the drawing paper or white cardboard draw the letters of the future inscription, cut them out. Now everyone needs to frame the first trimming white, glue in the red.
For the base, take a satin ribbon. With the help of a glue gun, letters are attached to it to make an inscription. Remember to maintain the distance between individual words.
Here is how much interesting and necessary will help make trimming. But this is not all that can be made in this technique. If you want to create a voluminous snowflake, look at a visual master class.
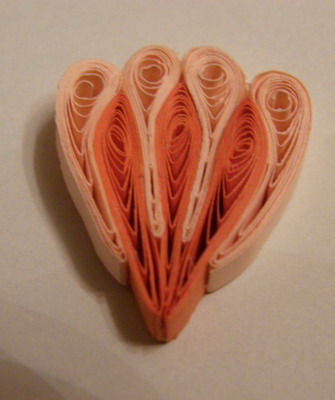
Another will teach you to make a topiary in the form of a heart in the same technique. This is what you give your loved one for his birthday, Valentine's Day.
Volumetric application, of course, is a bit more complicated than a flat one, but it also looks more impressive. The work done in this technique will be a strong decoration of the interior or expensive and spectacular gift to close people. In this article we bring to your attention a master class on volumetric application from paper with your own hands. Some lessons are suitable for children's creativity, others will be under the power of adults. Good luck with your work!
Bulk trees

Trees with volumetric crown - an unusual and original solution for children's creativity. Having finished the picture, the kid will certainly want to hang such a beauty in a frame on the wall, because the result is really wonderful.
For example, here such trees can be made in this technique:

So, a small master class.
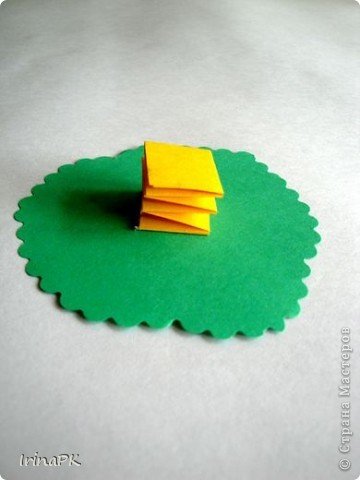
1. Cut out the wood contour from the cardboard. Separately, we need to cut a barrel that will fit the size of the cardboard blank. To this trunk we add the upper part - the branches.

2. Cut the strips of paper with dimensions of 1.5 cm * 10.5 cm, fold the accordion. Using curly scissors, we cut parts of the crown of different shapes and one lower part, equal in size to the bottom of a cardboard blank.

3. We place the accordions on the back of the crown blanks, except for the bottom. We glue it to the tree.
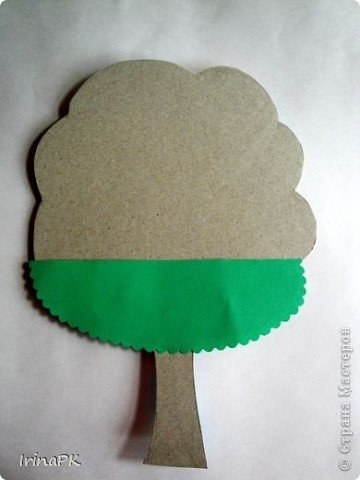
4. Top - trunk.
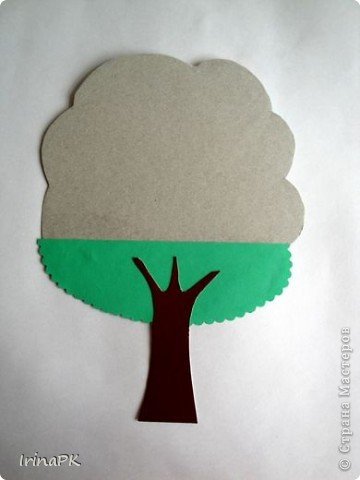
5. Glue the crown blanks on the harmonicas one by one, partially overlapping the adjacent ones.


6. It remains to decorate the tree. Weigh the colored fruits to get an apple tree.
The tree is ready.
Bouquet of flowers
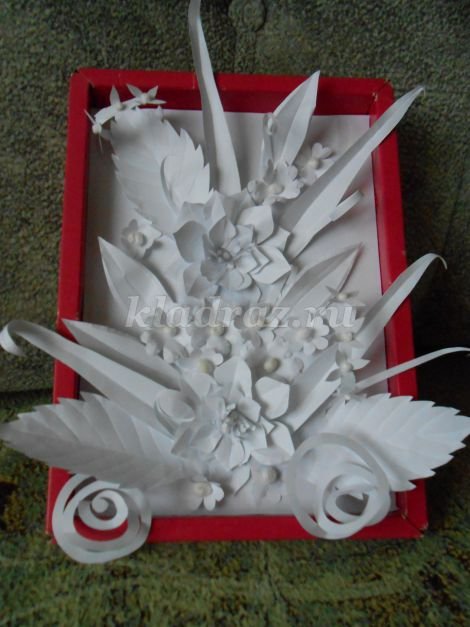
Beautiful panels can be made from plain landscape paper. If desired, the elements can be painted with watercolors. And if you take the paper more dense, then the work itself will turn out to be more voluminous, textured and interesting.
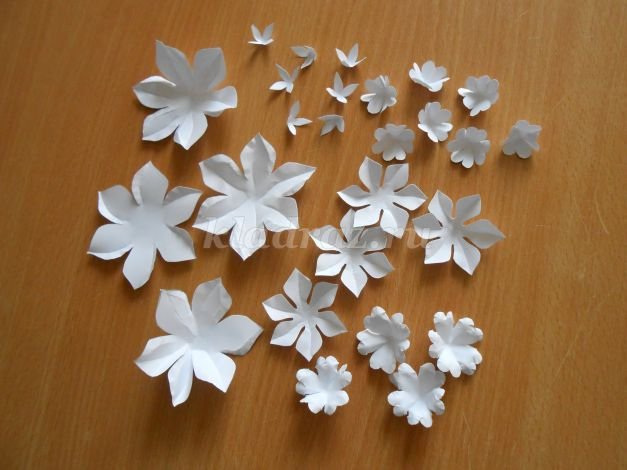
1. To begin with we draw templates for volumetric application from paper or we print ready ones. We have got such preparations here.

2. Cut a piece.
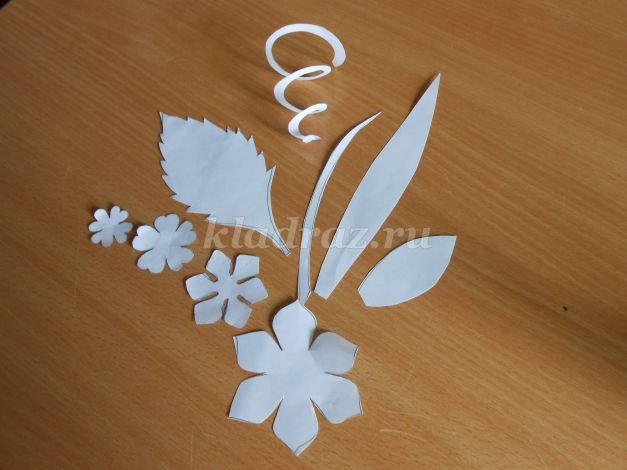
3. Outline on paper the required number of elements and also cut out.
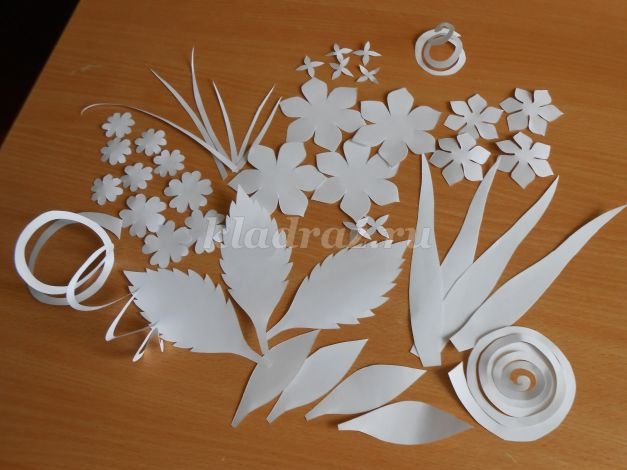
4. Make a background: cut a sheet of the desired size and paste it into the frame.


5. The reverse side of the clerical knife pushes the streaks on the leaves.


6. Thin leaves are ironed with scissors, creating fantasy curls.

7. Also pushing the middle and the edges of the flowers with a knife.
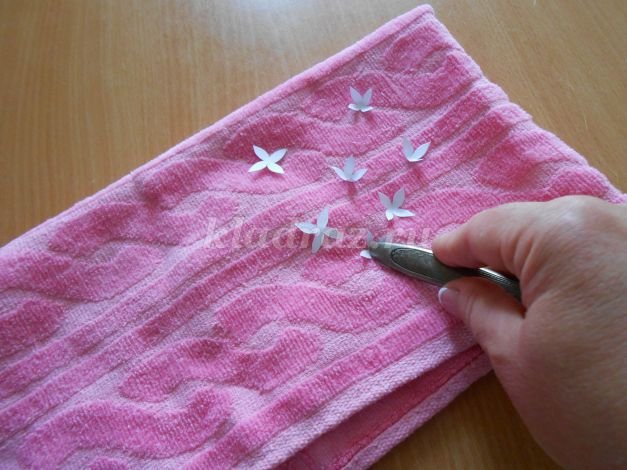

8. These are our ready-made flowers of different sizes and shapes.
9. Let's start creating the appliqué. According to the law of perspective, we begin work from the most distant objects, in our case - the leaves. Glue them to the base.

10. Creatively fantasizing, create a composition: flowers, bulky leaves, curls are beautifully placed and glued.

11. We obtain large stamens if we thinly cut the paper and fold it several times.

12. We can make small flowers of cotton buds or small beads.

13. Add the remaining decorative elements.
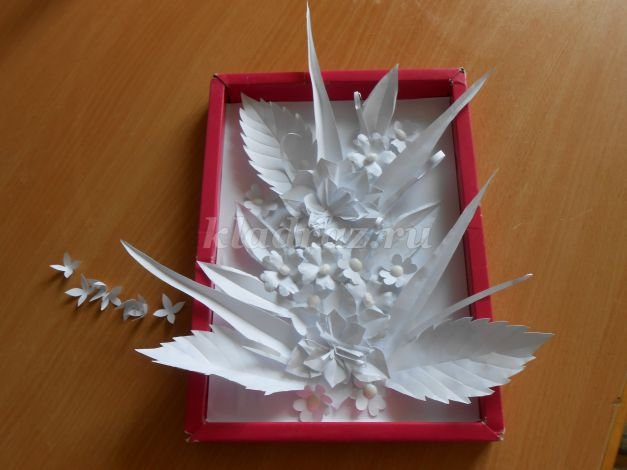
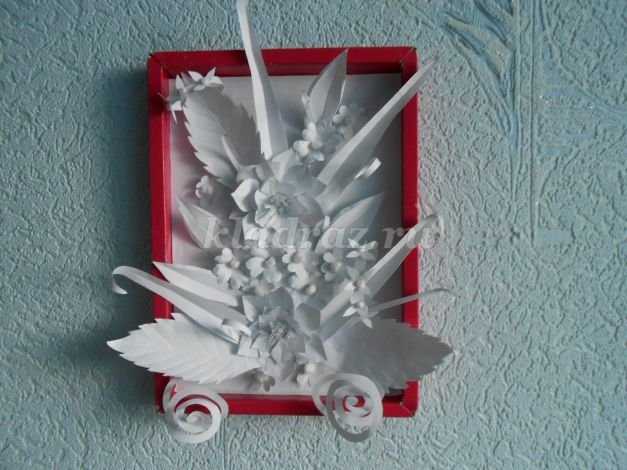
Work is ready! Can be hung on the wall.
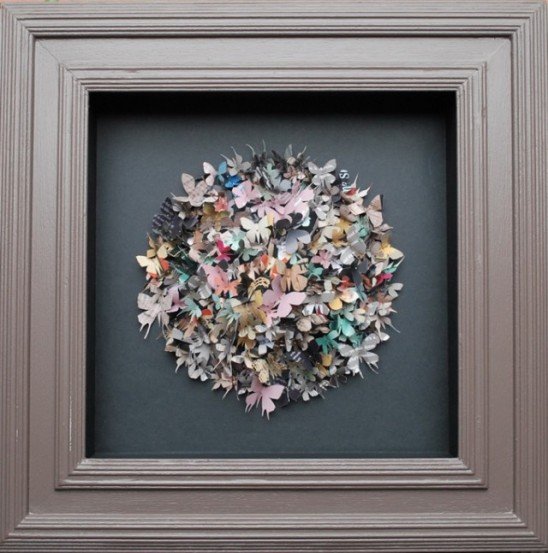
Butterfly panel
Rebecca Coles - the author of beautiful applications, whole pictures, made up of colorful butterflies. Creating such a job will require assiduity and patience from you, this technique is not complicated. The effect of perspective in it is achieved through the use of elements of different sizes, and the depth - in different shades and colors of butterflies.

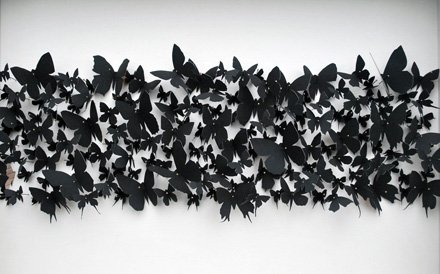


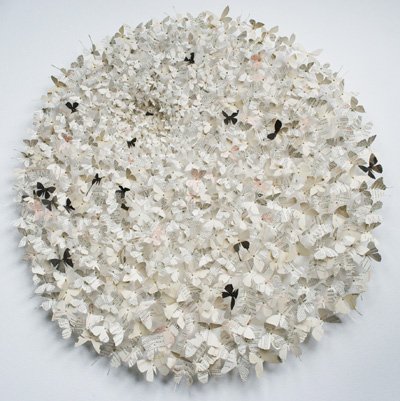
Unusually look butterflies cut from the pages of glossy magazines and newspapers.
How to make paper butterflies?

Any paper, be it a page of a magazine, newspaper, book, etc., is cut into small rectangles that fold in half. On one side, a half of an arbitrary butterfly silhouette is drawn and cut out.
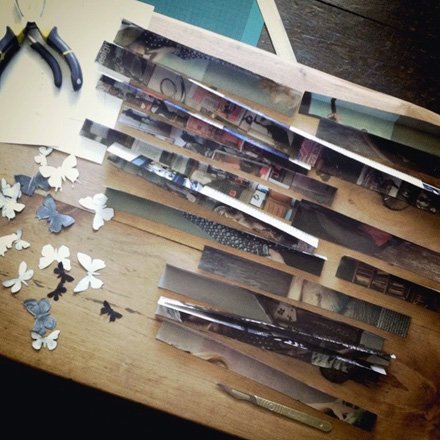

It remains to straighten the wings of a butterfly and use in creating the picture, sticking to the base or pinning pins.
Video compilation
Paper crafts are a wonderful way to spend time together for children and their parents. Working with applications is no more difficult than folding from paper with origami: it’s enough to outline the outlines of the future figure and cut it out if it comes to flat variants. And volumetric products allow you to create with the help of them whole pictures that are interesting precisely for their relief. And, of course, with them you can make a lot of attractive home accessories.
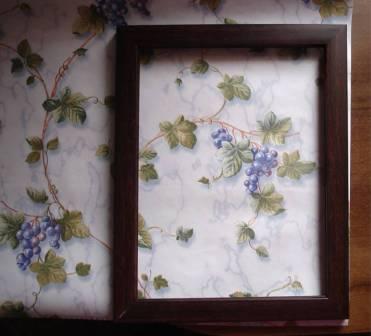
Volumetric application of flowers from paper: production

![]()


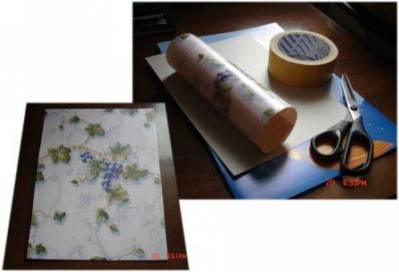
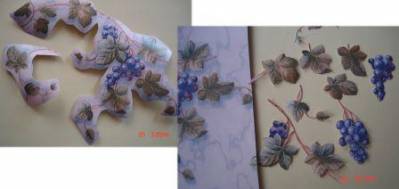
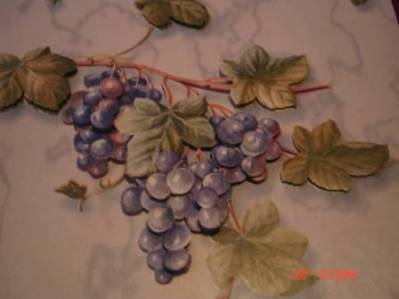
Of all the possible patterns for applications, flowers can rightly be considered the most interesting and multifunctional. Besides the fact that their types are diverse, it is with flowers that you can decorate almost everything: from a postcard to a large panel, small interior details, etc. Therefore, this element is required to be mastered by everyone who begins to get involved in paper handicrafts. Depending on what kind of flower you choose, the level of complexity is determined.
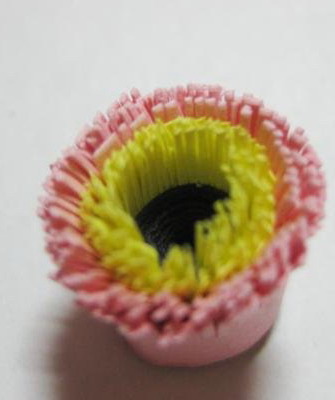
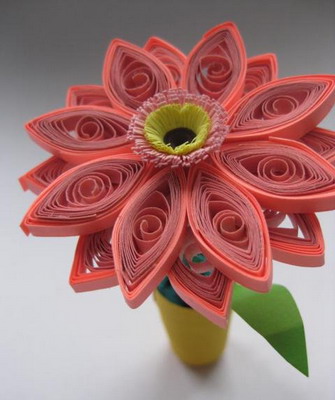
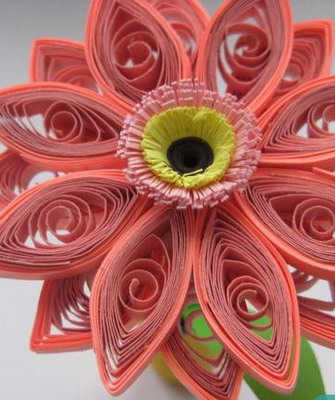
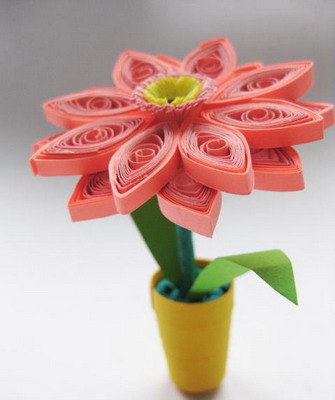
For example, to make a classic chamomile, it will take no more than half an hour. To do this, white oval petals are drawn on white paper, which can be slightly compressed on the sides to get narrower elements. If we recall the structure of this daisy, it will become clear that its petals are arranged in several rows: the same will be displayed in the application. Additionally, you will need green paper as a background, as well as a small piece of yellow paper from which the core of the flower will be cut.
Petals are cut in the amount of 16 pcs. the largest size, and then another 12 pieces, reduced in length by 3 mm, and in width - by 2 mm. With their bases they are glued to the selected background, forming a circle: the lower one of the large petals, the upper one of those that are smaller. And the last step is the addition of a yellow heart-circle. It can be made more interesting if you tear a small double-sided yellow sheet into small parts, smear the expected place of the core on the daisy with glue, and, keeping the circle shape, pour yellow scraps there. Then the center of the flower will turn out fluffy.
But not with all the flowers as easy as with chamomile. For example, a volumetric peony ball is created using other technologies: soft paper will be required, it will be loose, corrugated or similar in texture to paper napkins will work best. It is cut into squares, the length of the sides of which are chosen arbitrarily, but the circle of the future flower should enter the square. The layers of paper (8-10 pieces) are superimposed on each other, in the middle they are threaded with a thread, which is tied on the wrong side into a knot.
A pion pattern is drawn on thick cardboard, after which it is transferred by stroke to the top layer of colored paper. All layers are clipped at once along the drawn contour, then their conversion into petals begins. Since the peony is fluffy and voluminous, the algorithm works as follows. The upper paper circle rises, holding on to the center of the thread, its edges gather together, and you need to slightly crumple the paper. This layer should remain in such a vertical position.
Behind him the next sheet of paper rises, also folded with edges, but no longer so tightly, and again wrinkled slightly. It is required to lift up each layer, each time reducing the degree of convergence of its ends: the lowest one should move very slightly away from the surface on which the pion lies.
New Year's applications of colored paper: three-dimensional models
Before the New Year, all paper craft schemes become especially relevant: it’s so nice to receive a gift made by yourself. And never be over decoration for your own home. Through bulk paper applications You can make a beautiful postcard or a picture that will hang in the living room during the holidays. The centerpiece of any of these products will be the Christmas tree.
The easiest way to create it is bulk bulk application. To this end, the outline of the future Christmas tree is drawn on the background sheet of paper, which is filled with glue inside. It is best to use PVA, since the glue in the stick will not fix the necessary elements firmly enough if they are not pressed down. And this cannot be done in this case.
Now, from two-sided green paper, small squares or triangles are cut, which are crushed by hands and in the deformed state wake up to a predetermined shape. They are weakly pressed to the glue surface, and if necessary, fit along the contour.
Otherwise, you can fill in the template, if from each piece of colored paper to twist the dense balls, which also glued the entire silhouette of a painted Christmas tree. But in such a situation you will need to work more scrupulously, carefully sticking each element. But here it is easier to “decorate” the tree right away, if you roll up several balls of paper other than green and arrange them in rows along the diagonal, forming a garland. In the same way, it is possible to make imitation of Christmas-tree balls, which will be especially interesting if the basis for them is not colored paperand foil.
And you can make a postcard with a surprise: cut 3 circles from green paper, each of which is more than the diameter in diameter by 2-3 cm. Thus, their approximate diameters will be 5, 8 and 11 cm. The number of circles can be increased to 5- Ty, respectively, adding dimensions: they should gradually increase. Each of them draws a radius line to the center, and an incision is made with scissors along it.
Then you need to assemble each circle like a fan. To open a postcard, attach the base of the small circle to the top point inside the fold of the postcard, glue the sides of the "fan" to its halves. Repeat the same for the rest of the “fans”, arranging them so that the biggest one is at the bottom: it turns out a voluminous Christmas tree that will appear every time the card is opened.

How presentable your picture will turn out does not depend on the complexity of a particular application, but on the initial idea and layout of all elements against the general background. For example, some fashion illustrators complement their drawings with volume applications not only from paper, but also from other small elements: flower petals, beads, beads, etc. In their works, you can find inspiration for your own handicrafts: for example, you can not complete the whole picture with the help of three-dimensional applications, but only a part of it.
Draw silhouettes of ballerinas, paint them, and skirts to give pomp by appliquéing: tear two-sided colored paper into small pieces and lay it on the glue without pressing it tightly against the background so as not to kill the volume. Work will be more laborious if the paper is cut into long strips that curl into snails, and these parts fill the entire space of the ballet packs.
A sprig of mimosa, a template for which looks quite simple, can become more interesting if the sides of the oval-leaves are turned into a smaller and longer fringe. To do this, the incisions increase in frequency and extend to the central vertical, not reaching 1-2 mm before it. And so that not only the leaves, but also the flowers become more alive, pieces of paper for them are not cut into squares, but in an arbitrary shape, then carefully processed with glue and are interconnected into fluffy but small balls.
The more chaotic you will act, sticking together the "petals", without controlling the order of their connection, the more natural the flowers will look. As a stem, around which there will be leaves and flowers, you can use soft wire, pasted over with velvet paper of dark green color.
Volume paper application: photo


The most interesting of all are those volume applications in which textures alternate: for example, flat parts can be made of thick cardboard with a velor surface. A soft and voluminous - from a thin paper: corrugated, with glitter, fully matte. If the hand-made article is timed to the holiday, at the final stage nothing will prevent it from being decorated with cut rain, confetti, and other small paper details, which are fixed on transparent glue.
After you succeed in mastering the variants of volumetric paper applications suggested in the article, you can try to use the same patterns in the quilling technique, which are also a type of volumetric applications, but of a higher level of complexity.
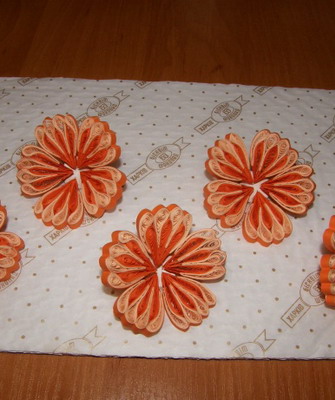
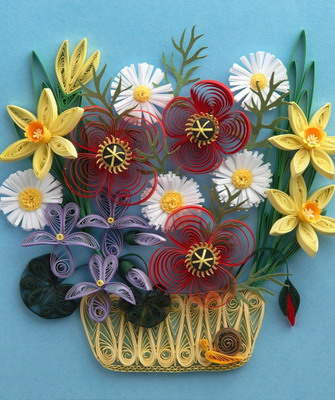
Flowers in the technique of quilling are now very popular, because with their help you can not just beautifully, but also very effectively arrange a gift box, box, box, photoframe, album or holiday card. Any composition made in this way looks unusual and truly luxurious. The technique itself is quite simple, but it requires patience and a certain amount of time, but the result is worth it.
Quilling is also called “paper twisting”, since this method involves twisting long, thin strips of paper. It is worth noting that deciding to do such an application, you will definitely need to choose a scheme, otherwise, trying to improvise, you can get confused. And how to make flowers in the technique of quilling, we will try to explain in detail and in this article.
Flowers in the technique of quilling do-it-yourself: step by step instructions
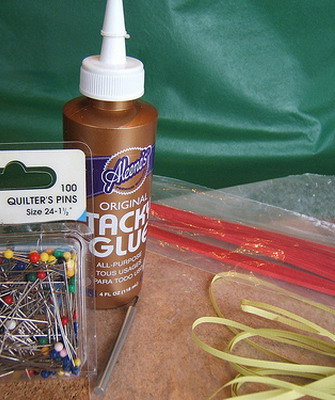
Before you begin work, you need to prepare the tools and materials: thick double-sided paper, scissors, PVA glue, pencil, ruler, compasses, awl. As for paper, it can be of different textures and shades. The most advantageous will look a composition of pearl, matte, shiny paper. The application can be flat or volumetric, it all depends on the ideas of the master.
Flowers made of paper using the quilling technique are made as follows:


1. The cut strips twist in a spiral. For this purpose, you can use an awl or a thin rod.

2. Spiraling by pressing or pressing is given the desired shape.

3. After this, the parts are glued together and fixed to the base.

There are many options for how to make flowers in the technique of quilling. For each of them, we need a scheme that includes the outline of the drawing and the elements themselves that fill it. For beginners, the challenge will be the location of the forms within the limits of the contour of the drawing, so it is better to gain experience in simple compositions and patterns. It is recommended to use step-by-step instructions and detailed diagrams, which indicate how many elements need to be prepared for work, as well as their sizes. All parts are prepared in advance, after which, based on the scheme, they are assembled and fixed to the base. This is reminiscent of engineering.


After mastering the simplest steps, most people who are interested in the technique and understand its essence begin to work with more complex compositions, but without relying on the scheme, using only their spatial imagination.
Anyone who has decided to start creating compositions for the first time is recommended to watch workshops on the topic “Flowers in the Quilling Technique for Beginners”:

Master classes, first of all, are worth watching for beginners, because how to make flowers using the quilling technique is explained step by step:

Making a spiral. The most important thing in this work is to learn how to make spirals, as this is the key to a neat, beautiful application.

To make a spiral for the pattern, you need to cut strips of paper of the desired thickness. Before you begin to wind it on the tool, it is recommended to hold it with a ruler or a fingernail, after which the strip will bend and become more obedient.

Now it can be wound on the tool (awl, toothpick, etc.). Work should be done very carefully, holding the strip with a slight tightness. After it is completely wound on the tool, it is better to leave it for a few minutes in such a way that the form is preserved. Then the resulting helix is removed from the tool.

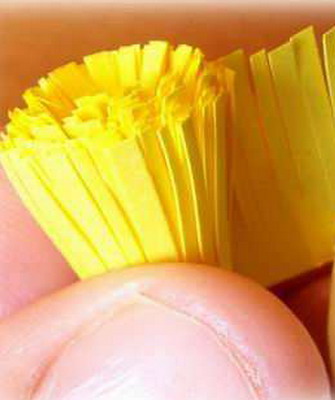
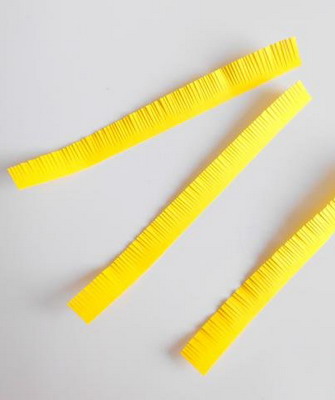
Creating fringe for flowers. It is easy to make a fringe, but you need to try and spend some time.
For manufacturing, a strip 1.5 cm wide will be required. With the help of scissors, it is necessary to make numerous cuts on it, which will fluff and help to obtain volumetric petals.
Simple ways to create flowers
Even the simplest flowers in the quilling technique look original and very beautiful.
How to create a little masterpiece is described in detail below:
1 option.

In the first stage, you need to make the petals. To do this, prepare two thin strips (10 mm wide) of different shades and glue them together. Since there will be 10 petals in a flower, it is necessary to make 10 such strips.


Each two-color strip rolled into a spiral with a diameter of 2 cm, then squeeze strongly to give it the shape of an eye.
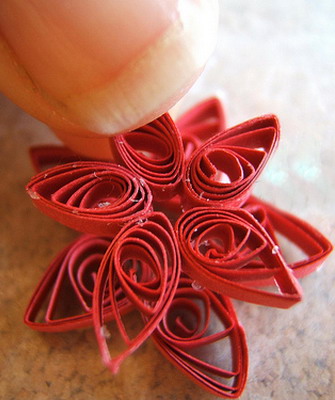

To give the petal an unusual shape, you need to twist one end of it with a thin, sharp object (awl, toothpick). Petal ready. This work is done with the remaining 19 petals.

At the second stage, the core of the flower is made. Two strips of different colors are fastened, for example, yellow and green. The resulting strip is twisted into a spiral and glued over the edge. The finished core is glued to a cardboard base, and 10 petals are glued around it.


You can make several of these flowers and arrange with their help a postcard, photo frame or something else, you just have to show imagination.
Option 2.
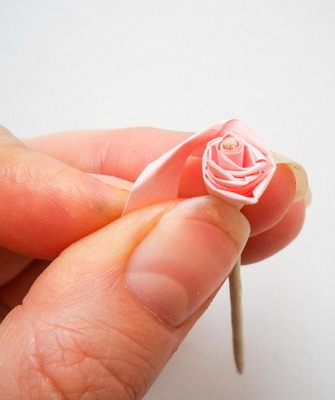
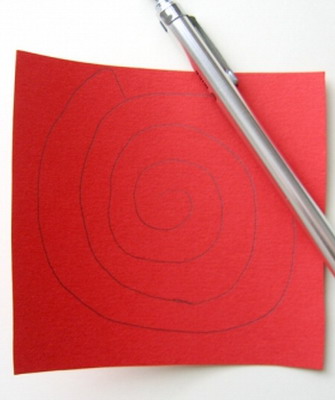
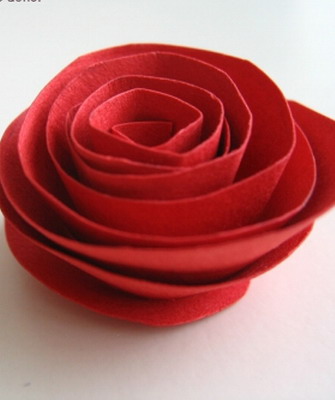
The most simple and beautiful flowers in the technique of quilling are, perhaps, roses. Make them the power of even a person who does not have experience in this art.

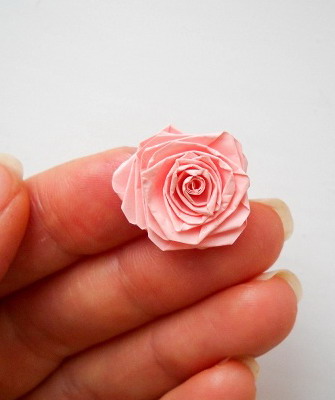
First, on a dense sheet of the desired shade is drawn spiral with 5 curls. Then a spiral is cut out along the curl line.


With the help of a special tool with a metal rod and a slot, designed to perform this technique, the resulting spiral-like strip is twisted into a bud, the edges are sealed with glue.


Having made several such buds, you can create a charming composition.
3 option.

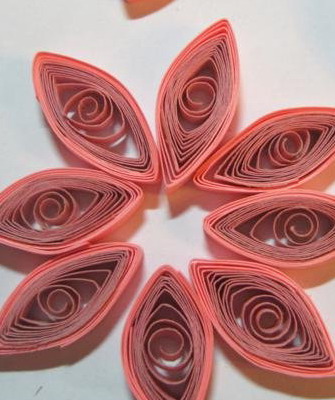
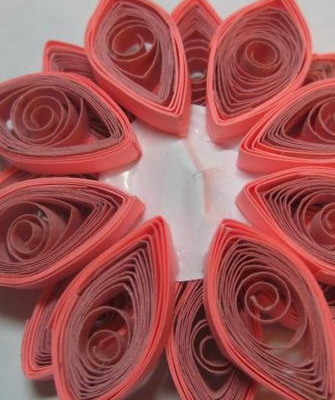
![]()

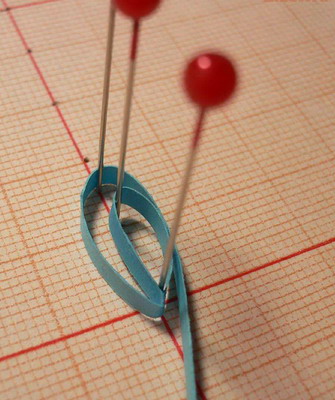
From paper strips of red or pink color, you will need to form 5 spirals with a diameter of 3 cm, glue them together, and then create another 5 smaller spirals with a diameter of 1.5 - 2 cm.


Smaller modules are glued on top of larger ones, thus, a bud is obtained. To create a solid composition, you need to make the stem and petals.
![]()

In order to properly arrange the stem, you need to fold a long strip of green with an accordion, fix the places of the fold for 1 minute with pins.


After this time, the pins can be removed, the stem attached to the base.
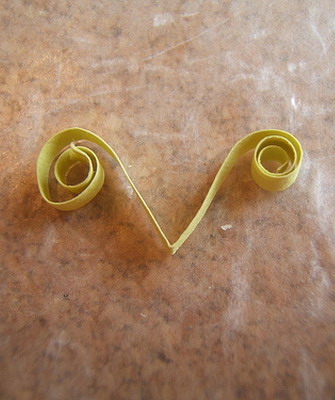
Make the stem in another way:
1. A strip of paper is bent V-shaped, and its edges are twisted into a thin spiral.
2. All parts are attached to the base with PVA glue.
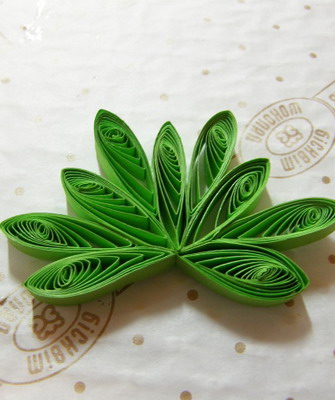
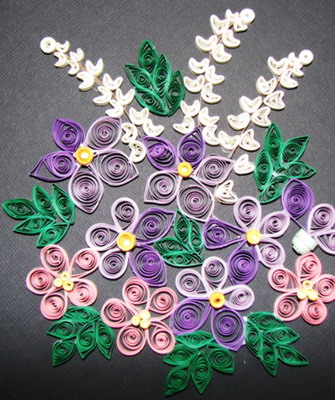
Below are photos of interesting works with the production of flowers in the technique of quilling:


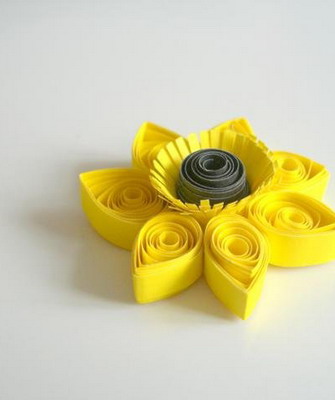
Bulk flowers. Chamomile, sunflower
Volumetric flowers in the technique of quilling - it is very beautiful, interesting, fascinating. They are used both to decorate a postcard, and to decorate some decorative elements.
Chamomile.

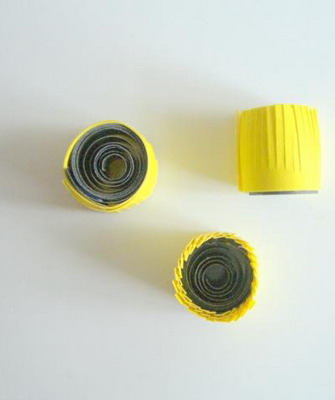
We propose to create a daisy using this method. To do this, you need white, yellow and green paper, as well as a standard set of tools. The width of each strip of paper should be 3 cm. The strips are wound on an awl, toothpick or special tool.


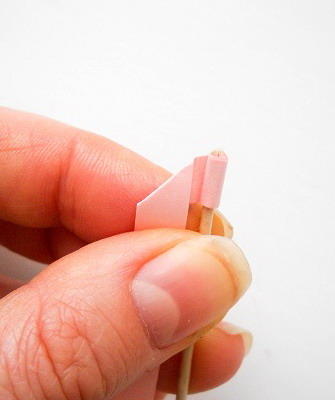
The resulting roll is removed from the tool and slightly weakened (it should not be tight). To give the petal an oval shape, you should slightly pinch it, but only on one side.
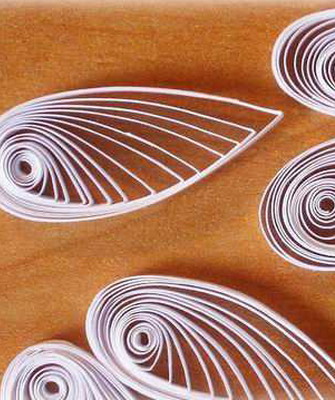
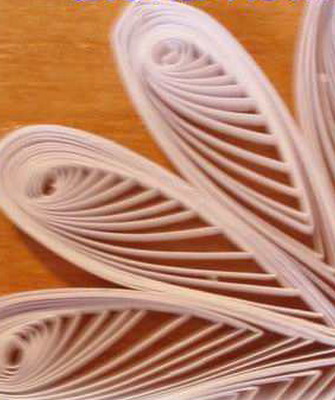
So get a droplet shape. The edge of the strip is sealed with glue. Such droplet-like petals will need a lot, the more there will be, the more magnificent the flower will turn out.
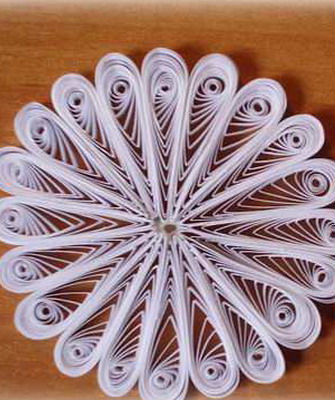

Now you need to make the core of the flower out of yellow paper. On a yellow strip, frequent cuts are made from one edge, this is how a fringe appears. After that, the strip is folded into a spiral. Petals are attached to the back side.

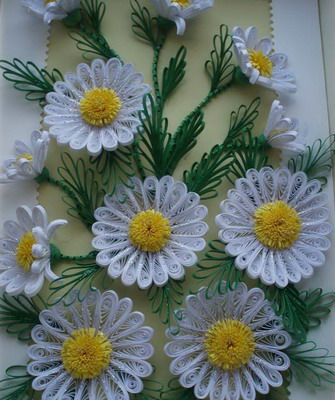
The stem is recommended to be made of corrugated paper, which must be carefully wound on a wire in an even layer, so that there are no gaps. Attach a flower to the end of the wire. The finished chamomile should be glued to the base, resulting in a volumetric composition.
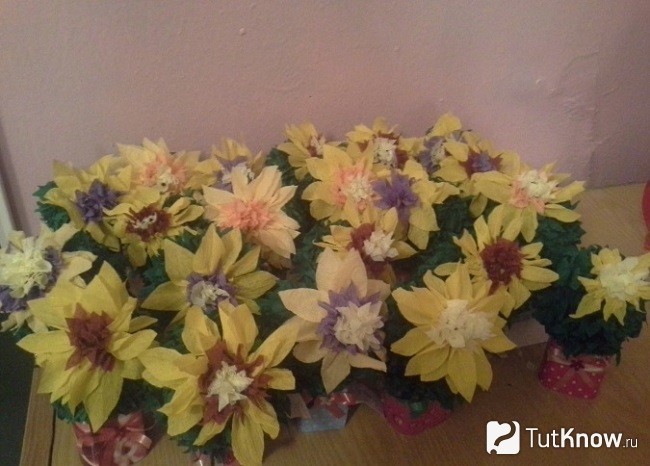
Sunflower.
Flowers in the technique of quilling with their own hands can be very different, but the sunflower looks bright, expressive and very impressive.


The work will require tools for quilling, yellow, black and green paper, PVA glue, floristic scotch, pins, cardboard, templates, circles, wire, ruler.
At the first stage, petals are made, of which there should be 2 rows in a medium-sized sunflower, each row containing 15 pieces. If the flowers are planned large, then there will be more petals.

The petals are made from sixty centimeter strips of yellow paper. The strips are screwed onto the tool or toothpick. Ready rolls dissolve to a diameter of about 3 cm, making measurements using a ruler. The edges of the rolls are treated with glue and fixed. After that, you need to give the roll a drop shape, as described above. Then you should hold one edge of the petal with your finger and move the middle of the roll to the opposite edge. Secure the rolls will help pins and glue. Now you need to make a few more of these petals.
At the second stage, the sunflower core is made with a diameter of 2–3 cm. This will require black colored paper and several miniature rolls of black thin strips. Each such roll is a sunflower seed. The seeds should be conical, therefore, using a sharp tool, you need to slightly squeeze the middle of the roll. The parts obtained are glued to the core until it is completely filled with such seeds.

In the third stage, the stem is created. To make it, they take a soft thin wire and divide it into 3 pieces 15-20 cm long. All the segments are wrapped with a small angle with floristic tape. If there is none, color paper will do.

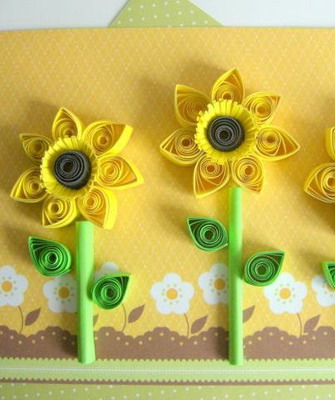
The fourth stage is the assembly of flowers. First you need to prepare a funnel of green cardboard, cutting a circle with a diameter of 3-4 cm. On it to make a cut from the edge to the middle. Process the edges of the cut with glue and join together to form a funnel. A stem is attached to the back of the funnel, to its sharp corner. The first row of petals is glued to the edges of the funnel, then the core and the second row of petals are attached.
We must not forget about the leaves of this amazing flower. They are made of two-sided green paper, giving the desired shape. Along the edges of the leaves are notched. On the sheet itself you can draw streaks with a felt-tip pen, so the plate will look natural. It is enough to prepare 5 - 6 sheets of different sizes. Upon completion, glue them to the stem. Making 3 - 5 such sunflowers, you can get a picture of flowers in the technique of quilling. One has only to glue them to the base and insert it into the photo frame of a suitable format. As a basis, suitable as cardboard, and any other thick paper.
You can make volumetric flowers in the technique of quilling, based on a master class, which describes in detail the process of creating real paper masterpieces:


What are the different flowers
Since the paper for this work can be used very different, starting with the usual color, ending with brilliant, the scope for imagination is unlimited. You can make a bouquet of flowers using the quilling technique, combining 3, 5 and more copies in it.


Such an application will be a wonderful decorative addition to any room and will daily delight the eye with its beauty.

Many people like wildflowers for their brightness, sweet simplicity and attractiveness. Using wildflowers in the technique of quilling, the masters create magnificent colorful paintings that depict a motley cheerful clearing. Blue, yellow, red, pink, blue, orange and other shades will be suitable for their production, because the color range of field plants is diverse.
3. Cutting thin parts.
Cut grass, feathers, hairs or fur is not difficult, try to cut in the direction of the growth of wool, otherwise it will "puff up". White edges paint over a lighter shade with a pencil than the drawing itself.
And when cutting stalks, white edges can be not painted over so as not to add unnecessary thickness.
4. Shaping.
Imagine how the subject that you want to portray looks like in real life, consider it as if in layers. This will help to recreate the volume of paper.
As a substrate, use an eraser, sponge or rubber pad (a computer mouse pad is suitable).

5. Installation and gluing.

6. Background.
The choice of background is very important. The appearance of the finished work largely depends on the color and texture of the material. If the picture is light, then a dark background will create an impression of depth and emphasize the image.
Choose a background that complements the image, and is not an independent part of the picture.
If you are going to insert a picture into the frame - do not add decorations. But in a postcard properly chosen decor will only give charm.

Step-by-step instruction execution:
1. Select a pattern for the entire composition and for the base layer.
2. Thin paper for the base layer must be sealed.
3. Cut the individual elements of the pattern for the second layer. Elements are cut out completely, repeating the pattern of the base layer.
4. Glue the elements of the second layer on the base with double-sided tape. The adhesive tape can be used in 1-2 additions (at this stage you can make your own changes to the drawing).

5. Cut the individual elements, form the subsequent layers of the picture. Before finally sticking a part, make sure it is in the correct position.
6. Finalize the work in the frame.
When making cards, you can additionally decorate with ribbons, sparkles, beads, etc.