Application in class and in extracurricular activities
To help teachers primary school
We invite you to a creative master class at MKOU VSOSH for technology lessons and creative classes in after-school groups in 2 "a" and 3 "a" classes. We are happy to share how we teach children to work with colored paper and cardboard. We make interesting creative work.
See them, use them in your pedagogical work, give to friends and relatives! And we draw ideas for creativity on the Internet, in methodical literature ...
We are getting ready for the technology lessons in advance, we are doing the work with a creative twist.
To zoom in - click on the pictures.
Students Usoltseva V.M. We are pleased to work with colored paper and cardboard.
In the day-care group they make baskets for mothers and greeting Cards for dads.
Application in primary classes in technology lessons and in the extended day group using information technology
Relevance:
we chose this topic because we really wanted the technology lessons in grades 1–4 with students to be creative and interesting. The application gives you the opportunity to quickly, inexpensively and not in the way everyone decorates their portfolios with their work and to please parents, teachers, children of the class with their neatly done works so that they can be presented to classmates and friends.
Objective:
to analyze the possibilities of using the application for a gift to a friend and mother, for the design of the portfolio of each student of the class, for an exhibition at competitions
For this we decided the following tasks:
- collected material about the application, about the history of its occurrence;
- systematized the work with applications by topics:
By type of execution
- by content,
- to the dates of the calendar,
- on the material from which it is made;
- analyzed the placement of applications in the students ’portfolio and in the teachers’ portfolio.
During the work, we, along with the students, used different methods:
theoretical (studied books, reference books, analyzed the information received, systematized);
empirical (independently made different types of applications, using different technologies of execution, created a collection of paintings-applications for decoration).
In the manufacture of applications used methodology Gusakova M.A., and also made their adjustments to this technique.
Work plan.
1. Entry
2. Main part:
but) from the history of the application;
b)types of application:
- by type of execution
- by content,
- on the material from which it is made.
at) description of the author's applications;
d) system of placement of applications in the design of exhibitions in the classroom and at school.
3.
Conclusion. Conclusion
4.
Informational resources.
 |
Master Class
1. Entry
We, along with the students, really wanted to see this manual colorful, neat, rich and informative. So that everyone who sees our applications can plunge into the world of beauty: to see the morning tenderness of dawn, to hear the hubbub of birds and the rustle of waves, to visit a fairy tale, in the world of childhood.
Application is the simplest and most affordable way to create paintings, which makes it possible to quickly and affordably decorate any exhibition, creative gallery with them.
2. The main part.
When making applications, we faced various questions: what is an application when it came from, from which it is possible to make an application other than paper, and we decided to turn to books, encyclopedias, to find answers in them.
It turns out that the word “applique” comes from the Latin word “applique”, which means “attachment”. Indeed, the picture-appliqués made in this way are distinguished by the fact that they all have a base, to which the cut elements of a different color or dressing are applied.
but). From the history of applications.
We were very surprised that the application appeared more than 2500 years ago. It was created by nomadic peoples, decorating with applique clothes, shoes, and housing. They performed their work of leather, fur and felt. In the Leningrad Hermitage there is a large felt carpet decorated with figures of goddesses and horsemen. There are items of horse harness, decorated with applique of leather and felt. All these items were found during excavations of mounds. Khanty, Mansi, Nanai, Evenki, Komi, Kazakhs, Kalmyks, Buryats use the appliqué to design a national costume, household items.
It turns out that the application of fabric appeared much later. Clothes and household items were decorated with such an appliqué fabric by stitching pieces onto the background. Currently, this type of application is used in the design of children's and youth clothing, it is decorated with decorative panels, curtains, tapestries.
But the most "young" is considered to be paper application; it was developed only in the 16th century. This is carving out black paper silhouettes, plants, household items, animals,
figures of people in the dance. We found out that the “youngest” application is from dried plants, straw, moss, etc. This is floristry.
In different areas, the application was different. How many colors, bright patterns in it!
b). Types of applications.
But it turns out that this is not all that you can know about the application. We tried to determine the types of applications. By type of execution we have identified two groups: flat and voluminous application.
Flat application - this is the most simple application by execution. To do this, cut out the details of paper, fabric, leather and other materials and stick them on the background. And you can make such an application out of paper by cutting it off. The edges of such parts are uneven, giving the impression of fluffiness and roughness. This application is called mosaic. Pieces of paper can be cut and scissors. Paper mosaic can perform both contour and solid images.
BUT volume application creates some appearance of volume. According to the methods of manufacturing, we divided it into four groups:
- only separate parts of the application should be glued to the background, and the rest should be slightly bent;
- cut several times the same part and glue in two or three planes;
- take some volumetric detail (for example, a box for a birdhouse, cotton wool for snow) and glue it onto the background;
- appliqué parts made of crumpled or corrugated paper (crown of a tree, the core of a flower) to show the volume of the game material.
It is interesting that in terms of their content, the application can also be divided into types: subject, subject, ornamental, applique from silhouettes, type.
Subject application - This is the most simple application. It is used in the manufacture of simple images: trees, leaves, flowers, butterflies, vases, dolls, people, vegetables, berries, animals.
Story (thematic) application more complex, consisting of several objects in motion. These applications are often used to illustrate literary works: fairy tales, fables, poems, short stories. Most often, such applications are multicolored, but can be made from the same color.
Ornamental application used to decorate clothes, carpets, albums, bookmarks. To do this, make an ornament representing the alternation of geometric, plant or other forms. It can be composed of both identical and mixed parts. It is also possible to use simultaneously in the ornament geometric figuresand vegetable forms.
Silk appliqué - an interesting type of application work. He draws to his original image. The work uses contrast. For the manufacture of parts using black paper, sticking it on a white background, and vice versa - the white parts are glued on a black background.
Font application used at registration. Beautiful letters of colored paper make out the headlines, the names of posters, manuals.
We found out that you can use everything that you have to make an appliqué: pieces of leather and fabric left after sewing, trimming of fur, hanks of colored yarn, remnants of cords and rope, foam rubber, chips from board games, matchboxes, seeds of different fruits, plant seeds, different types of paper. No need to look for anything specifically. You just have to look around you.
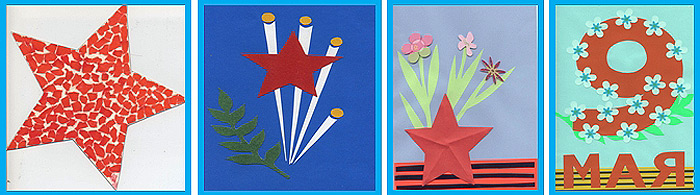
We called these appliqué paintings. "Stars of Heroes", dedicating them to Victory Day. These are flat and volumetric applications and made in mosaic technique. We made the first of paper using a tearing method, completely clogging up the whole image. First, we drew a sketch of the future application, chose the colors of the paper, and then proceeded to its implementation: tearing off pieces of paper, smearing it with glue and gluing it. The work was carried out collectively, dividing the production of individual elements among themselves. And we made the following applications from colored, velvet paper, cardboard and white. Such works we gave to veterans of the Great Patriotic War.
Using the same technique, we performed the following picture-applications "Seasons", inspired by the music of Pyotr Ilyich Tchaikovsky.
 |
|||
Spring. |
Winter. |
Autumn. |
Summer. |
And the plot of these applications we found in the book Gusakova MA "Application: A textbook for students of pedagogical schools in the specialty No. 2002" Preschool education "and No. 2010" Education in preschool institutions", - edition 3, - Moscow: Enlightenment, 1987. Figure 122 "Decorative flower", made of straw.
We are northern villagers. Often we leave with our parents to the south. And we bring to the lessons of labor an unusual natural material: the straw of various plants, barley, wheat, and oats. We brought bundles of straw of these plants, cut the knots from the straws, and the remaining parts were laid out in boxes separately. Then the prepared straws were placed in a cup of hot water. After 10 minutes, the guys began to cut them with a sharp knife and scissors along the trunk. And the other guys opened the doors and ironed them with a hot iron. It turned out straw ribbons of different shades: from golden to greenish-brown. The most beautiful ribbons turned out from barley straws.
Of these, we decided to make pots and flower vases in appliqués, and make the background on red paper.

Here the volume objective application is ready. And here it is - "The Flower of Summer".
The eggshell from dinner, we, too, all went into business. On a cardboard we drew a butterfly contour with a simple pencil and pasted the shells with the glue “Moment”, it turned out to be a wonderful butterfly!

In this book, we also liked the picture 26. It was a plot mosaic “A hen ryaba”.
And we have completed the story on the theme of the fairy tale "Kolobok".
![]()
We made a volumetric out of a flat application, replacing colored paper with plasticine, and a plain background with delicate wallpaper resembling a summer glade. Our "Gingerbread Man" turned out amazing.
Deciding to create a plot application "Swans on the pond" and performing a sketch, we chose the material for the manufacture of parts of the picture. We began our work by choosing a background. We made it out of paper using black. Primary color is black velvet paper. Water, birds - made from scraps of white paper.

Somehow, in technology lessons, we learned to do ladybugs, butterflies, whales, dolphins and fish. The guys offered to use them in the manufacture of paintings, applications. What happened? Story application “Fish in the pond”, “Ladybug on a leaf”, “Frog and whale for a walk”, “Dolphins play ball”.
On the green cardboard we pasted multicolored ladybugs. A colorful fabulous fish launched into the pond.

Just imagine how beautiful "Aquarium" turned out with us! The guys at home have accumulated a lot of empty candy boxes. Having fantasized, we decided to use them in our work. Frame replaced box. In it pasted the background - light blue paper. Cut out green plants and blue pebbles from paper. Glue them using glue for glue. It remains to distribute the fish. The result was a voluminous plot application. In work it was used only a miscellaneous colored paper. Works were performed individually. What is not an original gift for friends and relatives!

Giving gifts is great. We came up with pictures - applications "A gift to mother, teacher, grandmother, classmate." Work performed collectively, individually, in groups.

First, sketched pictures. Made a few templates for flowers. The templates translated and cut out the details of the flowers from the multicolored trimmings. Then they took two or three details of the flower of different colors and glued together. It turned out voluminous subject applications made of scraps of paper.
In the book “Application Works in Primary Classes” / compilers: Scheblykin I.K., Romanina V.I., Kaganova I.I., released in Moscow in 1983, we liked the application “Spring” on page 148, made of paper .
We decided to make the same picture for the Day of Birds. Using the drawing, we drew a sketch. According to the sketch made templates details. Began to choose color paper, but it turned out that we do not have sheets of the desired format. What to do? We decided to use paper in our work. We cut out the background, birdhouse, birch, starling, and sun from paper, and open branches from velvet paper.

They carried out the application in the usual way: a background was pasted on a sheet of drawing paper, then a white trunk was pasted, and black stripes were pasted on it. It turned out birch. On the big branch, we stuck a birdhouse from different shades of brown, creating the appearance of volume.
But to nature lovers, we presented a voluminous object application “Memories of Summer”, made in the style of floristics.

In early September, we collected colorful leaves, flowers, grassy plants, and maple seeds. Leaves, grass and flowers are laid out in old textbooks so that there are several pages between them. The books were piled on top of each other, a small plate was placed on top, and a load was placed on it. After 2-3 weeks the material for the applications was ready. Each student prepared such work himself, displaying creativity and ingenuity.
And for this picture we used birch bark and dried birch leaves.

We called our application "Russian birch". For the design of this picture, we chose a box of candy. A trunk and branches were cut out of birch bark, small birch leaves of various shades were selected.
3. Conclusion. Conclusion
Having collected and systematized the material about the application, we learned a lot about the types of applications, learned how to do them, using different techniques of implementation. The creation of applications began with the use of the method of M.A. Gusakova.
In the manufacture of paintings appeared new ideas:
- at production volume applications use origami, flat soft toys, chips from board games, plastic boxes from kinder surprise; finely chopped threads of different colors (appl.6); plasticine.
- in the manufacture of flat applications use knitting, batik and clay; combine at the same time a different material on the texture (fabric, paper);
- stick fabric with wallpaper glue;
- for registration of pictures to use boxes from under candies;
- to give expressiveness to cover the seeds of plants with nail polish (colorless and color).
Looking at the placement of paintings in the portfolio, we made recommendations:
- You can donate works to parents, friends and classmates paintings with fabulous characters;
- stored as a memory of the school.
Creating applications, we realized that they are an original memorable gift to mom, dad, beloved teacher, friends. There is a good tradition in our school - to give presents to war and labor veterans. We make gifts to veterans with our own hands, and many of them have our applications.
When making a portfolio, we recommend using the application, as this:
convenient, practical
(the application is not broken, dust can be wiped with a damp cloth), cheap
(in the application, you can use any available material without spending money), attractively (
you can create any picture you like).
4. Information resources.
- Gusakova M.A. Application Training A manual for students of pedagogical schools in the specialty 2002. M., Enlightenment, 1977.
- Scheblykin I.K. and other. Application work in primary school: A Handbook for teachers on vneklas. work /I.K. Scheblykin, V.I. Romanin, I.I. Kaganova .- 160 pp., Ill.
- Great Encyclopedic Dictionary - 2nd ed., Pererab. and additional - M .: Big Russian Encyc; St. Petersburg "Norint", 2001.-1456 p., Ill.
- Encyclopedic dictionary of the young artist. Comp. N. I. Platonov, V. D. Sinyukov. - M., Pedagogy, 1983.-416 p., Il.
ATTACHMENT:
1. We prepared these applications for the Evenkia holiday:

2. And in the September days, when mushrooms were gathered in the forest with my parents, fruits and berries were bought in the store — they used cloth and colored paper for the technology lessons.


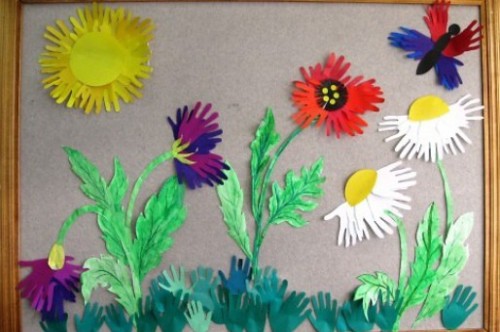
3. Festive mural.

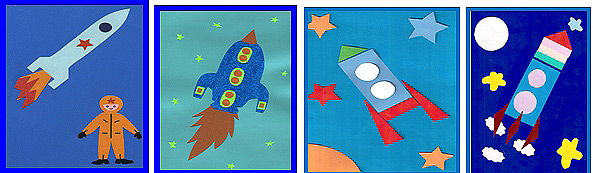
4. For the Cosmonautics Day, we all performed works of this kind from cardboard, velvet, corrugated and colored paper.
5. And how children on Teacher's Day love, on March 8, to give congratulations to teachers, grandmothers, girls and mothers! These are the wonderful works:
![]()
We wish you creativity in work!
Mentz Elena Alexandrovna
Usoltseva Valentina Mikhailovna
Volume paper application for younger students
Master class on needlework. Paper application
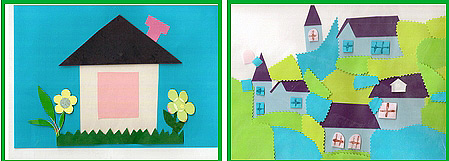
Application "Country House"
Author of the work: Svetlana Basanova, tutor of the extended day group “MBOU SOSH No. 16”, Chistopol, Tatarstan
The master class is designed for children of primary school age, teachers and parents.
The purpose of the master class: interior decoration in the extended day group.
purpose: development of artistic and creative abilities by means of manual labor.
Tasks:
Developmental: to develop artistic taste, a sense of composition; Creative skills;
Educational: learn to design from paper; to form skills in working with scissors, glue, paper, napkins; promote the development of fine motor skills and coordination of hand movements; form and develop manual skills;
Educational: to bring up independence and accuracy in work.
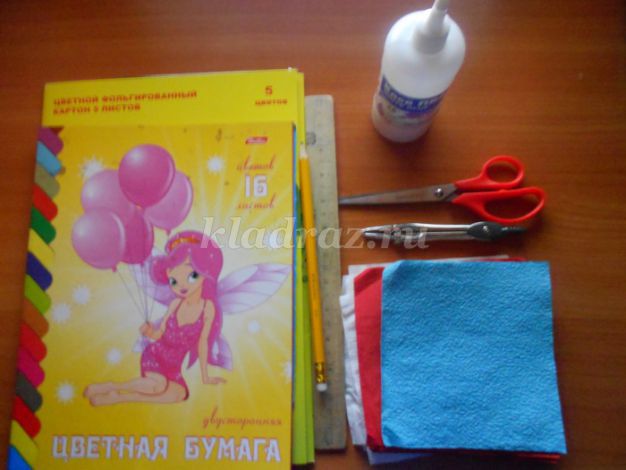
Materials and equipment: colored paper, cardboard, paper napkins, scissors, compasses, pencil, PVA glue, ruler.
Working process: Ah, this village house,
Where the distance froze outside the window ...
Here it’s like God's grace
The soul wants to fly so much.
1. For the manufacture of panels prepare a sheet of cardboard. Design the background paper in green and blue.

2. From the yellow paper, cut out the silhouette of the house with a height of 14 cm and a width of 10 cm.
Now also from yellow paper cut out strips 4 cm wide. 9 strips 10 cm long, one strip 9 cm long, 8 cm, 7 cm, 6 cm, 5 cm, 4 cm, 3 cm, 2 cm, 1 cm.

3. Then, with the help of a pencil, we fold the tubes - “logs” for our house and glue them from one edge.
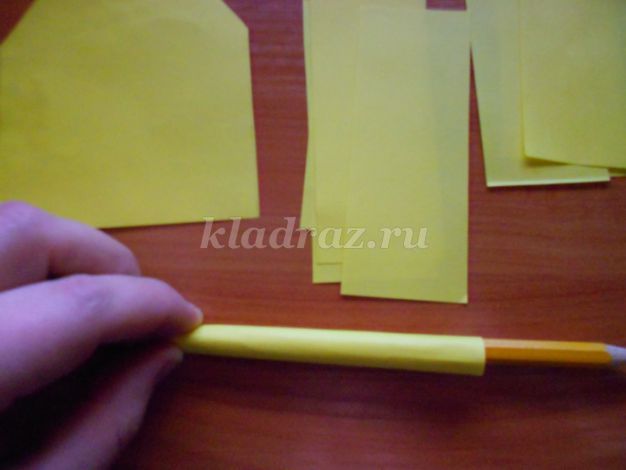

4. Start building a house. Apply glue to the silhouette of the house and put the tubes up from the bottom, tightly gluing them to each other.

5. We make the roof of the house - cut out two red stripes 1.5 cm wide, 12 cm long. Fold the strips in half along the dividing line and glue on the roof slope.

6. Let's make windows in our house - cut out 3 rectangles of red color 3x2.5 cm and three rectangles of white color 2x2.5 cm,

stick white on red. Then we make frames from thin strips. Glue the windows on the house.
8. Guess the boys, the unusual riddle:
Green aunt dressed in needles,
It stands alone in the woods on a hillock.
Wore earrings for fun,
Hiding for the squirrels in the catkins nuts. (Christmas tree)
To make a Christmas tree, we take a sheet of green paper, fold it in four and a half more, draw the outline of the Christmas tree, cut it out.

Separate the Christmas trees and glue together with each other only at the bend.

10. Make the sun. From yellow paper, we cut 2 circles with a diameter of 5 and 2.5 cm and 1 circle with a red color with a diameter of 3.5 cm. We also cut 8 rays - triangles with a height of 2.5 cm.

11. That's what the sun turned out.

12. Making clouds. Fold the napkin white together and cut an oval. Then along the edges of the oval we make scissors cuts.

Glue all the napkin layers in the center and disperse the clouds.

13. Guess the riddle:
I look like a cloud
In the meadow you will find me,
My coat of curls,
And my name is ... lamb
Now we make a curly lamb. Cut out white paper from the head, legs, torso and tail.

On the head we draw a mouth and an eye. Cut a rectangle 11 cm x 3 cm, make cuts on both sides.

14. Now with the help of the rod from the handle we wind each strip and make curls.

15. Glue the curls on the torso. Also make out the head.

16. Glue the finished parts on the cardboard.

17. Guess another riddle:
Tall and green
She will be mowed.
Sheep, goats and cows
There are always her ready.
(Grass)
We make grass from green paper. Randomly cut strips of paper. From one edge along the entire length we make incisions.
AT primary school A variety of creative activities with the manufacture of applications and original paintings are becoming an important part of the educational process. Why is the application so important for younger students, and what crafts can kids do?
The advantages of using applications in primary school lessons
The benefits of using applications are widely discussed by teachers around the world, because hand-made crafts make great imagination.
Some teachers even refuse to give children tasks, trying to stimulate them to invent something original and truly unusual. One of the main advantages of such lessons lies in the fact that the manufacture of handicrafts takes place in an informal setting. Many kids find it hard to get used to the school walls, and so lessons for them turn into a lot of stress. With the help of handicrafts, kids will learn something new, while simultaneously developing fine motor skills of fingers.
By the way, the development of fine motor skills is another undoubted advantage of working with applications. Children constantly glue something, collect, work through the details of a particular picture, making it as beautiful and realistic as possible.
Classes applique on the lessons - a great way to focus the attention of the kids. Experienced teachers know that kids under the age of ten cannot concentrate on any task for more than 10-15 minutes. Work with handicrafts teaches to perseverance, to concentrate on small and important details. All this subsequently contributes to an increase in the intellectual activity of the child.
Here are just lessons with the use of such a creative approach you need wisely. First, teachers should always set a specific goal for the children, which they must fulfill. Even if the teacher encourages the kids to come up with their own crafts, the topic should be thought out and outlined in advance.
Secondly, do not forget to use the application to create a variety of gifts. On March 8, February 23 and May 9, children can come up with interesting presents for their parents using appliqués.

Thirdly, this method of working with paper and glue can be used not only in technology lessons, but also within other subjects. For example, in nature studies, children can make flowers and plants out of paper, remembering their appearance and names along the way.
And finally, in the process of making crafts, the child does not need to be limited. Even if the baby begins to do something unusual and strange, the teacher should carefully direct the baby on the right path. The teacher himself must control the process and help the children in the manufacture of the application. Under the strict guidance, and using all the rules of a literate, creative lesson, children will be able to enjoy the lesson, and the teacher will face high pedagogical results of work!
Examples of application for younger students
Portraits of applications and various crafts should be selected in accordance with the age of children. For example, first graders can be offered to make a bulk lily from paper. The manufacturing process itself is quite simple, and the kids will only need colored paper, glue and scissors to work.
First you need to cut a circle out of pink or red paper. Next, you need to make several deep cuts on this circle (5-6 pieces). Curling the tips of the pieces of paper, the kids will get volumetric petals from the lily. In the middle of such a flower you need to place a piece of yellow paper that will represent the core of the lily.
Usually, children aged 7-8 years require no more than twenty minutes to make a similar flower. In order to keep the work done, it can be glued to a piece of strong and hard cardboard. This craft will be a great gift.
With the help of the appliqué technique, kids in the second or third grade can make real pictures in mosaic style. To do this, cut into small squares of colored paper. On the sheet of colored paper of blue or yellow color should outline the contours of the future picture. For example, babies can depict a flower or a snowflake. Now it only remains to glue the small pieces of colored paper to the places where the outline was drawn. As a result, it turns out very original hand-made article, bright and creative at the same time.
The teacher can additionally stimulate the development of imagination in their students. To do this, he can ask each child to lay out absolutely any pattern with this technique. The result is either an abstract picture or an image of the natural landscape. Beautiful pictures with the mosaic technique can be performed on a piece of cardboard, because then the craft will stand the test of time.
For the manufacture of original crafts is absolutely not necessary to use only paper. For example, sand applications are popular. To make them on a piece of cardboard, it is necessary to draw some kind of picture (for example, an allusion on the theme of the seashore). After the drawing was ready, glue should be applied to the places where the sand will be located. Further, these areas will only sprinkle with sand and wait until it dries. The remnants of the sand, which is not stuck, you need to gently shake. If the teacher wants the picture to be more realistic, you can glue shells or tiny flowers, also made with applique, to the picture.
Dried sand can be covered with a layer of paint to make the picture seem voluminous and realistic at the same time. Such crafts can be made not from sand, but, for example, from rice. The technique is exactly the same, but the picture will be even more voluminous.
For the manufacture of handicrafts in the classroom in the primary class, you can use pieces of cloth. For example, a child can cut out images of butterflies, flowers and grass from colored fabric. Having pasted all this on pieces of cardboard, the baby will receive a full and very bright picture. To decorate his crafts, the kid can use buttons, pieces of lightning and even pieces of wool. All this together looks very original. The main thing here is not to be afraid of the abundance of details, because, the more unusual things appear in the picture, the more original it is.
You can use anything for inspiration. For example, an application can be created from egg shells. These shells should be crushed and painted as much as possible in different colors using paint. Further it will be necessary only to glue the shells to the cardboard, focusing on the desired pattern. Usually such an image is very original, and at the same time, working within the limits of this technique, you can perform absolutely any image.
Original applications can even be made from leaves. For example, a baby can spread flowers and plants from small leaves. Even animal images can be laid out using yellow or red. autumn leaves. As a result, the baby will receive the original crafts, and the process of its manufacture will develop a lot of imagination.
When working with younger students, it is important to think through every detail of the future application, making the activity not only interesting and productive. The more a student uses different materials for making crafts, the better, because in the process he learns to work with completely different details.
For example, a baby can cut several flowers from paper by sticking them on a piece of cardboard. Further, in order to give a drawing of volume, a child can decorate the petals of flowers with rhinestones or beads. Such an odd job is always very interesting. With the help of rhinestones and beads, you can lay out individual parts of the picture, for example, leaves of plants or images of the sun. The final result will be brighter if the baby starts using beads and rhinestones of different colors.
Crafts can be made in a completely bizarre way, for example, using pieces of paper piled up into lumps. To do this, the child needs to prepare pieces of paper of different colors. These pieces of paper need to be rolled into tiny lumps, subsequently gluing them to the cardboard. The lumps themselves should eventually merge into a single picture. This technique can make flowers on a piece of cardboard or images of animals. The result will be quite original, especially if the kids start using pieces of paper of different colors and sizes.
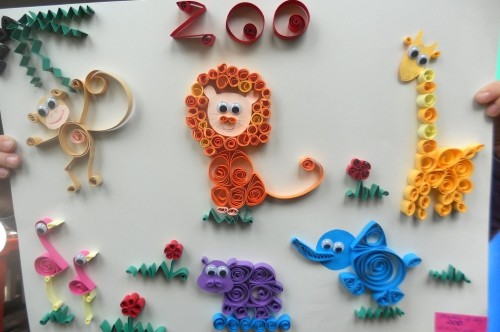
A technique in which a three-dimensional pattern is created with the help of paper curls is very popular. Babies need to cut the same strips of colored paper, curling each of them. Then from these curls of different colors should create pictures. Such curls can act as an image of flower petals or as part of a picture depicting an animal. Attach these pieces of paper is using a simple PVA glue. The final application only turns out bright, when the child will not be afraid to exercise their own imagination.
For the manufacture of Christmas crafts, kids often use foil. You can cut out snowflakes from pieces of foil by sticking them to cardboard in different places and in different quantities. To make the picture look original, schoolchildren can decorate the drawing with the help of beads. Such creative work will definitely not leave anyone indifferent.
The great advantage of the application lies in the fact that you can use a variety of materials to create crafts. For example, in some technology lessons, teachers suggest that younger students create pictures of pasta. Themselves pasta of different forms must be attached to the cardboard with glue in the form of certain patterns. Once the picture is finished, the child can proceed to the coloring of their work.
For example, with the help of pasta, you can create a picture called "The Sea at Sunset". Pasta creates sea waves, images of the sun and flying seagulls. Of course, the noodles themselves should be painted in accordance with their ideas about the color of the sea and the sun.
Creative crafts for children can be created from stranger materials. For example, wooden chips are actively used for these purposes. The technique of work is about the same as when creating a picture using beads. The picture must first be drawn on cardboard, and then put on the right places a layer of glue. Sawdust is securely attached to the craft with the help of PVA, and then painted in the required colors. Such an unusual crafts can be presented for any reason, and it helps children to get acquainted with different materials and application techniques.
There are several dozens of applications, and each of them is interesting, original in its own way. For such lessons to be useful, the teacher should especially control the discipline. In the process of making crafts, younger students should not forget that they are in school, and this obliges them to behave properly. The lessons themselves with the manufacture of handicrafts are no longer relevant to the sixth grade, and therefore in elementary school they should be used as often as possible.
While instilling in children a love for applications, a teacher should not forget that even such fun lessons should have their own pedagogical goals. Not only the development of the imagination of the child, but often the performance of this child in a particular subject in the future depends on how well each kid performs the craft, how creatively he makes it. Therefore, ignoring the manufacture of handicrafts in primary school is not worth it.